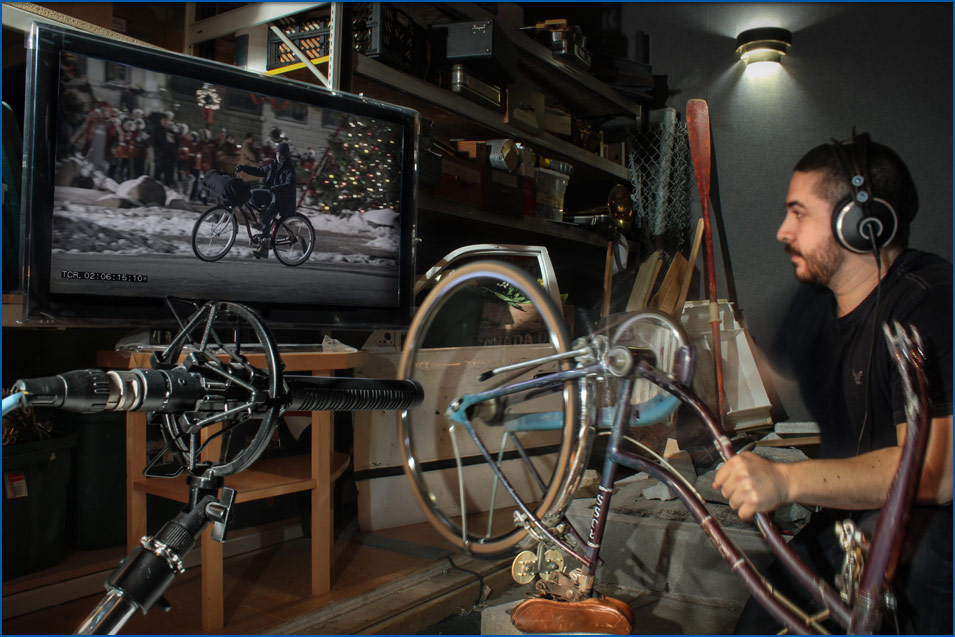
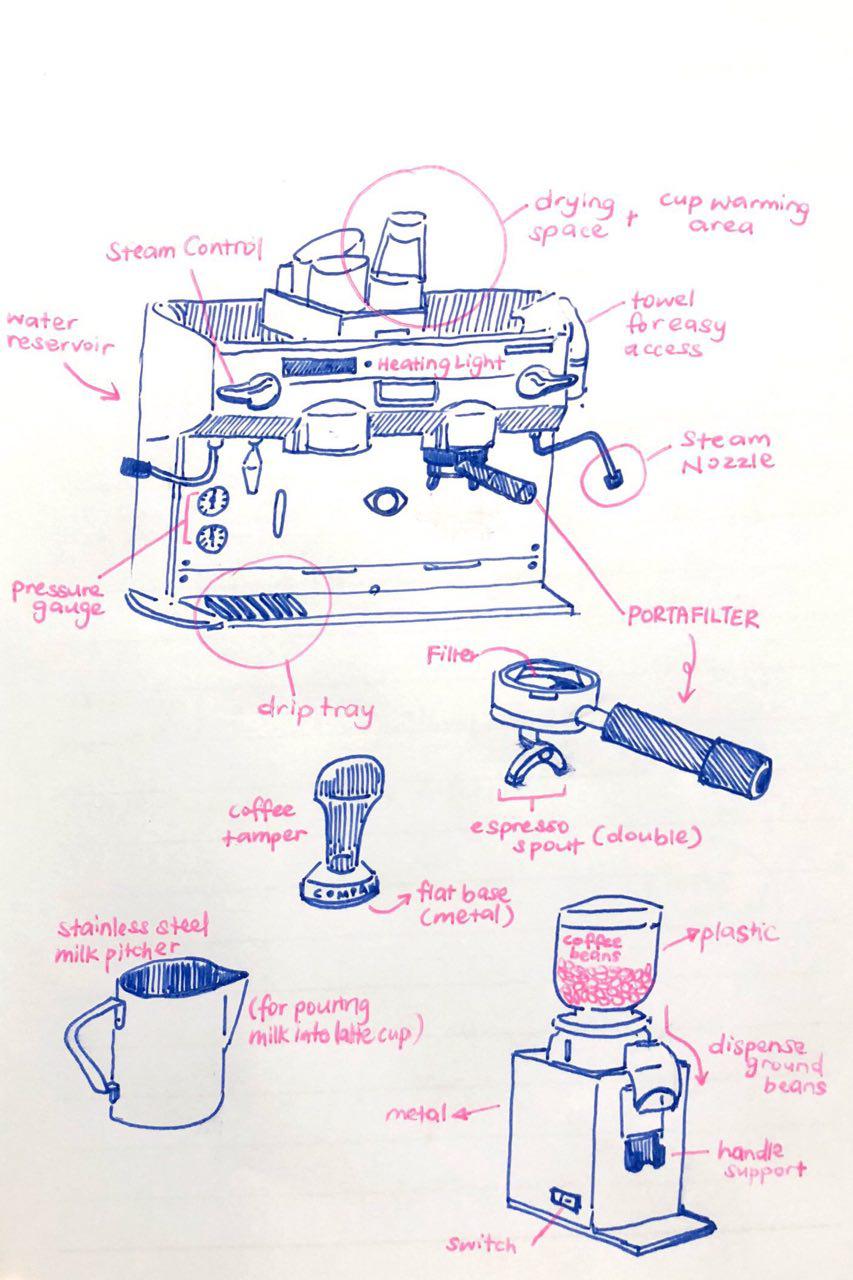
Creative Practice: Foley – the reproduction of everyday sound effects for film and videos from small creaky step sounds to explosions in Hollywood. All kinds of tools are used to recreate the desired sound effects. All kinds.
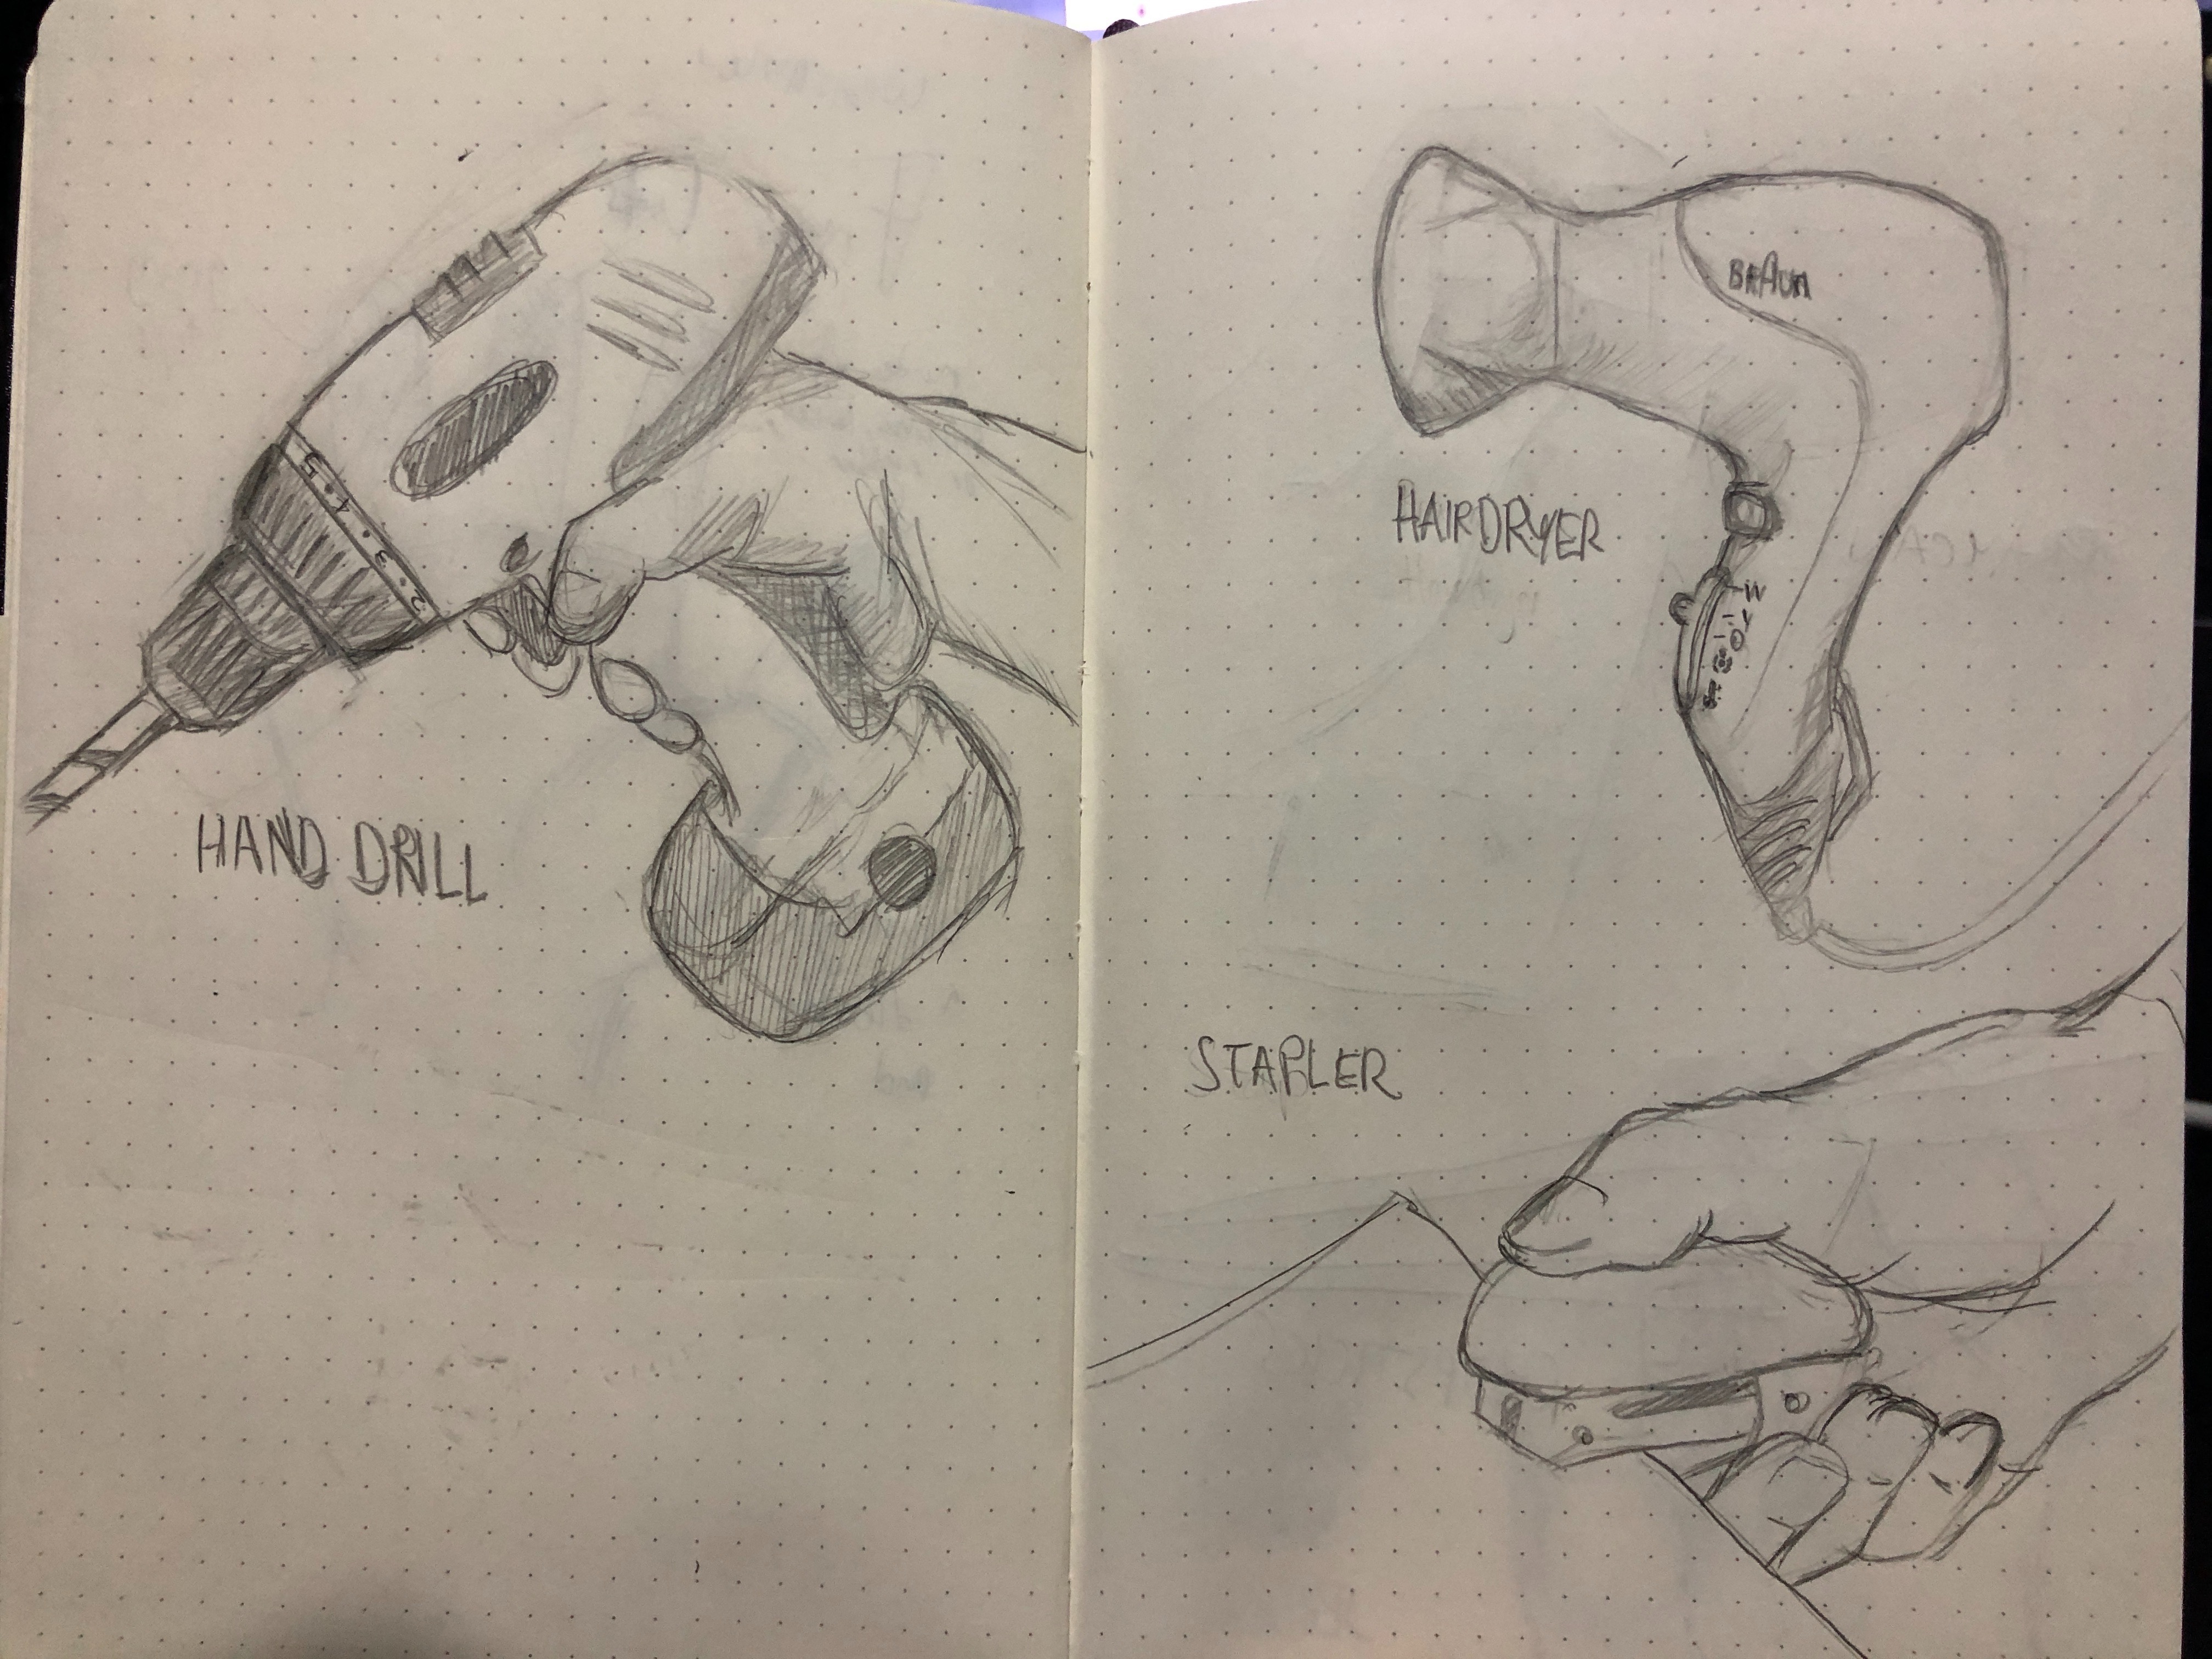
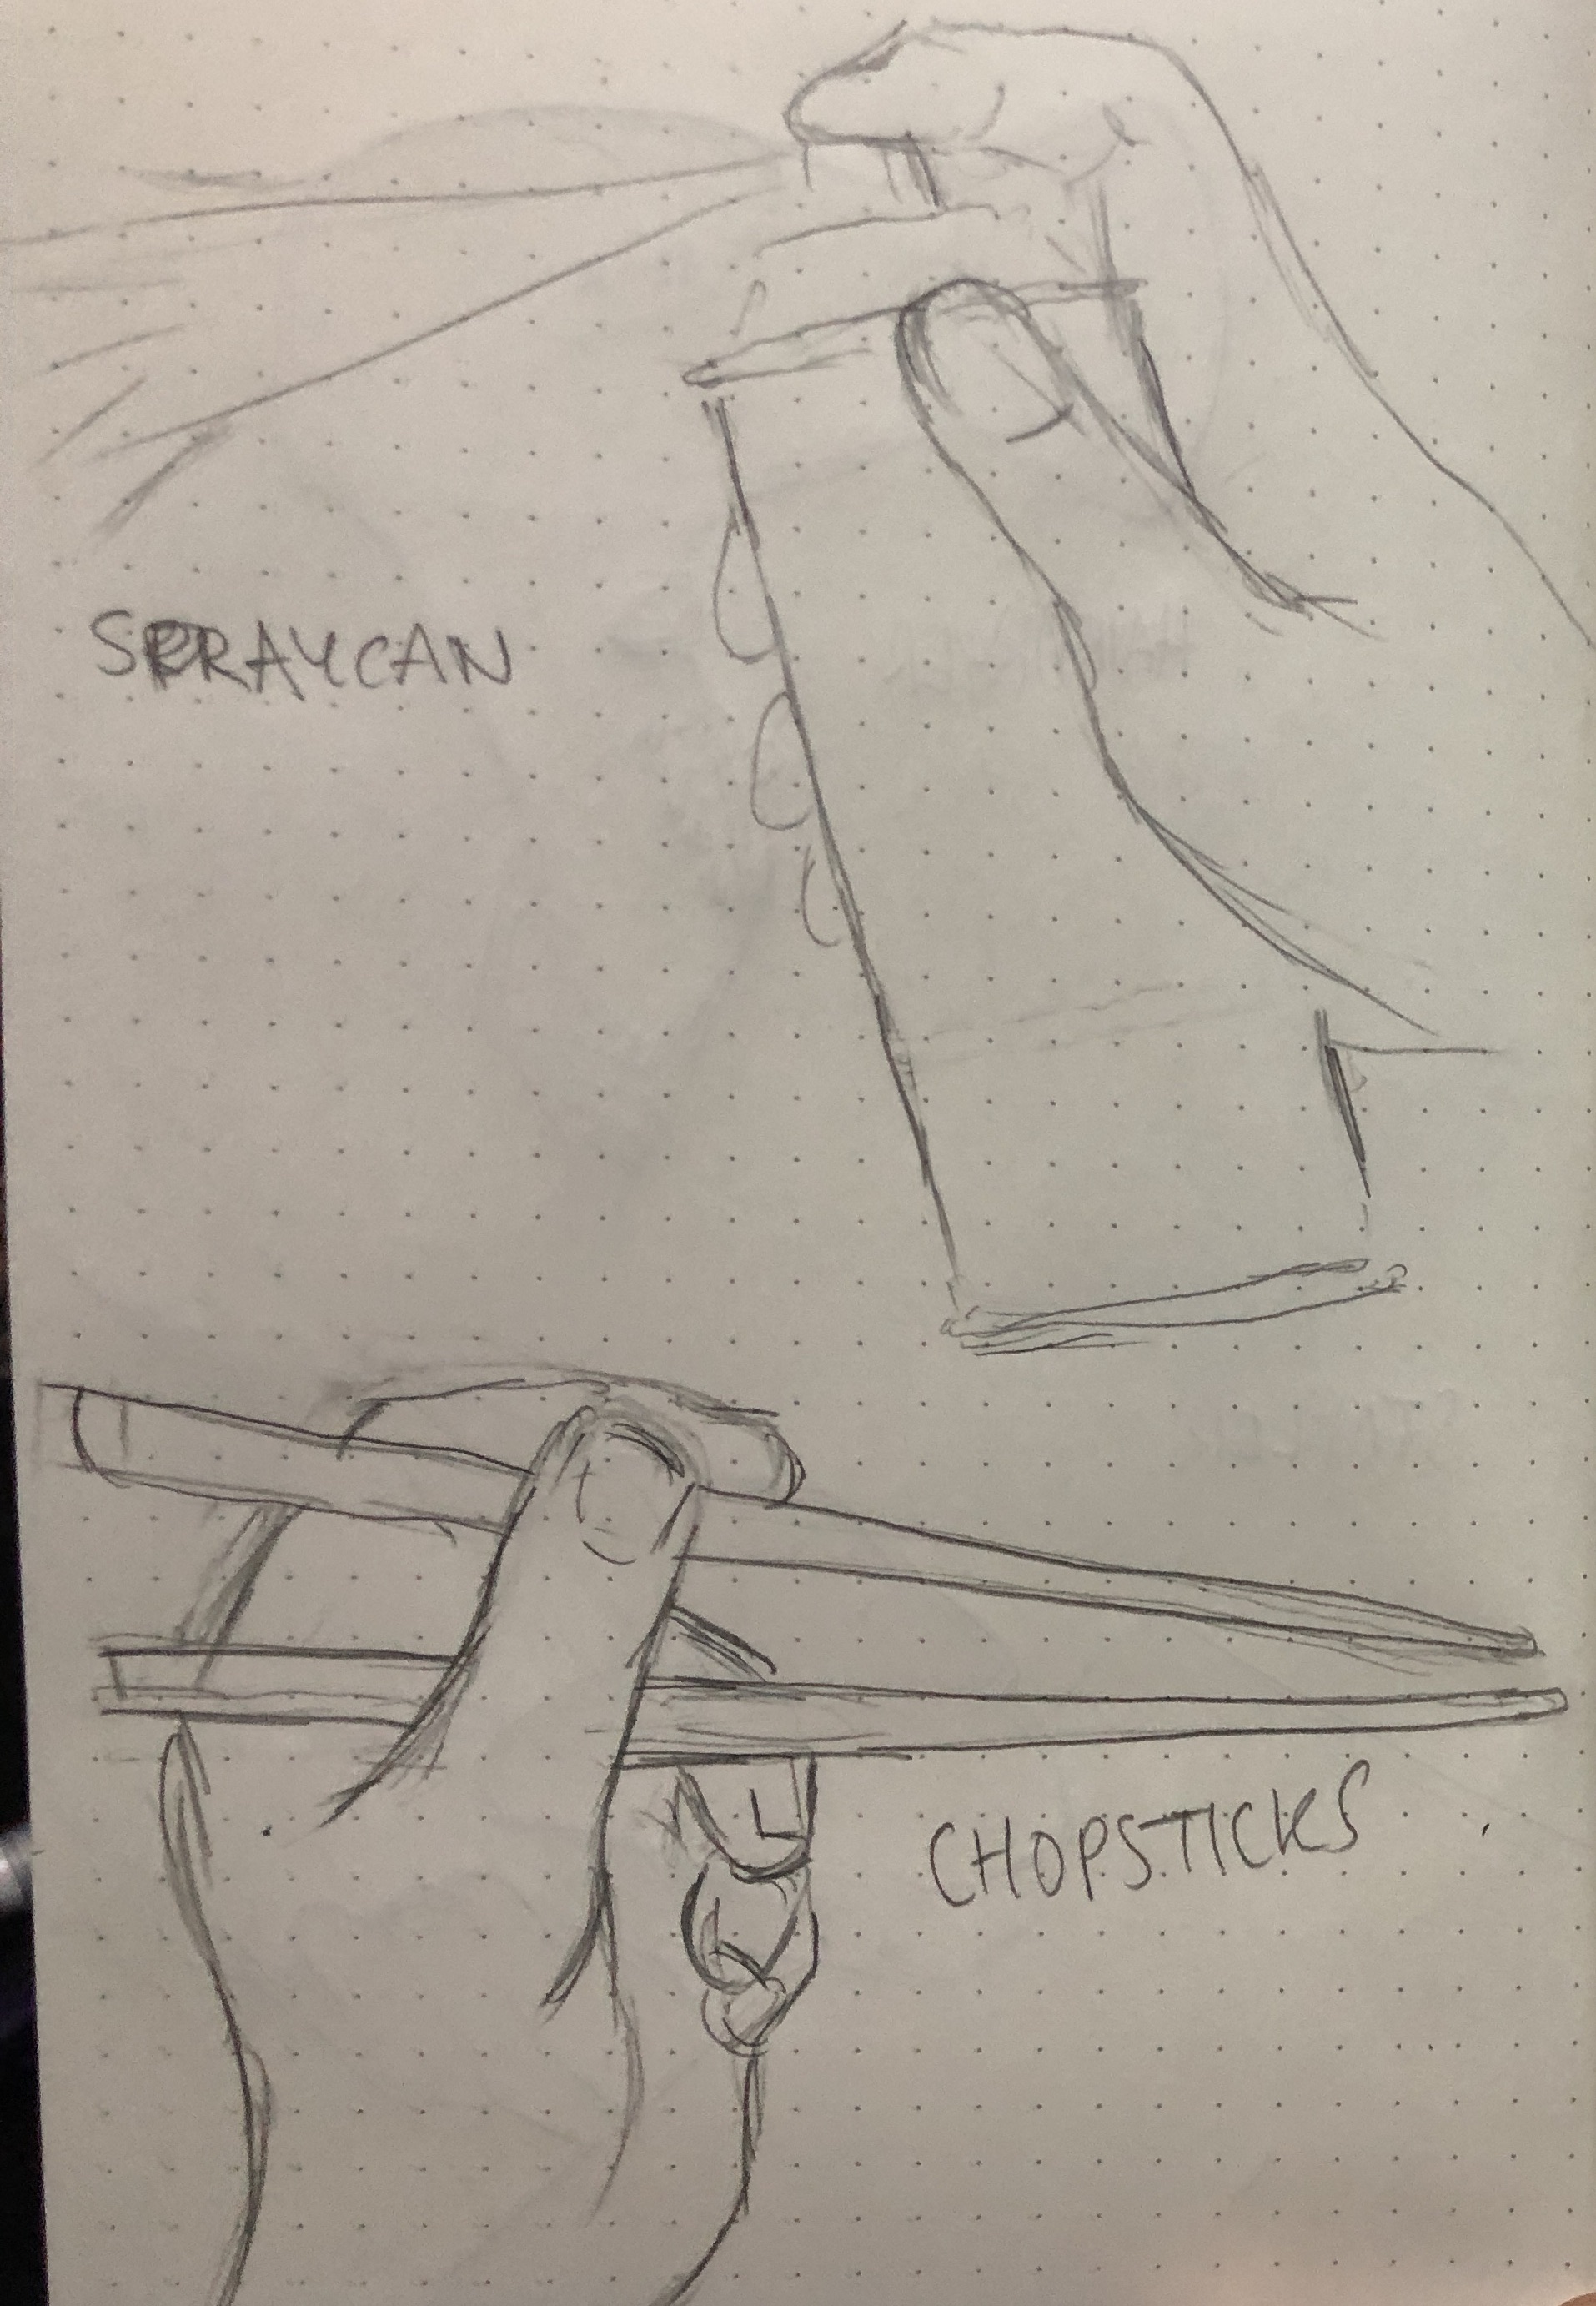
Tools Used: Since a foley artist can use ANYTHING as a tool, I took common tools used in everyday life and sketched them out.
Hand Drill
Hairdryer
Stapler
Spraycan
Chopsticks
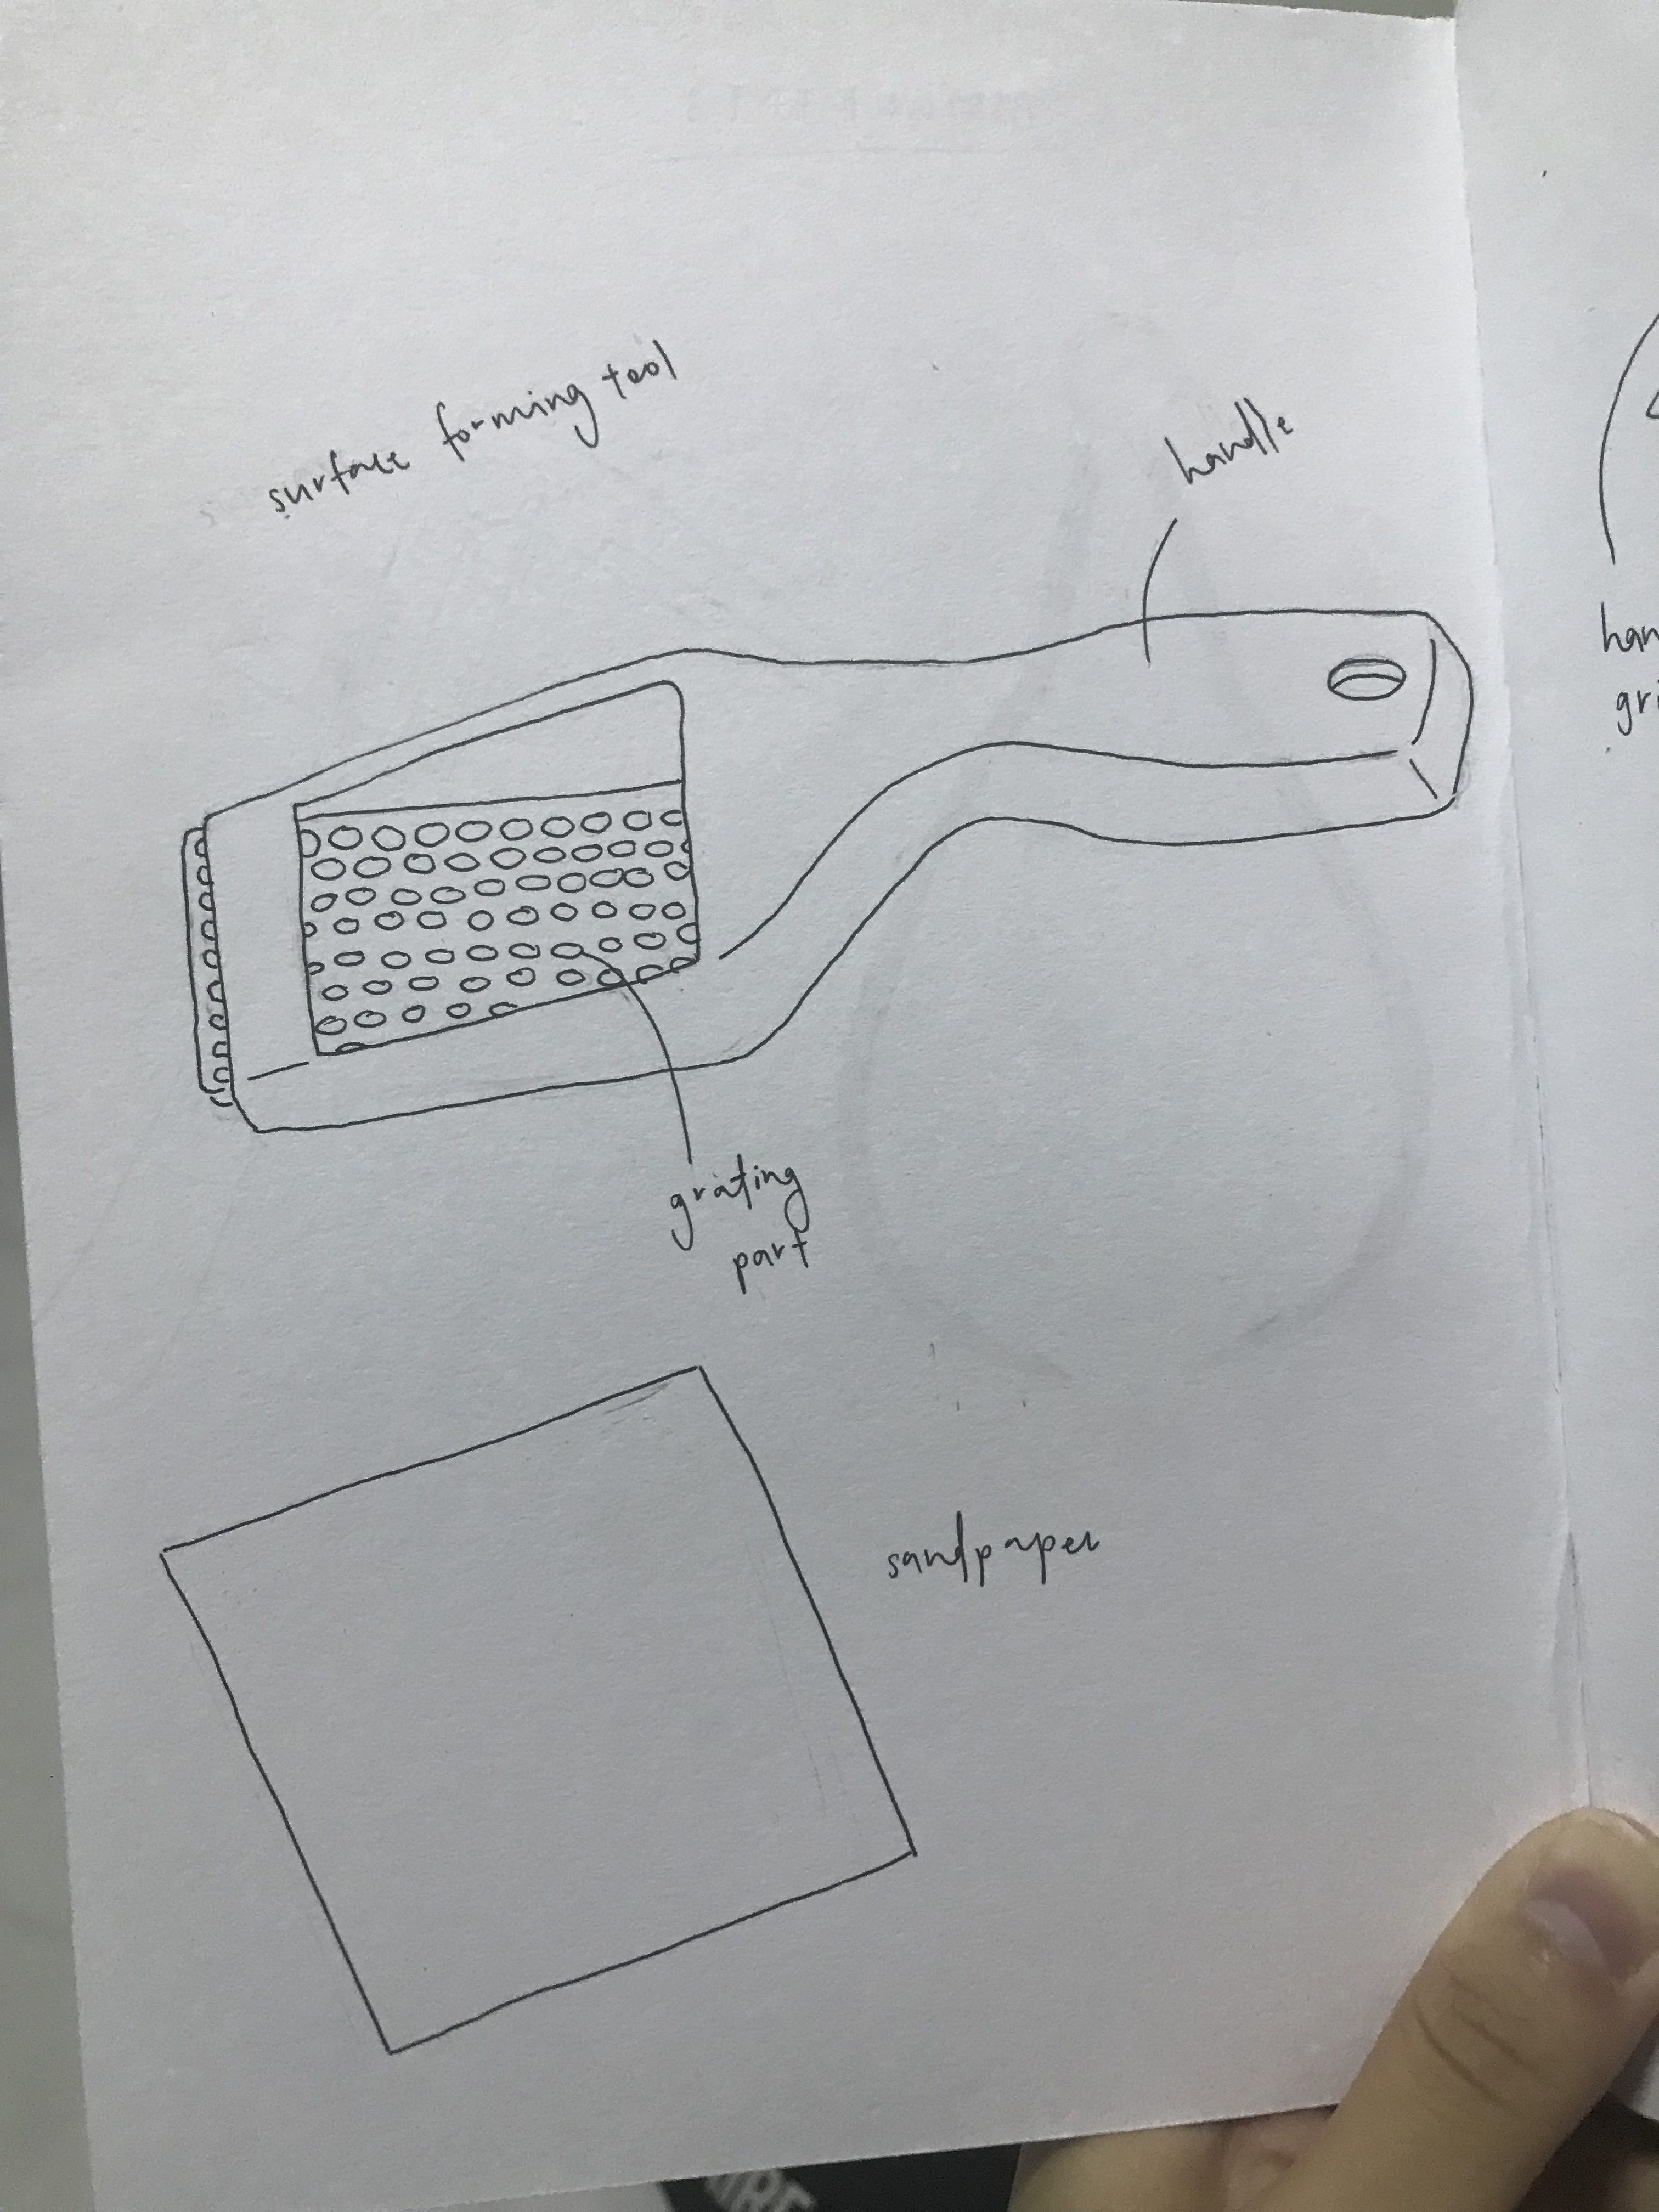
Drawing of tools:
My prototype: The idea is to make the foley artist’s job more fun when producing sounds for recording which led to whacky designs you saw in class.
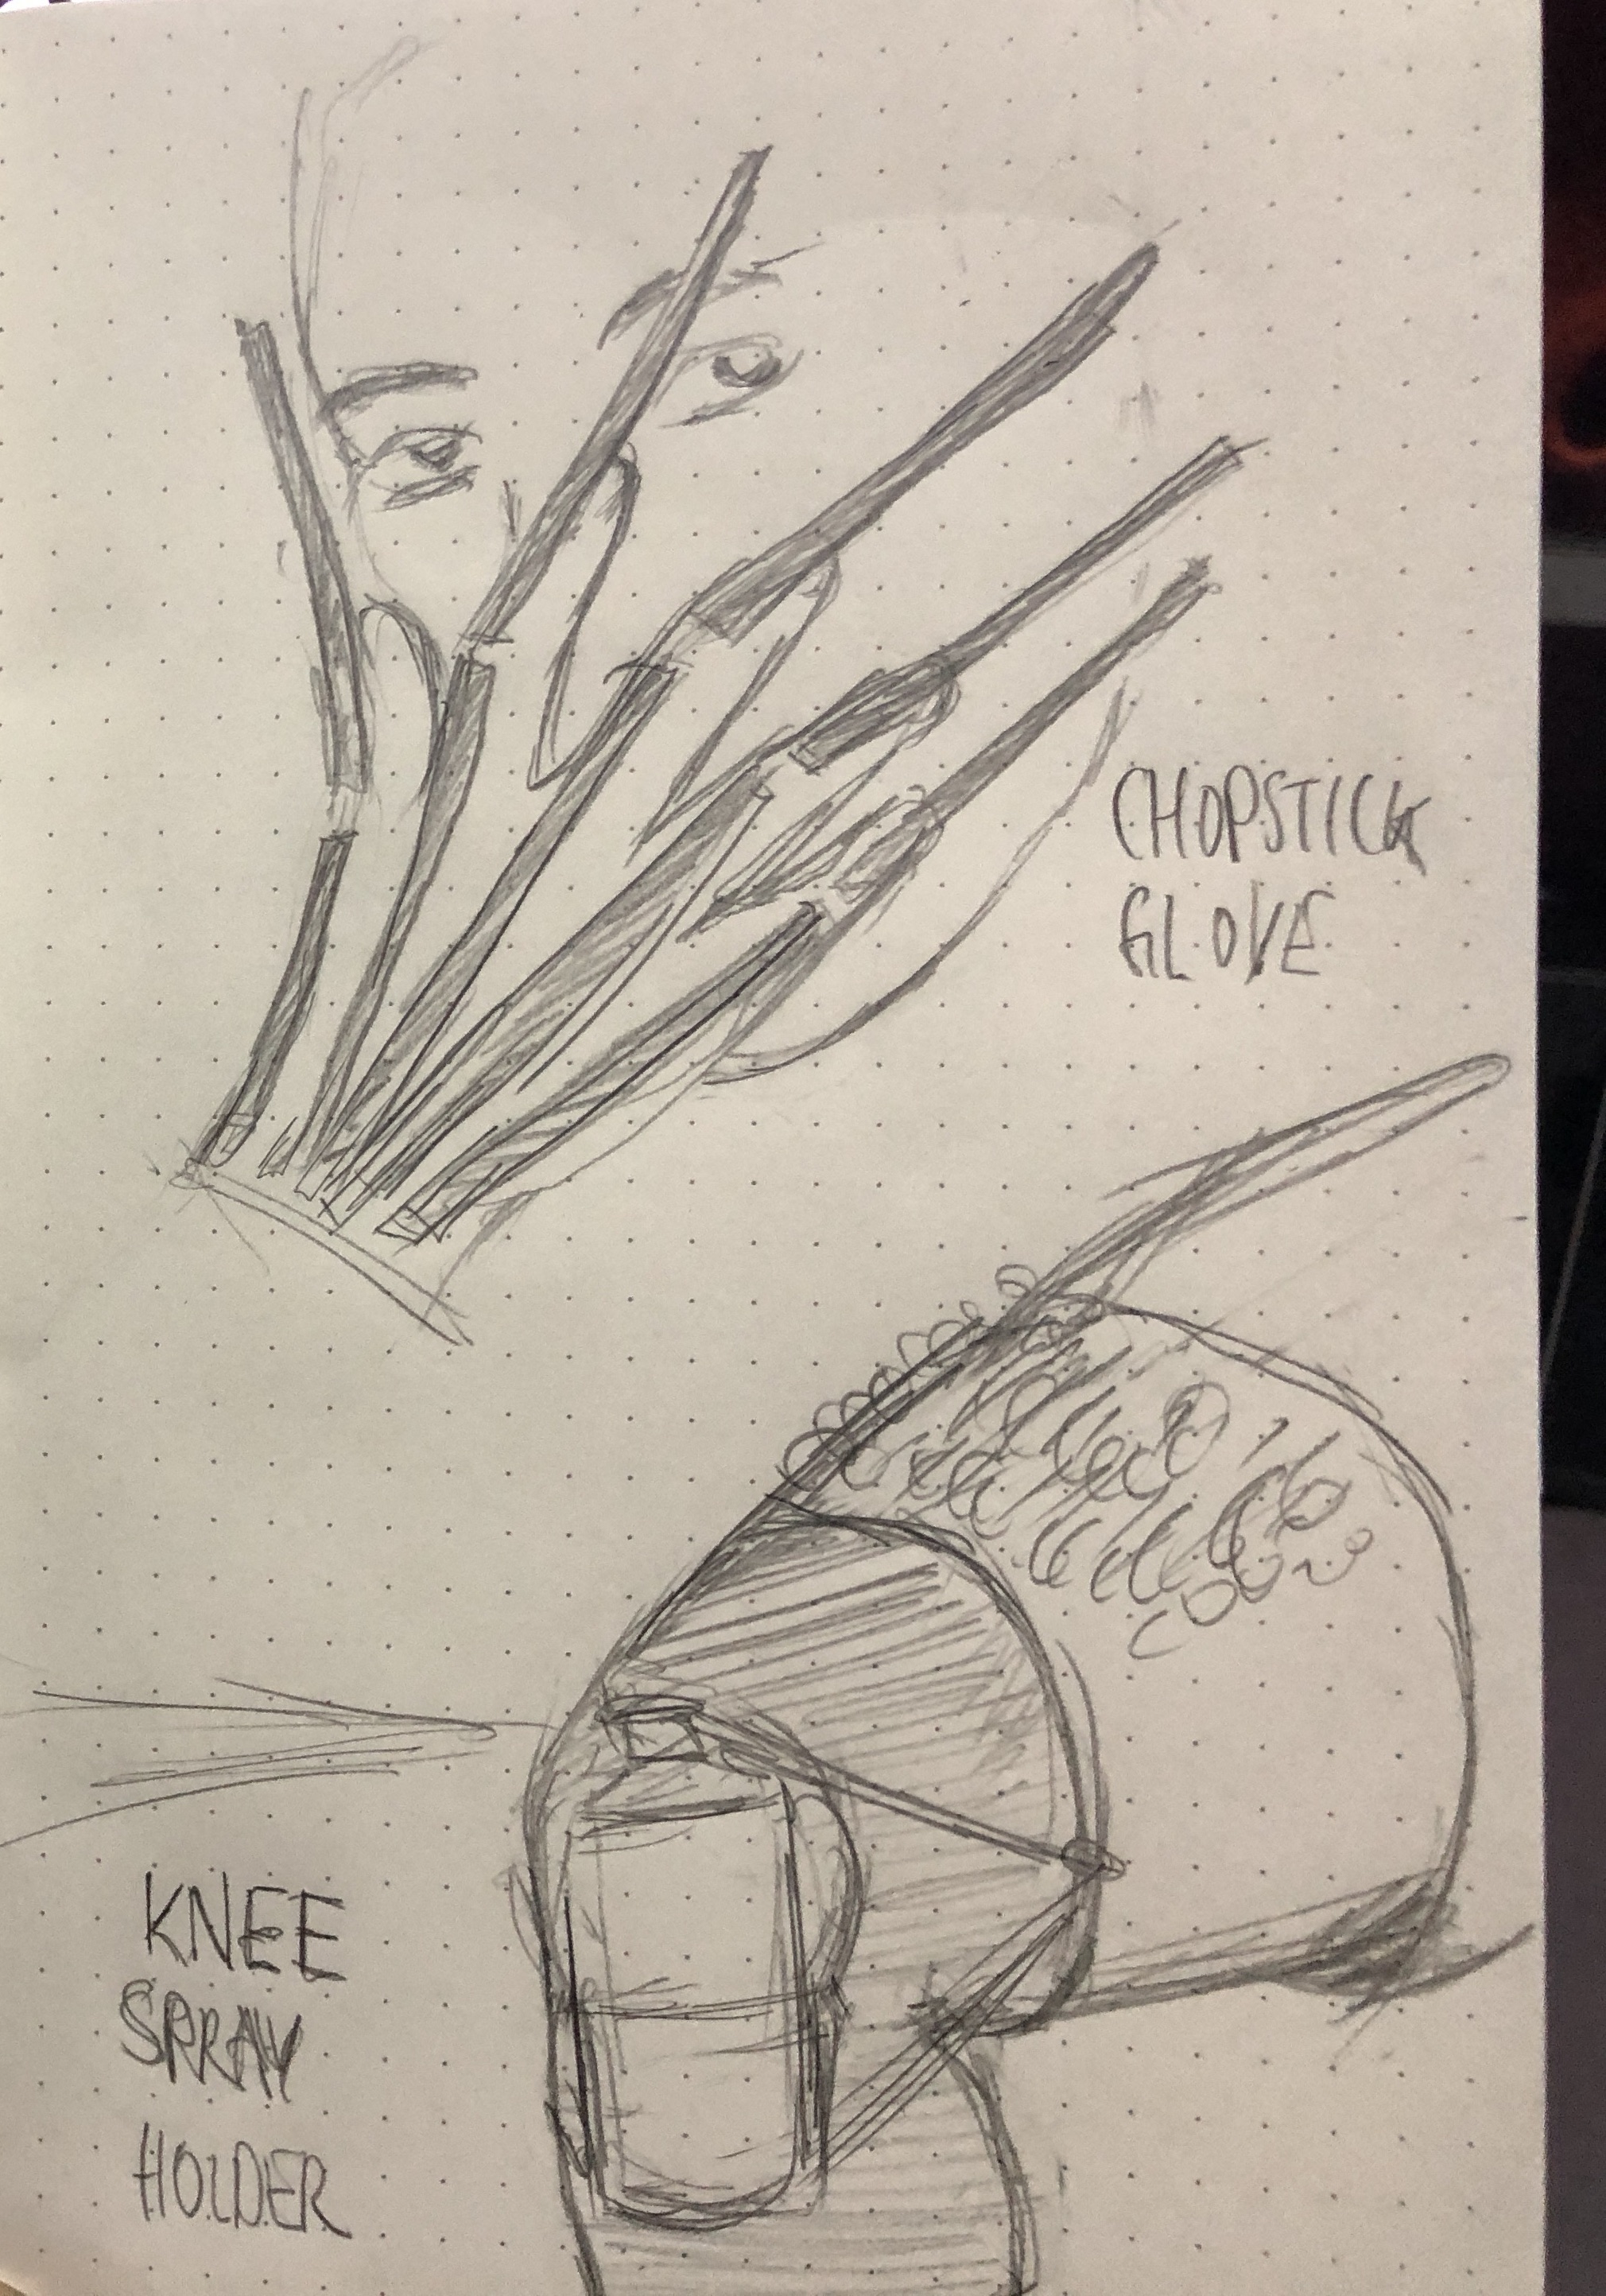
The chopstick glove is useless in grabbing stuff due to the design but still can be used to make chopstick sounds when struck against another object.
Holding a spray can be tiring. Why not use the retraction of your knee to create the sound so that you have free hands to make other sounds?
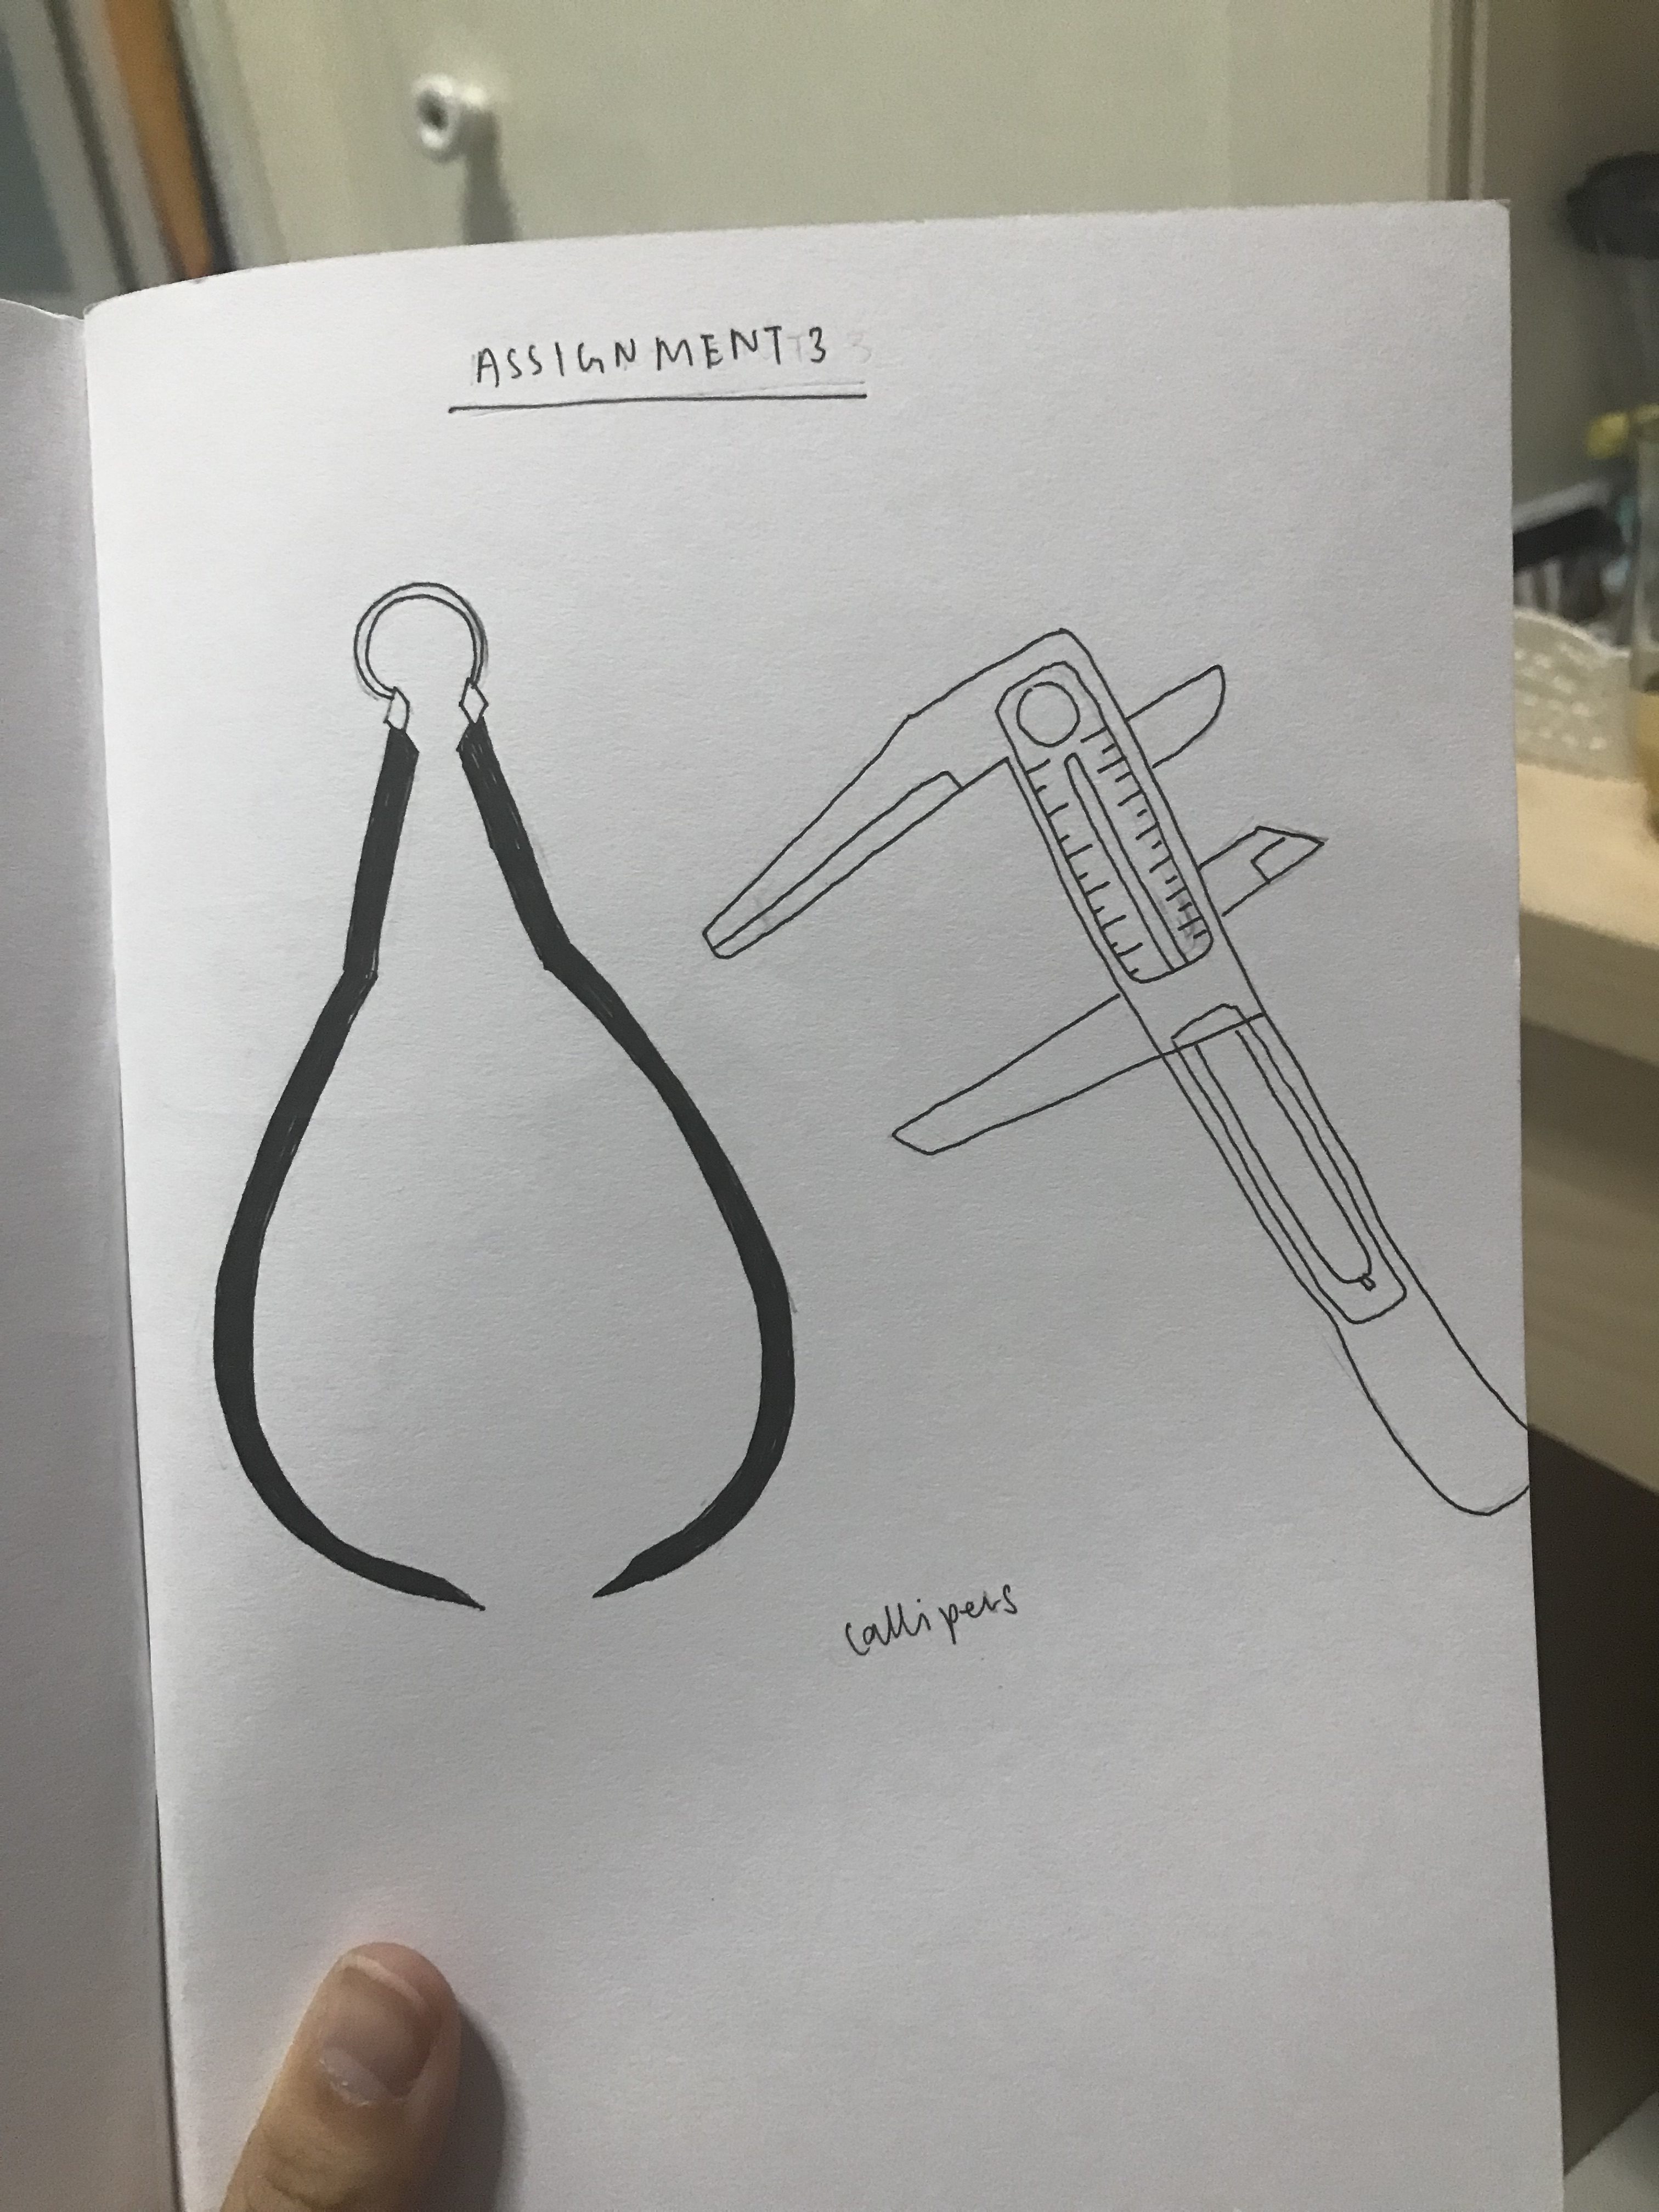
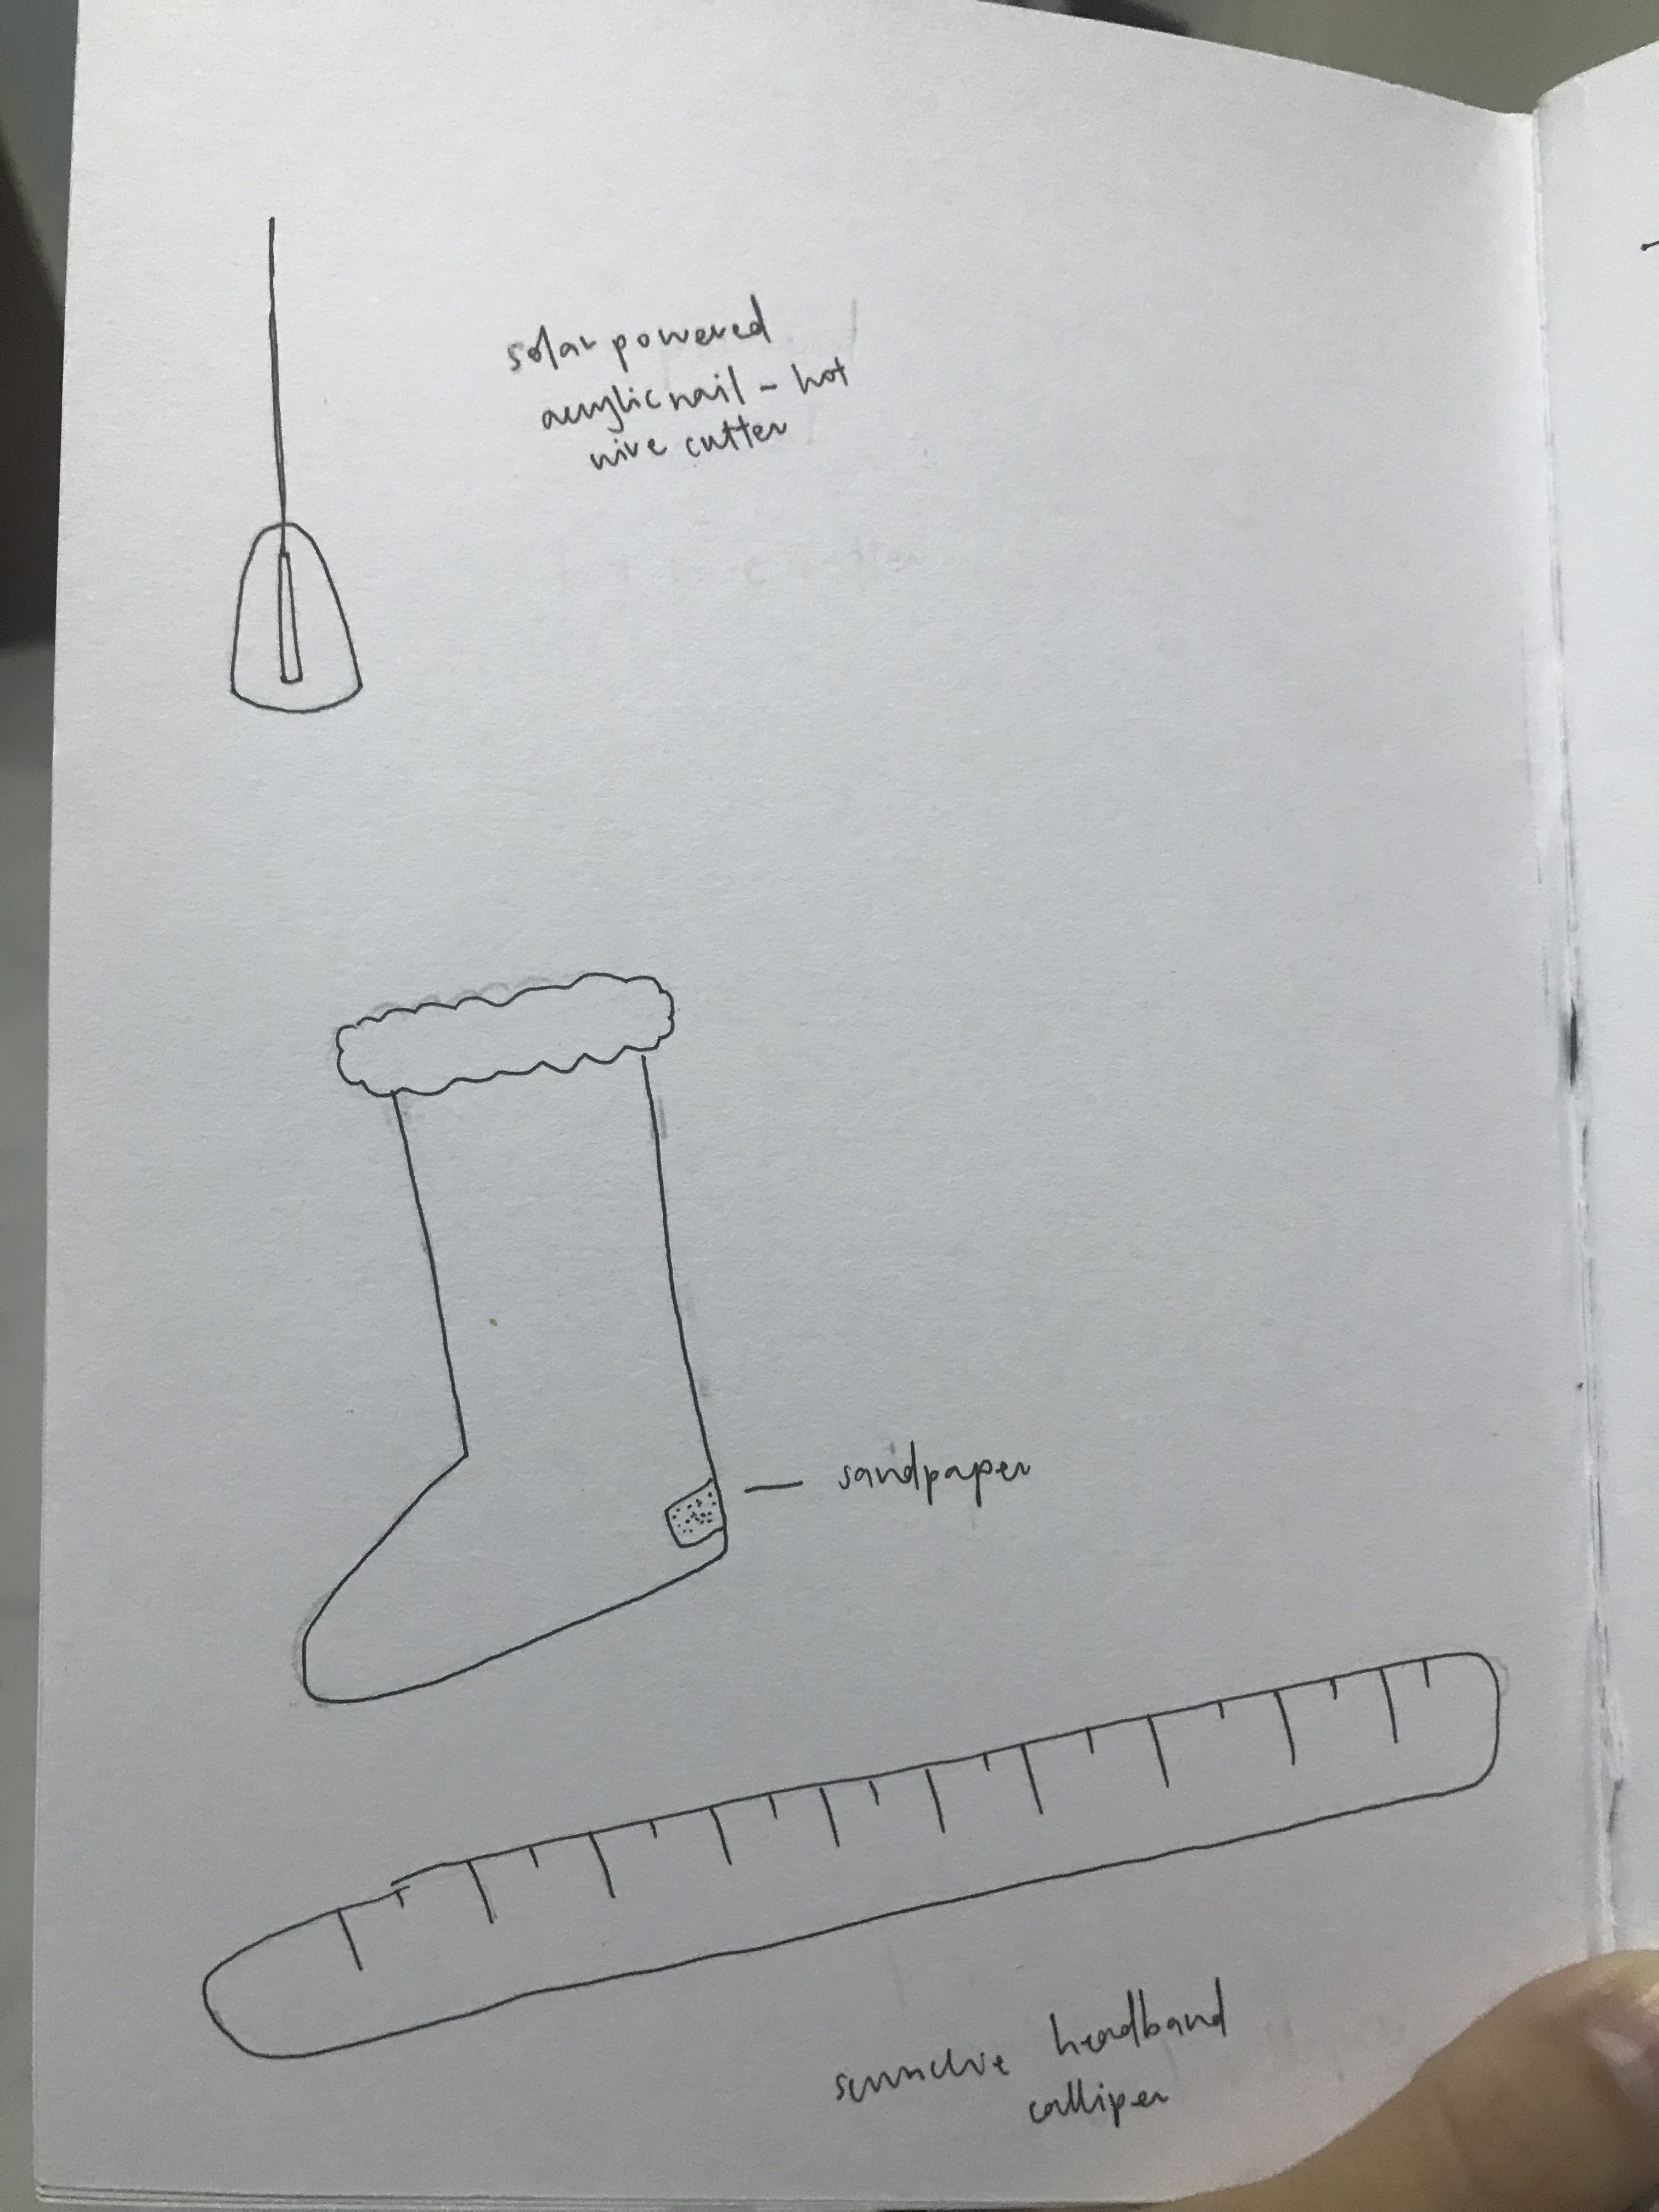
Ideas fortools: 1) Acrylic nail with extendable hot wire attached 2) Hairband that acts as a calliper/ruler
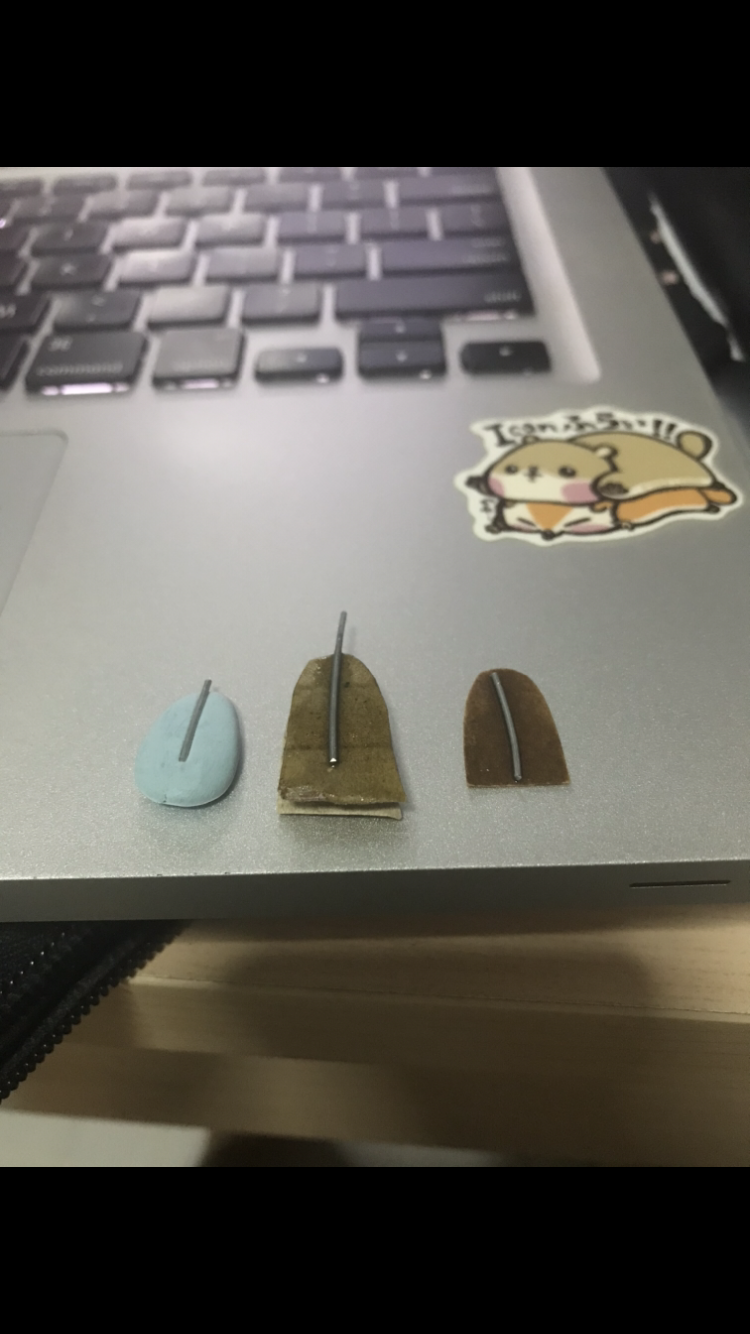
1) The acrylic nail is meant to be solar powered and will extend only when in use. When it isn’t in use, the wire part will simply look like it’s a part of the nail art. This can be useful as it makes the hot wire cutter very much more portable, as well as allows the user more flexibility and control over the cuts.
Models of the acrylic nail. The one in the middle is how the hot wire cutter will look like slightly extended, while the one on the right is how it will look like when not in use.
2) The calliper headband is a piece of fabric that has a wire in it that allows it to be malleable and can be used to tie up hair/ keep hair out of the face. It is an existing accessory. However, instead of just being plain or having prints for aesthetic purposes, it will have measurements printed out on it, allowing users to use it as a calliper/ ruler as well. The malleability of the headband means that users can use to measure objects with irregular shapes as well.
Prototype of the calliper headband alongside the actual existing accessory.
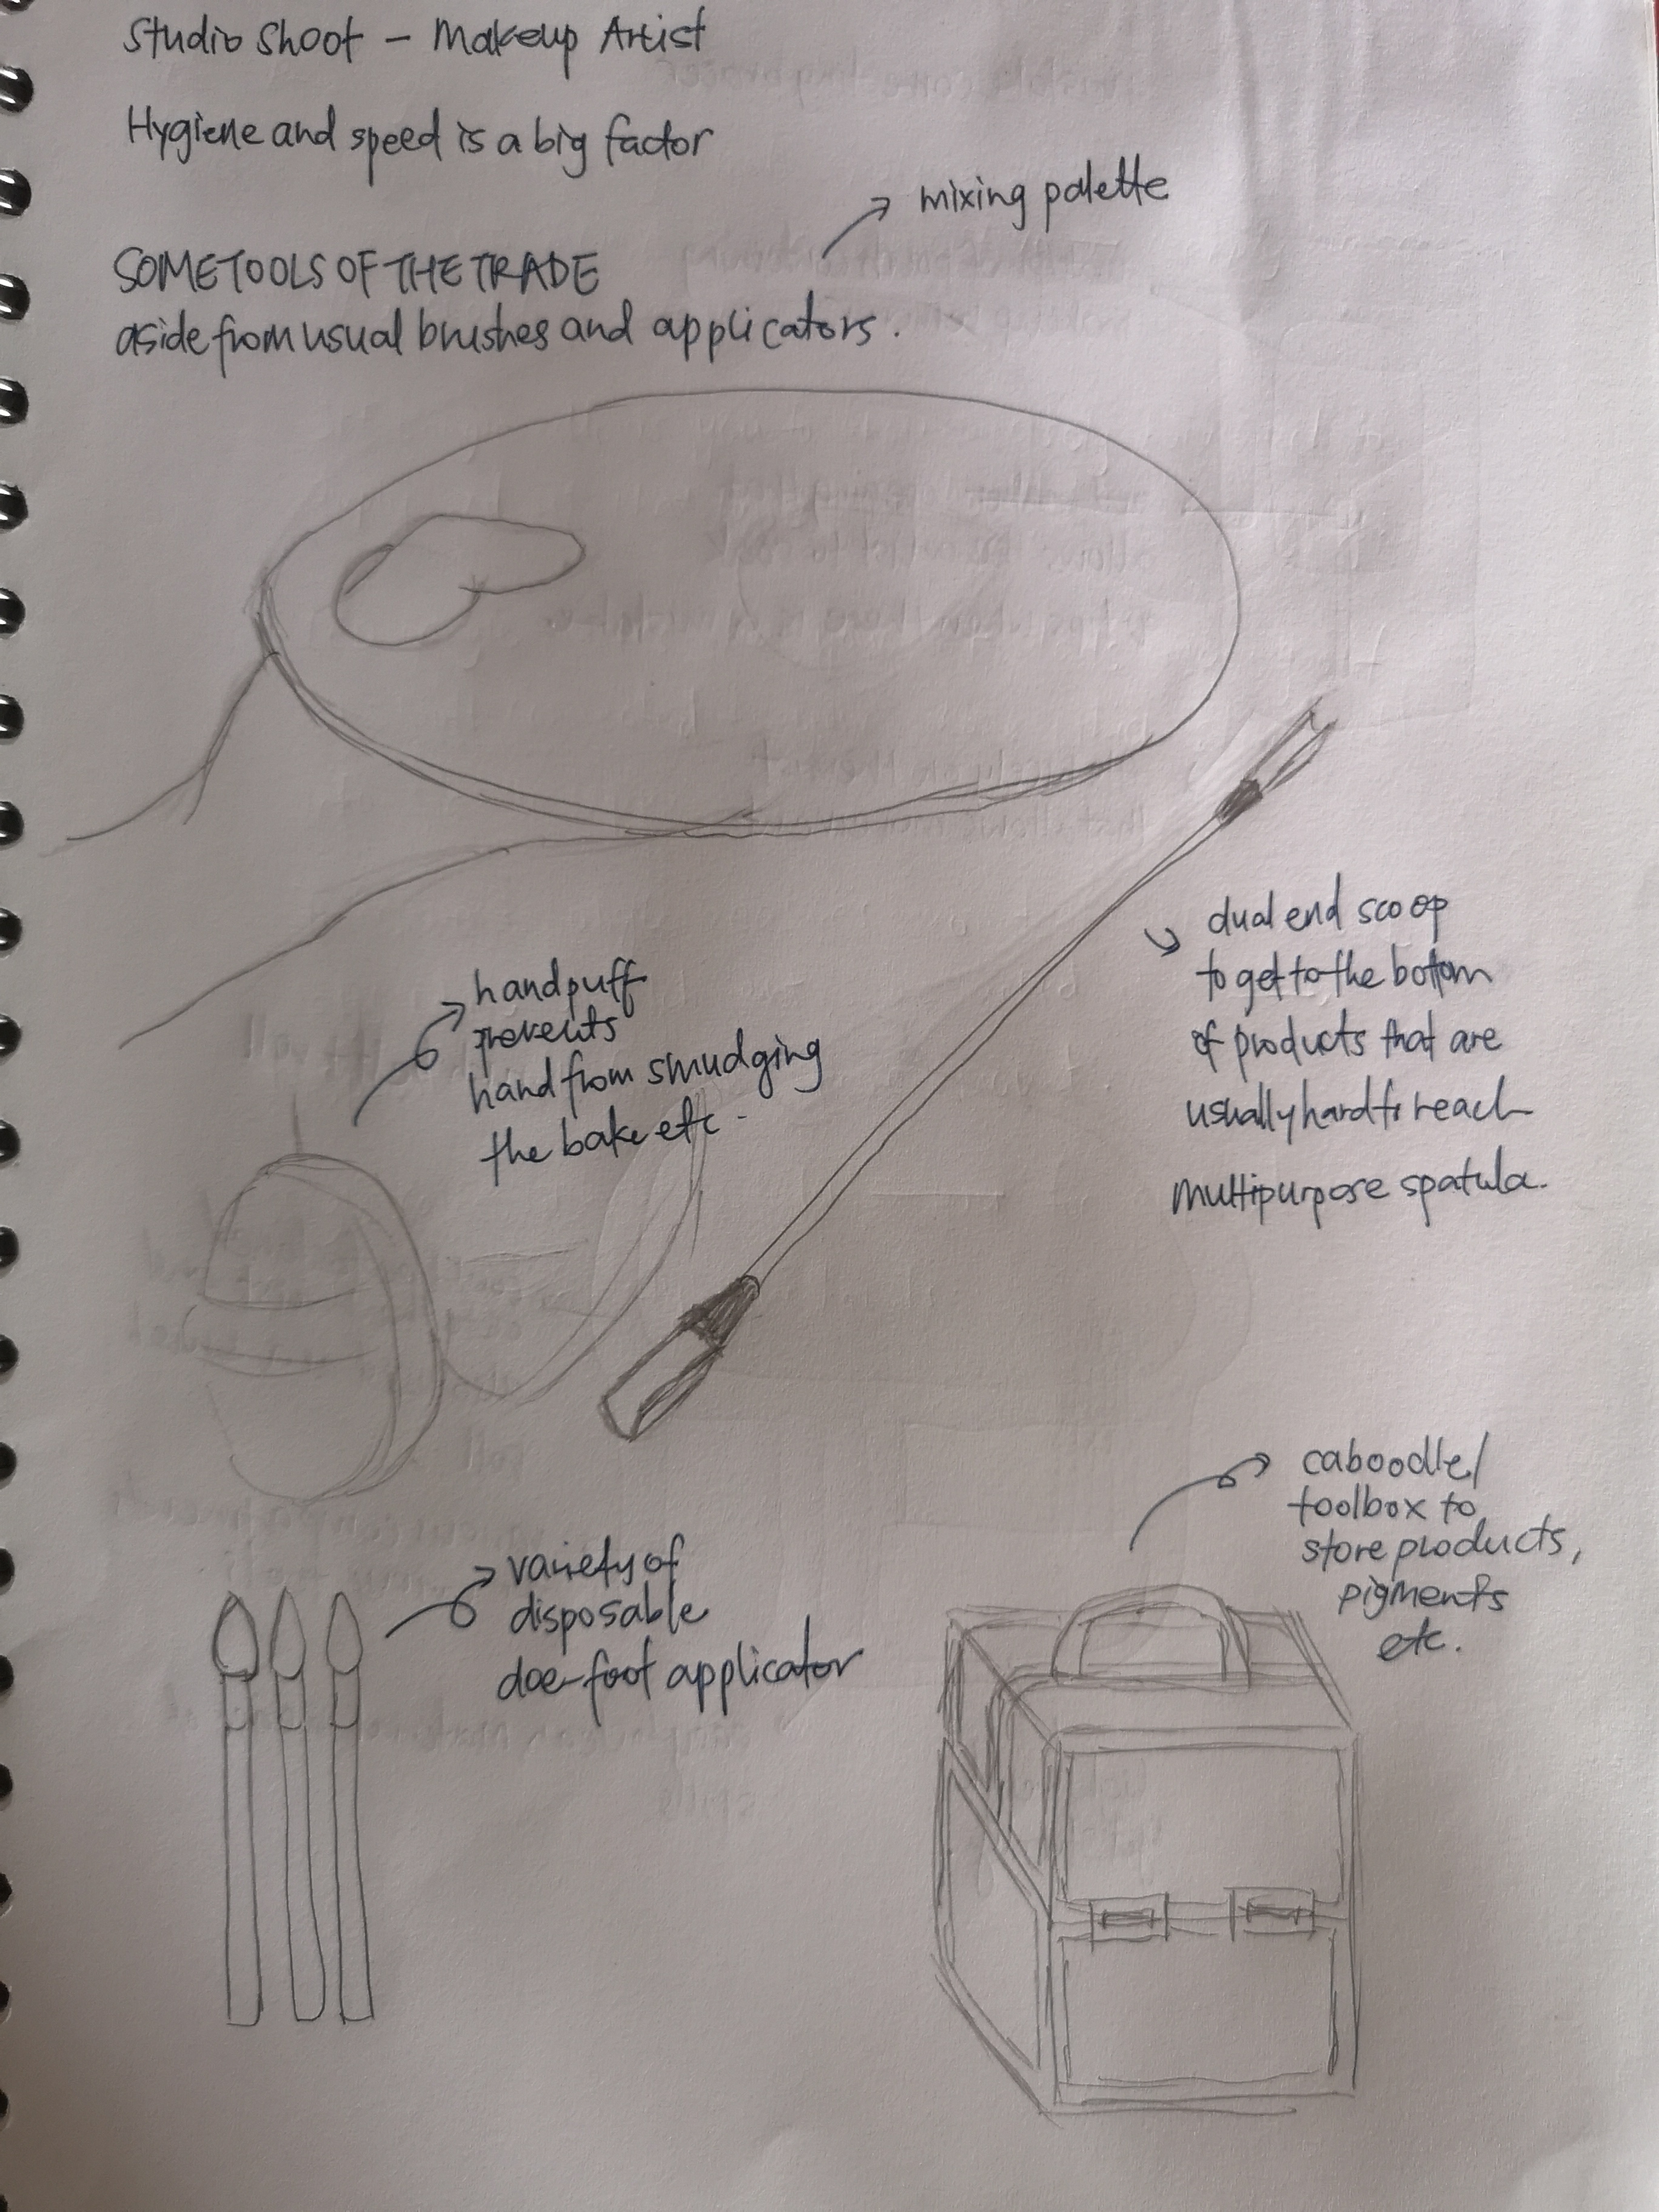
Brushes (main tools to deposit pigments onto the face
Sponges: For blending and pressing
Disposable applicators: For hygiene,
Caboodle: For storage and travelling
Spatula: for scooping products and hygiene
Mixing palette: for mixing products
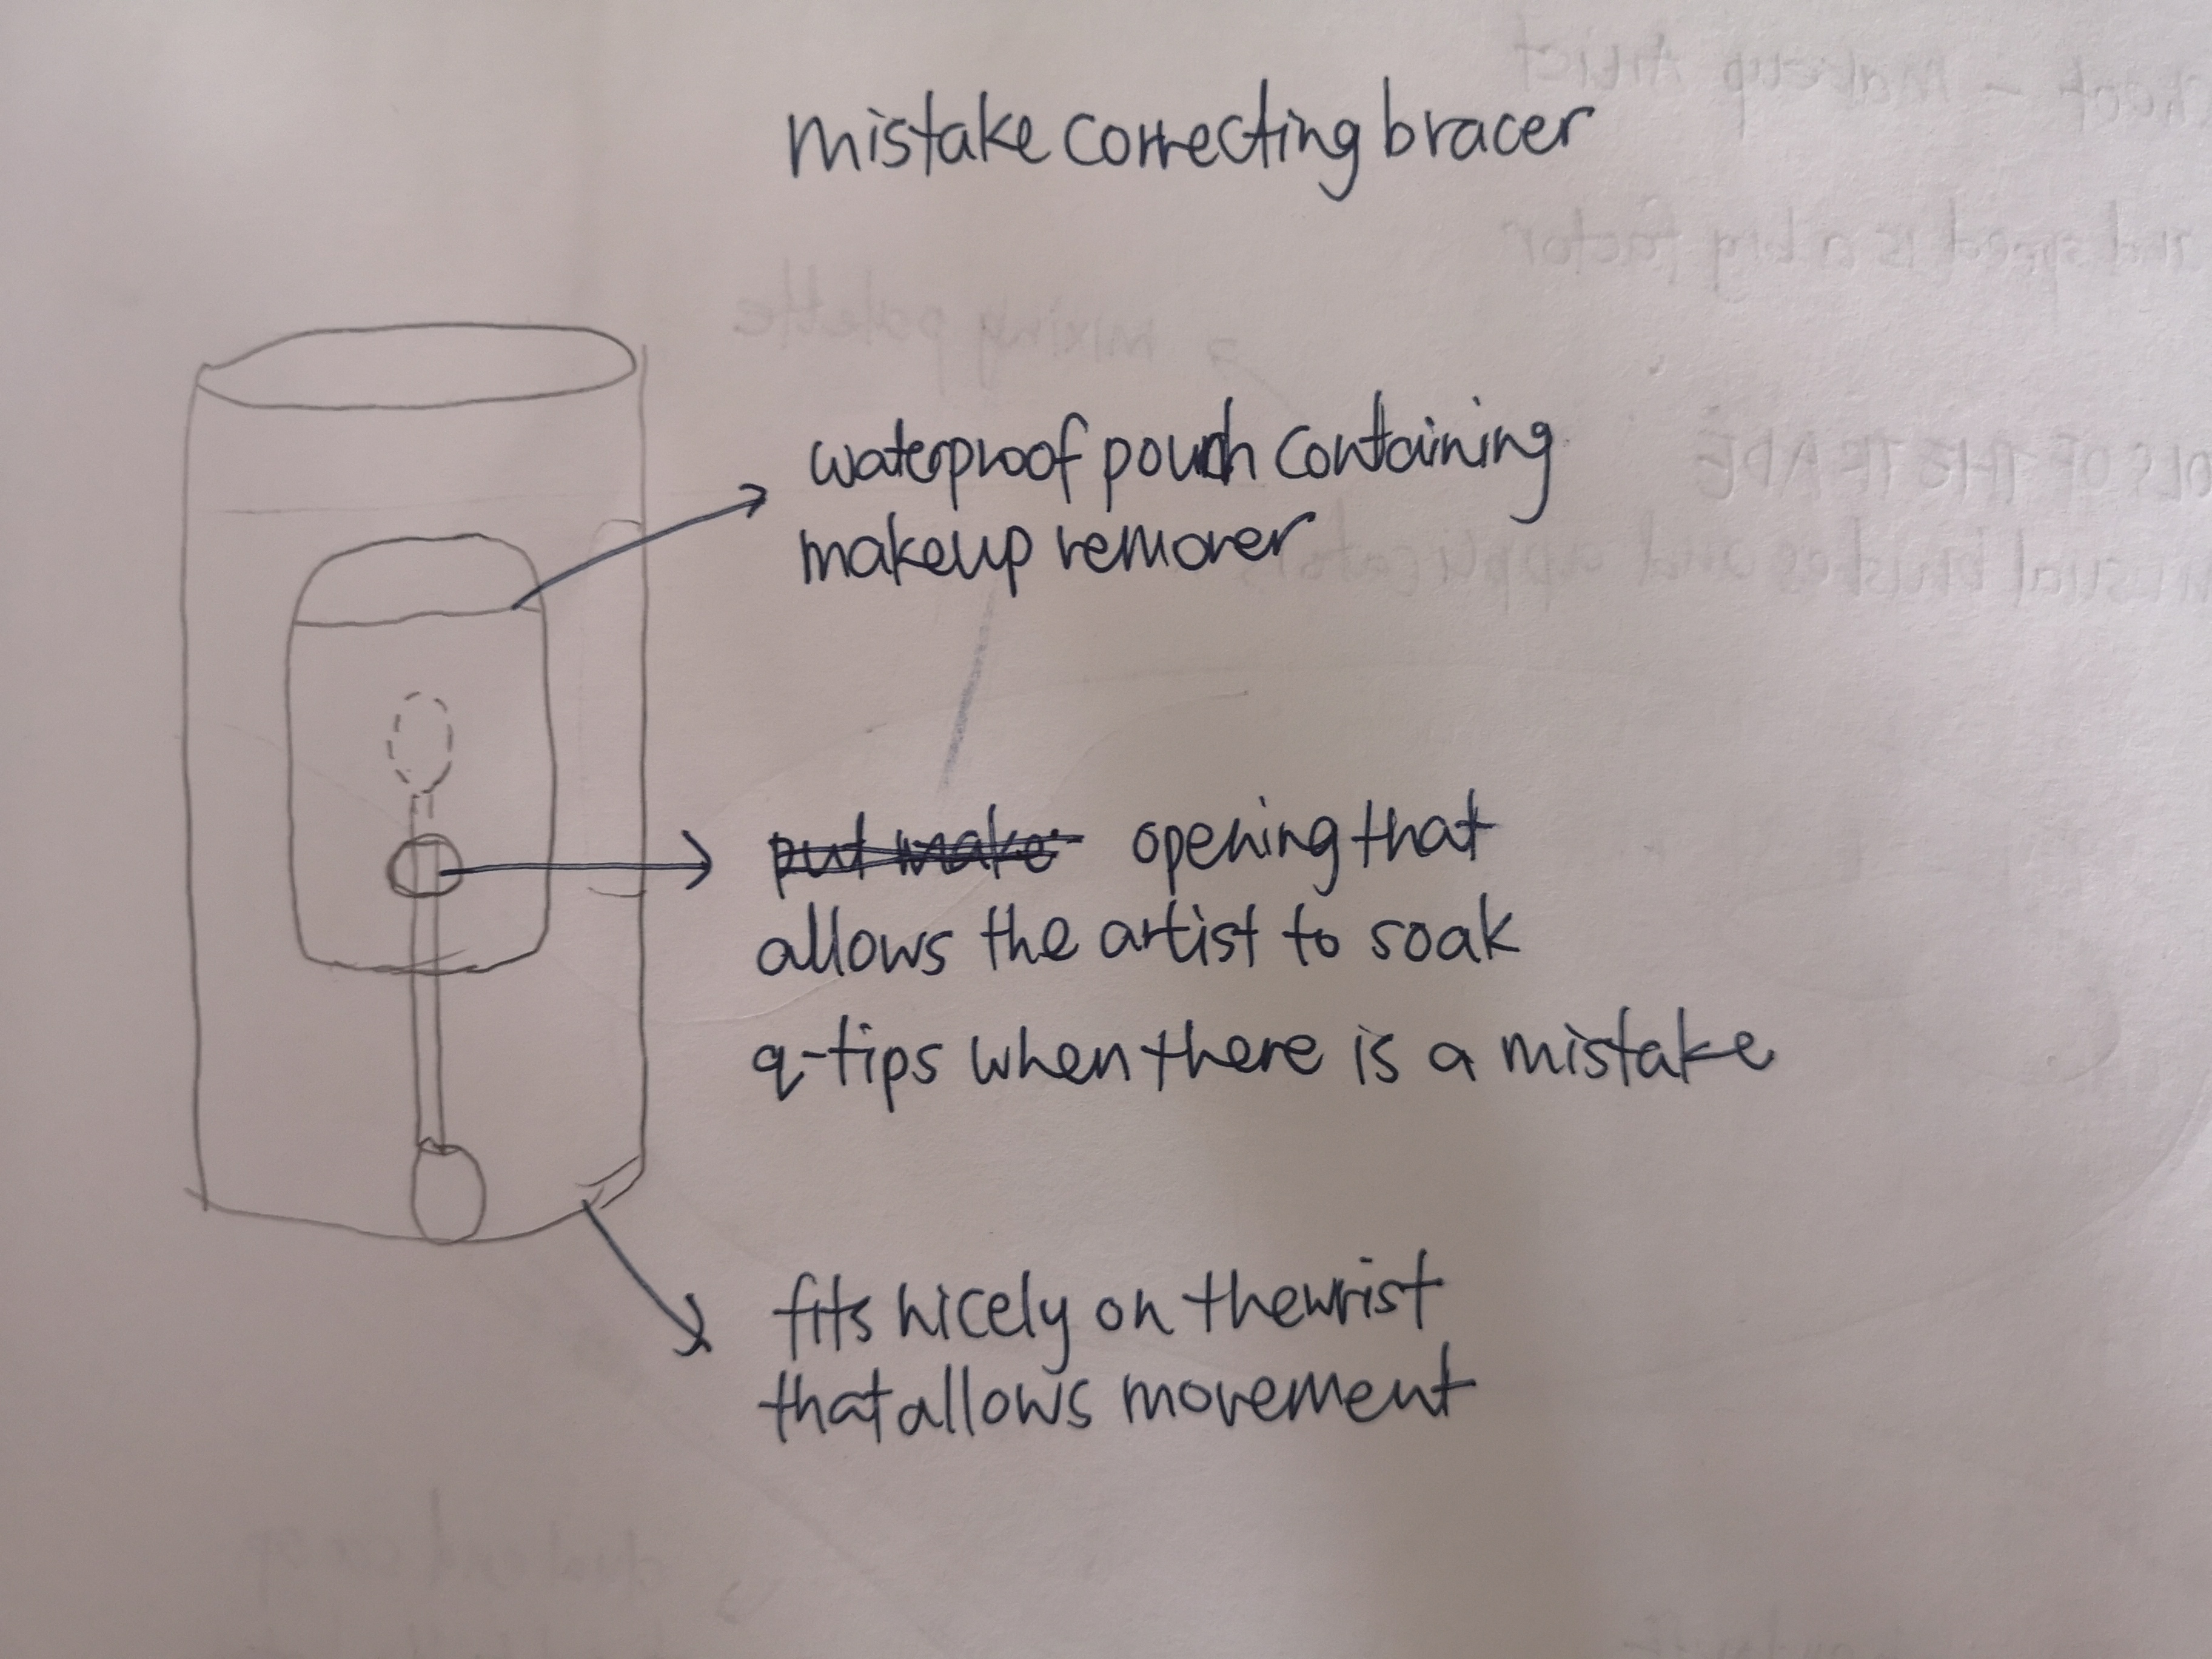
Problems faced: During a busy shoot, an artist on job needs to be quick and fast— without compromising on hygiene, thus there is less room for mistakes and corrections. Usually, correction is done by using a makeup remover— often big and clunky and not as precise. Having an mistake correcting “eraser” that is close to you help save time as you don’t need to keep going back to your stash to find your remover.
A makeup apron
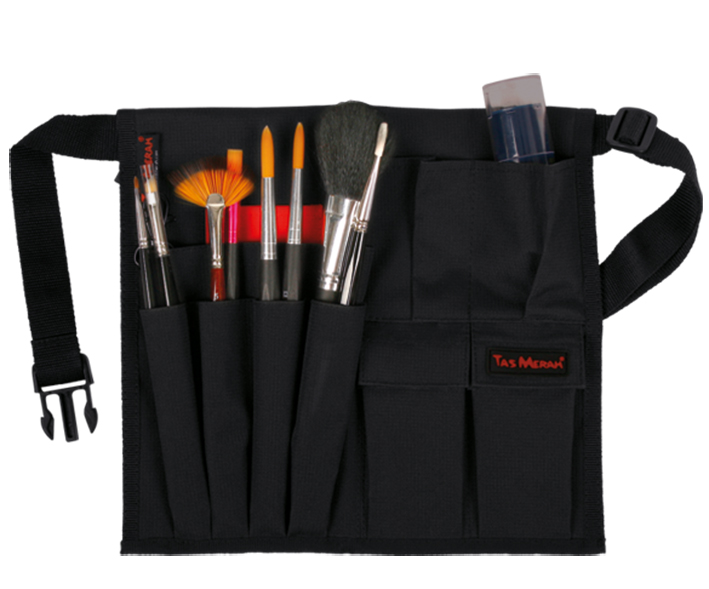
Another thing of issue would be the organisation of brushes. Usually they are splayed out on the desk in a brush roll, and are stuffed full of brushes. When things get hectic, it is difficult to find things in general. Hence, having a wearable mobile brush holder would give the artist more speed when she needs to switch up her packing brush to her blending brushes.
Idea 1: mistake correcting bracer
A wristguard that functions as a portable makeup remover + q-tip holder. The waterproof pouch attached holds enough liquid for an entire shoot and can be easily refilled.
Idea 2: A brush roll belt
Initially I wanted to make a brush belt and roll (see drawing) that enables you to wear it during a job and easily wraps up into a bundle for storage. But an artist can easily have over 20-50 brushes and it isn’t surprising to see them with multiple brush so. So why not a customisable belt instead?
The belt enables you to attach any brush roll on it so you could wear them on your waist. Basically a fanny pack for brushes. It could be adjusted so that the size of the belt fits your waist. While it may sound quite useless, I think the quick DIY could save artists money on buying multiple brush belts if they already have many brush rolls due to the customisability.
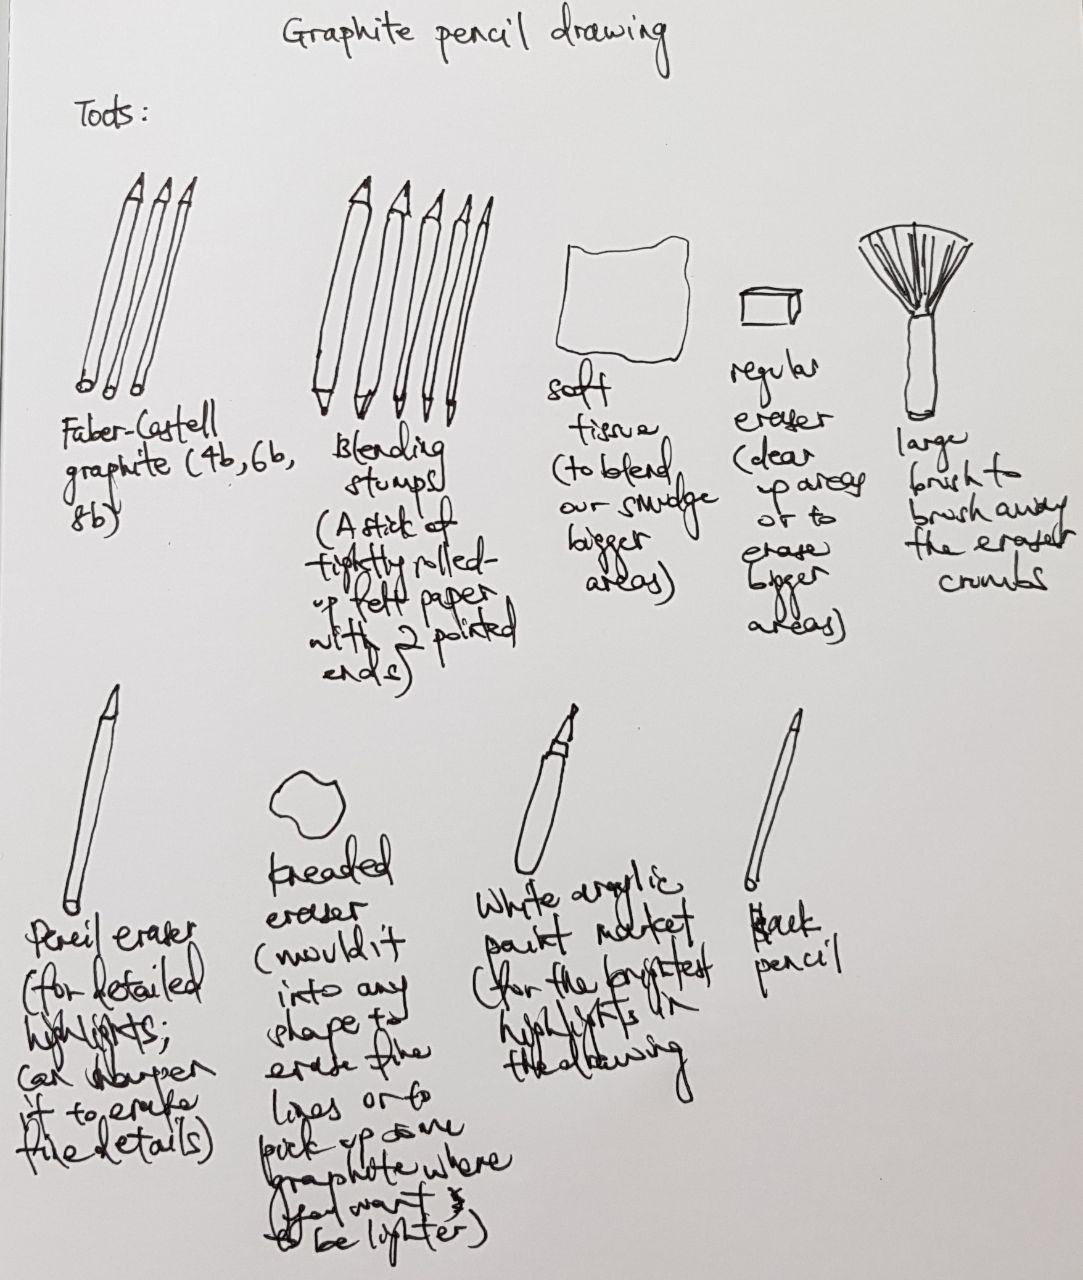
Blending stumps (tightly rolled-up felt paper with 2 pointed ends)
Soft tissue (blend/smudge bigger areas)
Regular eraser (erase bigger areas)
Kneaded eraser (erase fine lines or pick up graphite where you want it lighter)
Brush (brush away eraser crumbs)
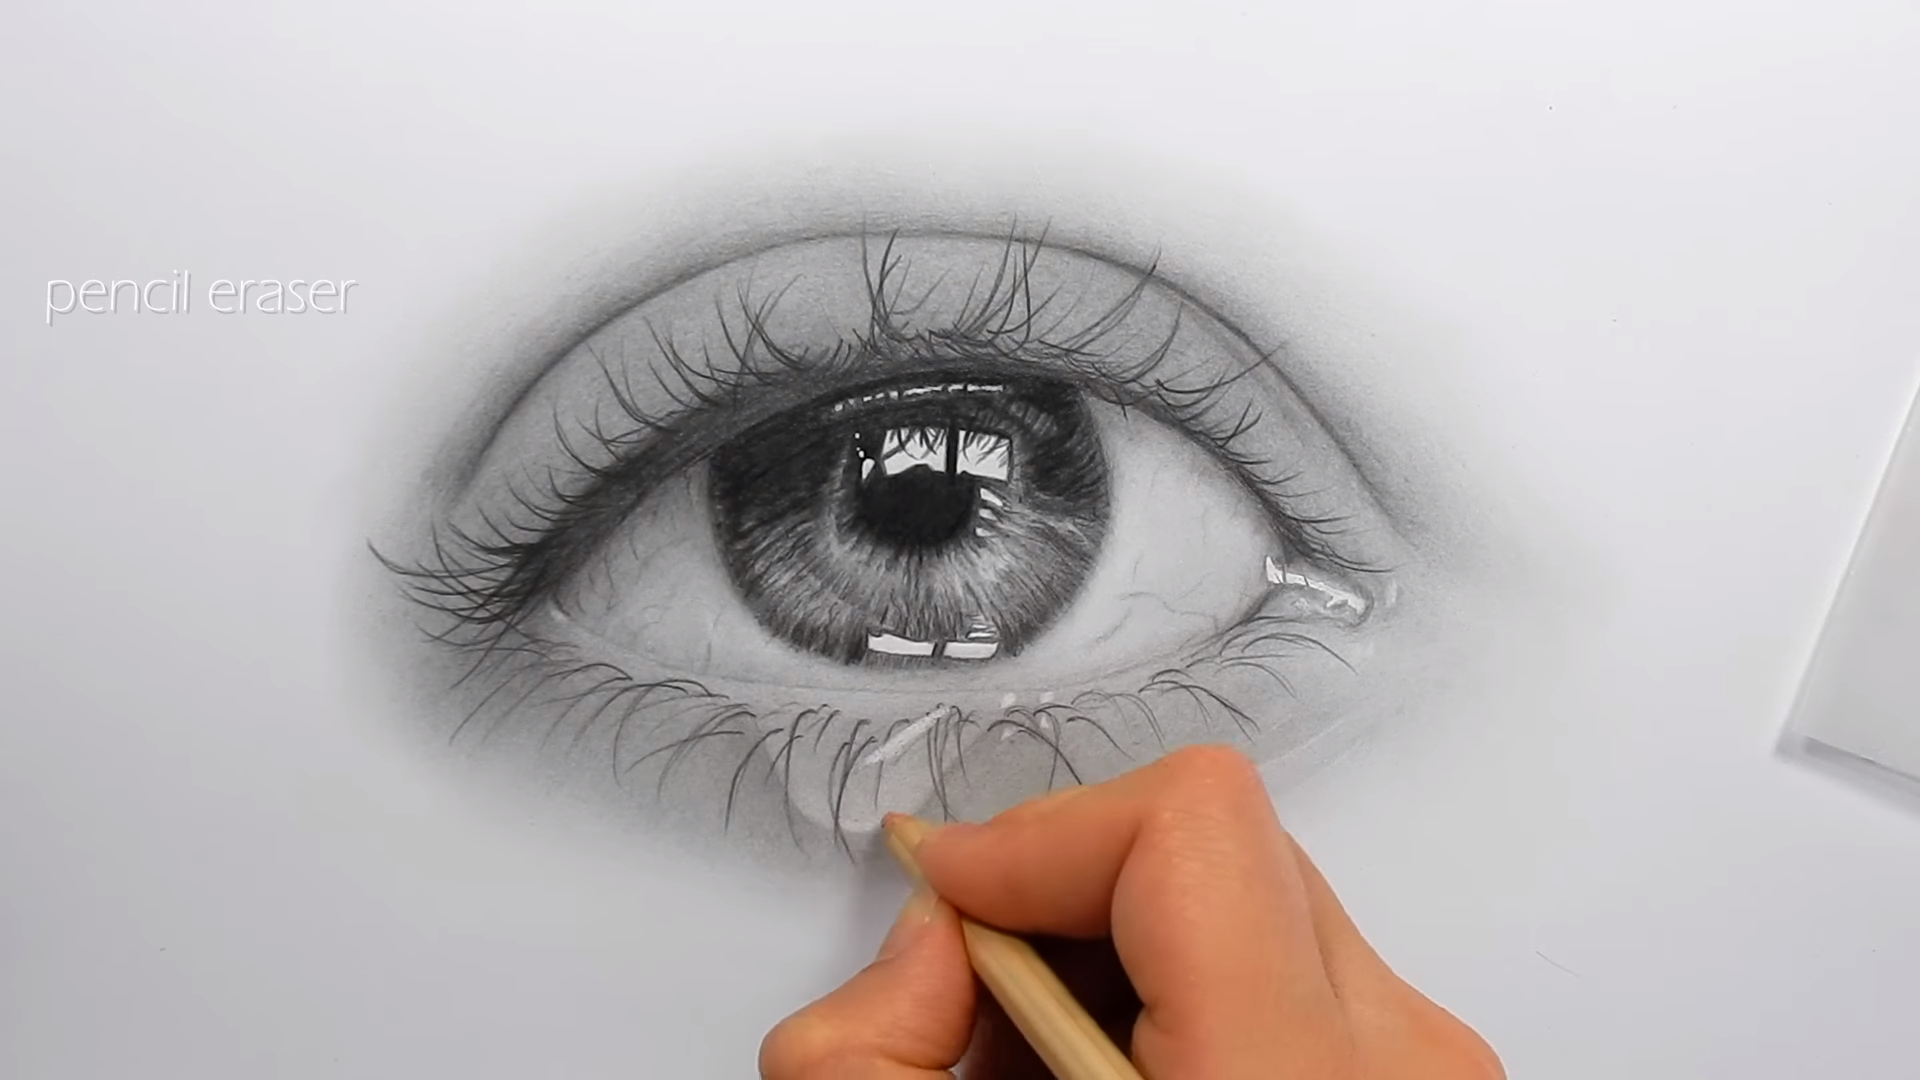
Eraser pencil (for detailed highlights)
Problem faced:
The problem faced by graphite pencil drawing artists are that there are way too many tools that they need while they are drawing. For instance, for a blending stump, they have at least 5 different thickness of the tips. There are also eraser pencils, kneaded eraser, regular eraser, blending tissue, and a brush to brush away the crumbs. There are also graphite pencils of different hardness, black pencils and white markers. Hence, the tabletop may turn into a mess with the number of tools involved. It may also be difficult to find what they need amidst the mess.
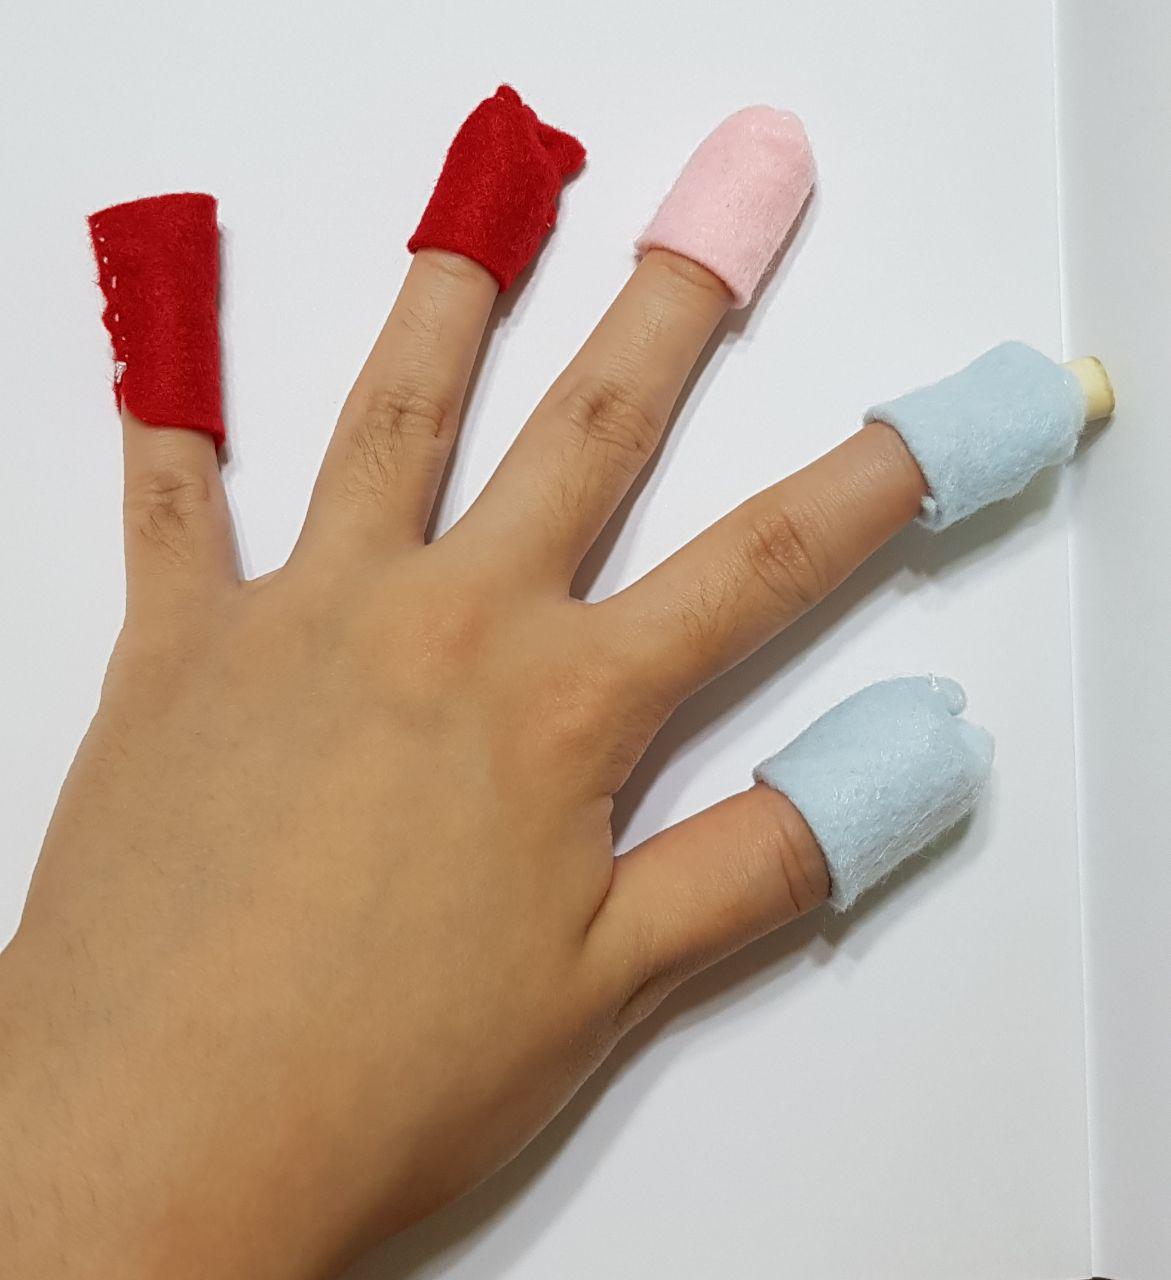
Idea 1: Finger Glove It
Creating a graphite pencil drawing but can’t find the necessary tools on hand? Eraser crumbs all over the place, blending tissues flying everywhere? Blending stumps, eraser pencil, erasers obstructing your artwork and cluttering the space? Don’t worry, you can now have it all on one hand with the new finger gloves!
Now, while the artist is drawing with one hand, the other hand will have finger gloves on each finger. On the pinky finger, the finger glove will be made of thin fibre brush material, and will act as a substitute for the brush, which is used to brush away eraser crumbs. On the ring finger, the finger glove have a ‘container’ that will contain soft tissues (up to 5), which is used to blend or smudge bigger areas. The tip of the middle finger’s finger glove will store blending stumps of different thickness, and functions like a multi-coloured clickable pen. The tip of the index finger’s finger glove will hold the kneaded eraser and eraser pencil. Lastly, the thumb’s finger glove will have a regular eraser at its tip.
The finger gloves will be made of breathable material such as cotton or linen. Garments made of linen or cotton are valued for their exceptional coolness and freshness in hot and humid weather.
A useless version of Finger Glove It would be if the erasers are stuck to the bottom flat side of the fingers instead of the tip of the fingers. If so, there would be accidental erases while the other hand with finger gloves is holding onto the drawing. Moreover, it is hard to control the erasers when drawing fine lines with them. Having them on the tip of the fingers would provide more precision as though holding a pen.
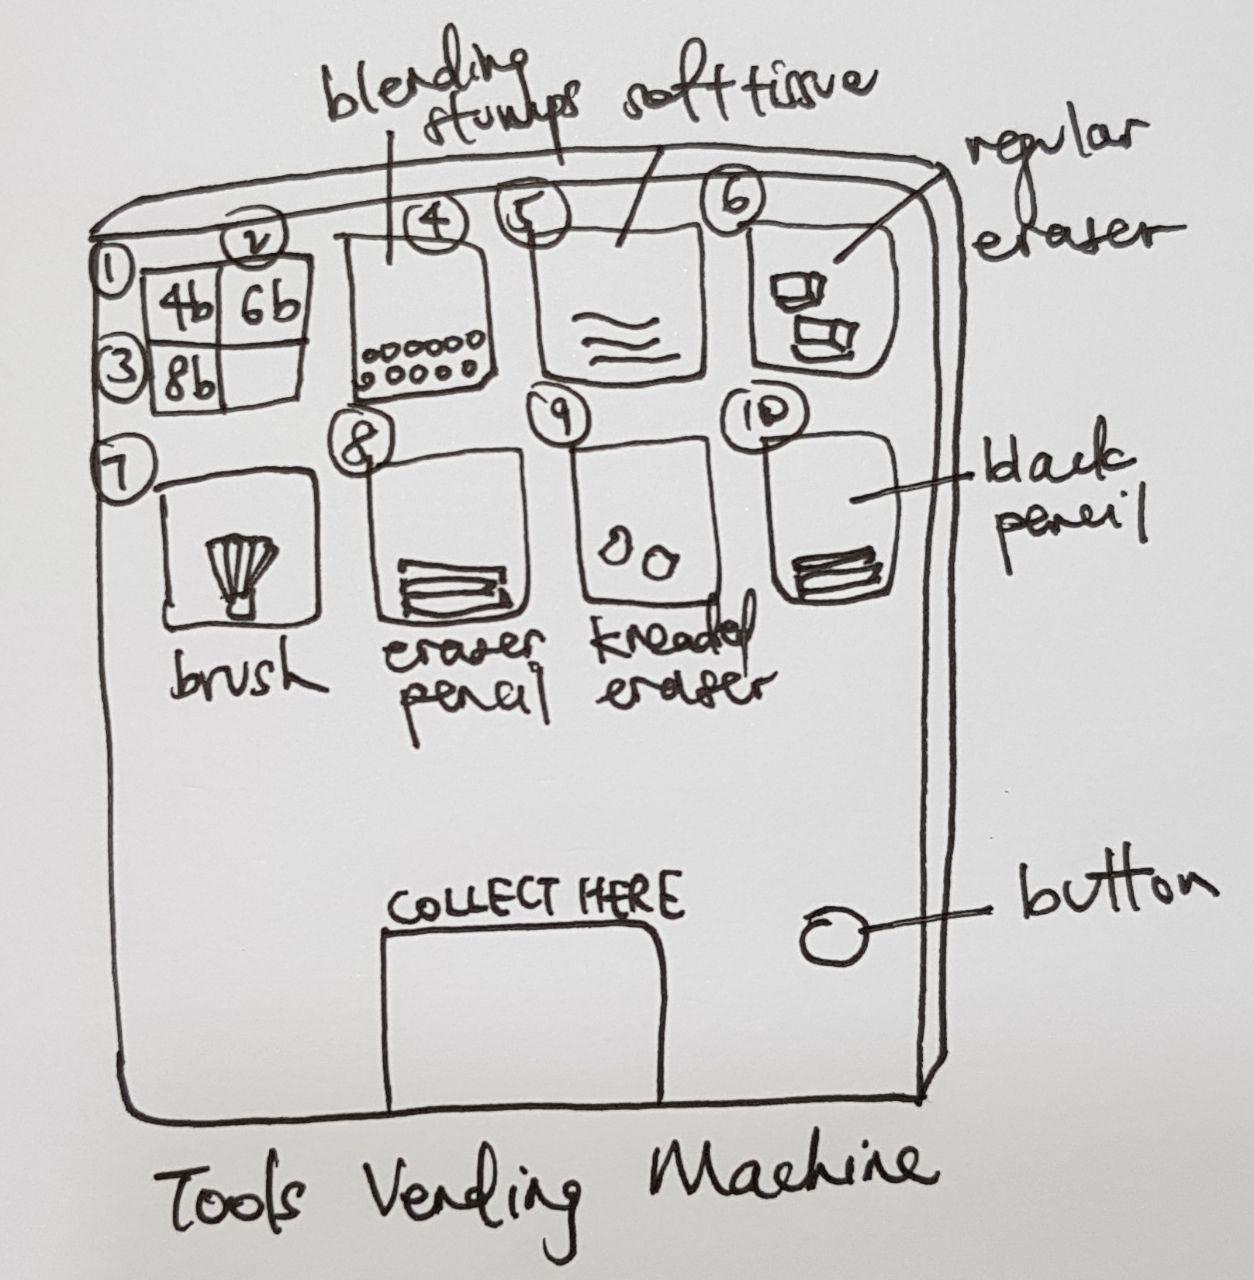
Idea 2: Tools Vending Machine
A relatively useless idea (unless improved): A tools vending machine that dispenses the tool needed when the relevant button is pressed. For instance, if 1 is pressed, a 4b graphite pencil would be dispensed and the user will collect it at the mouth of the machine. After using, the user can place it back into its belonging box.
However, this solution involves more steps than the Finger Glove It. Firstly, the user would have to press the button, wait for a few seconds for the tool to drop for their use. After using it, they would also have to deposit it back to its source. Hence, it is a hassle, and the user could simply take the tool from their respective boxes without the machine’s function.
I believe it could be modified to perhaps a hanging magnetic board which can store all the tools and save space at the same time, where the artist can reach out for it easily each time. However, this is still not as convenient as the Finger Glove It since the artist would not need to reach out or search for the tool; it is already on hand. Alternatively, the vending machine could be improved to have voice detection properties just like Siri, where the artist could just narrate what he wants and the tool will drop down. As the artist narrates, he could still draw on. After using the tool, he could place it into the collection area and the tool would be sent up to its original place.
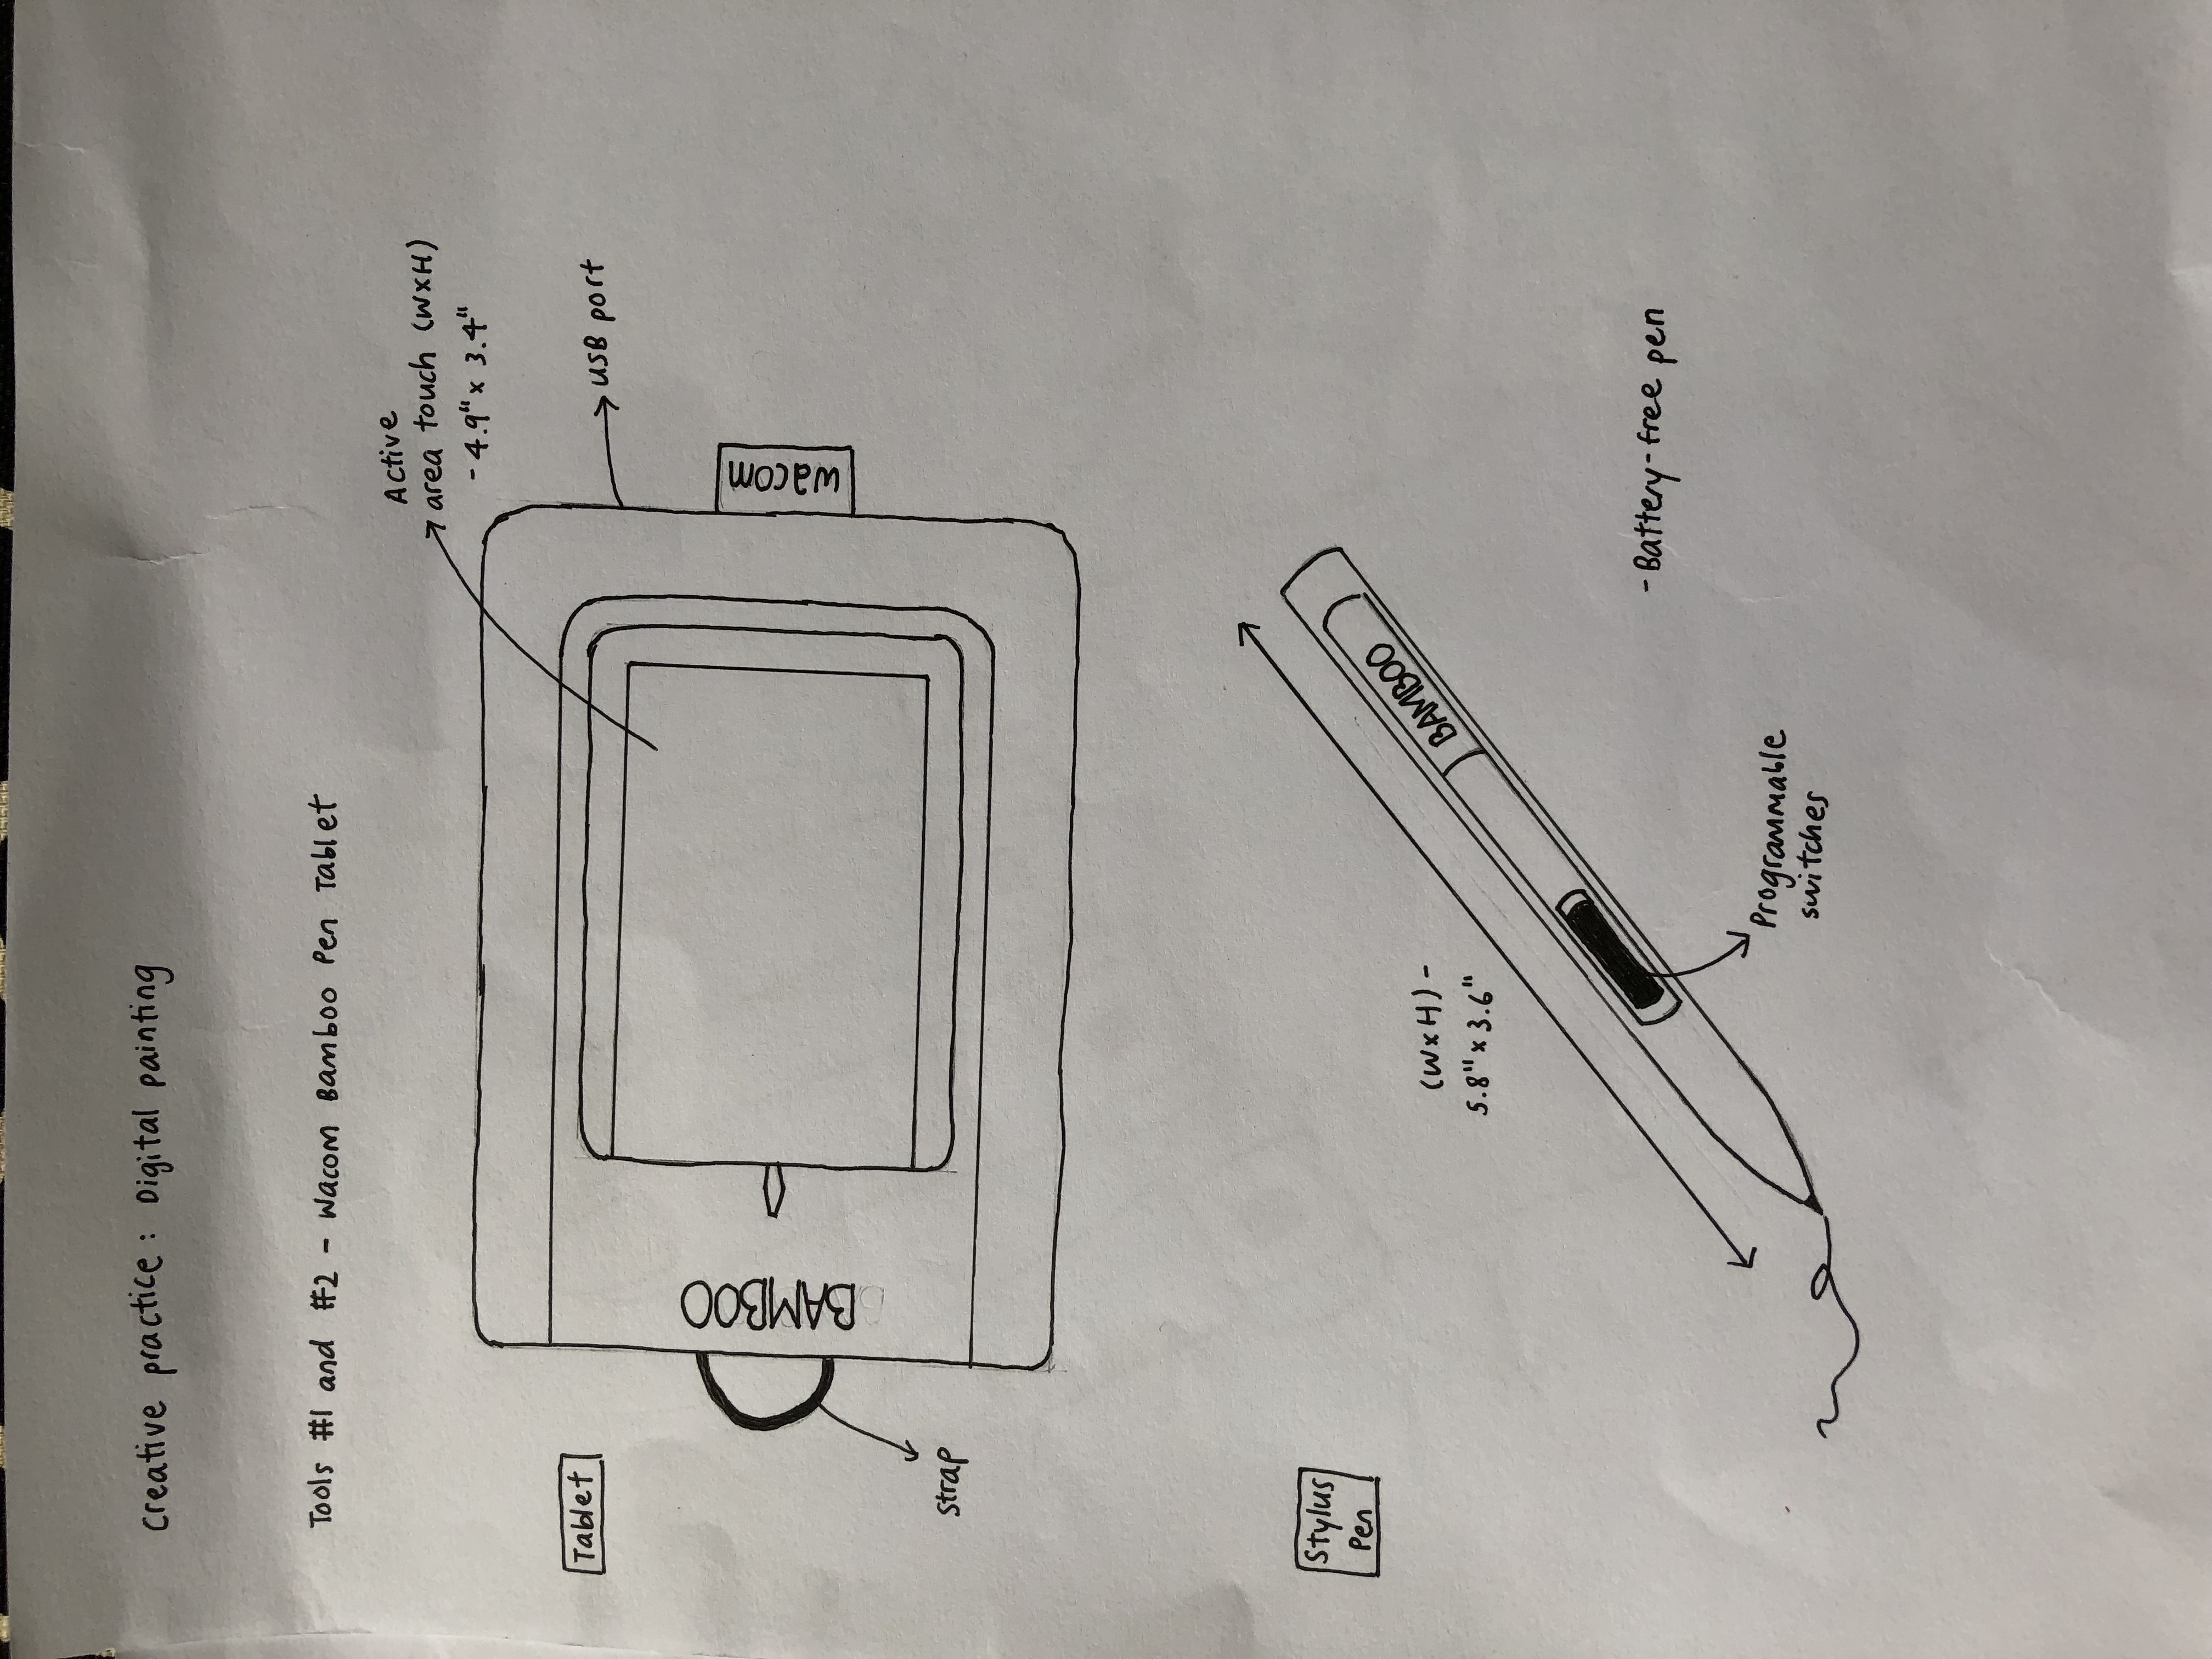
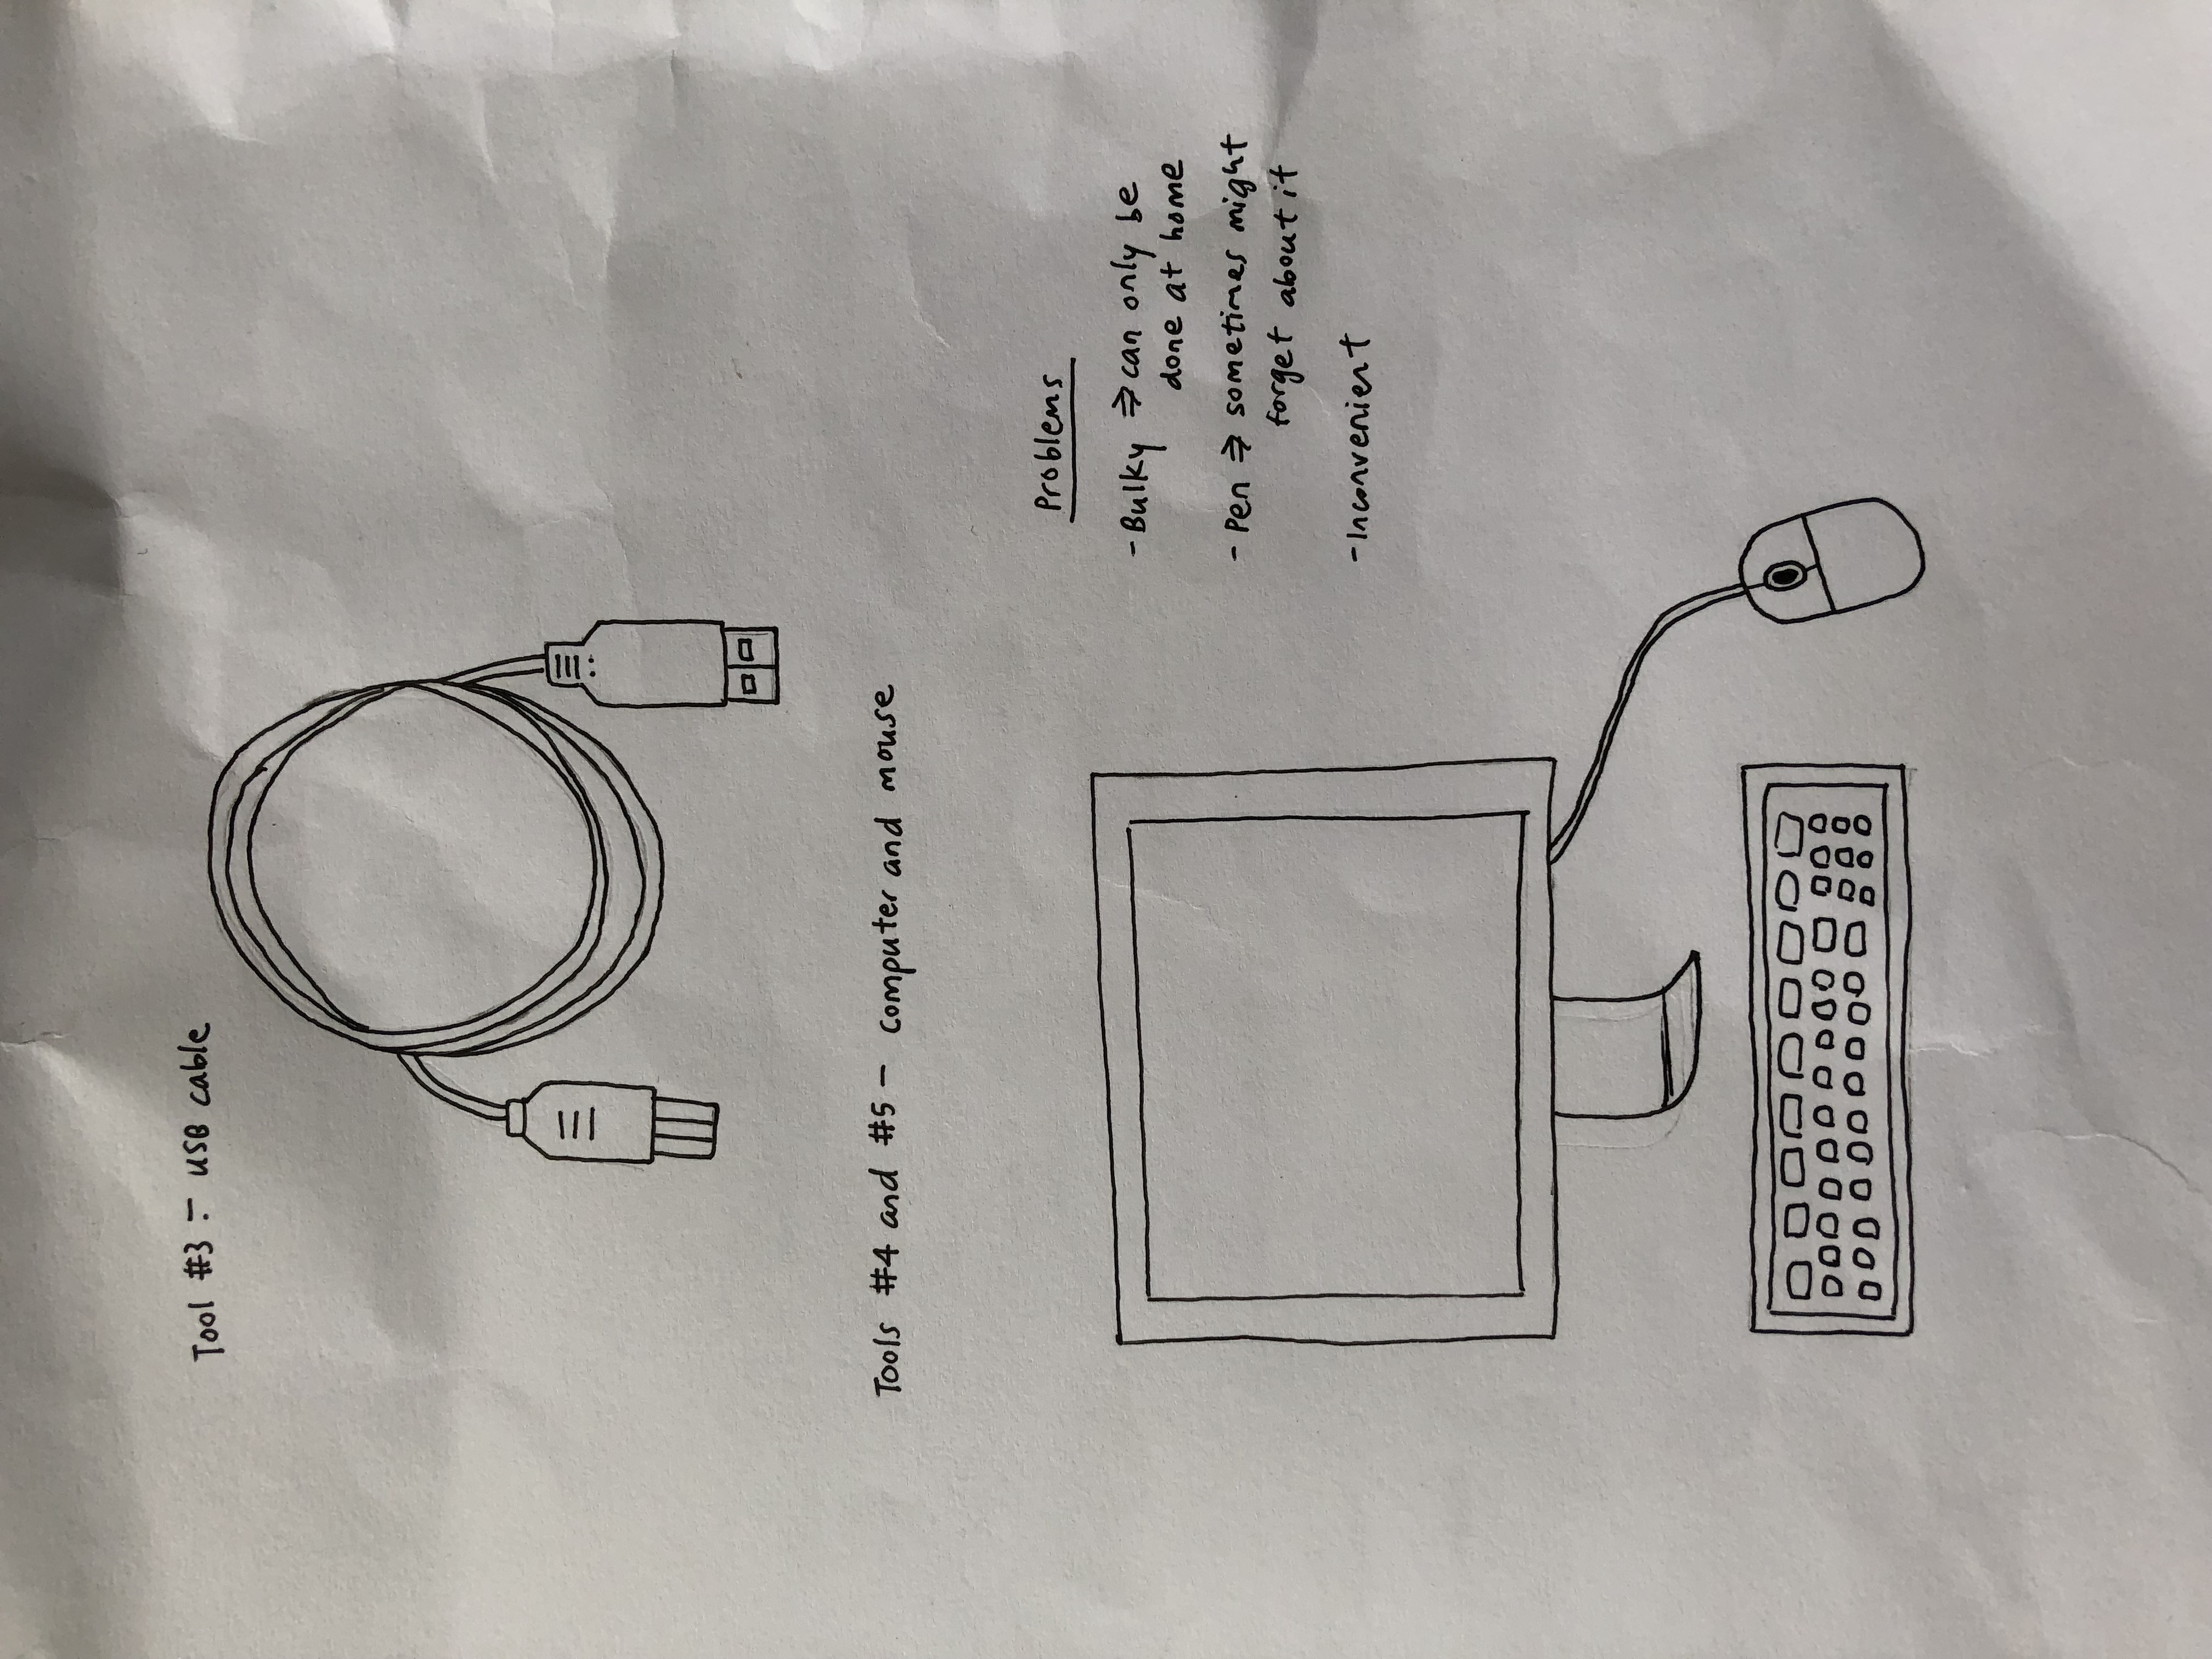
Toolsused 1. Wacom Bamboo Pen Tablet 2. Stylus pen 3. Computer 4. USB cable (to connect the tablet to the computer)
Problems faced by the practitioner 1. Inconvenience: The tablet needs to be connected to a computer for it to work. Since the computer and tablet can be quite bulky and heavy, the practitioner can only do digital painting at home and not anywhere outside. 2. Stylus pen may get lost: Since the pen is quite small and there is no cord connecting it to the tablet, the practitioner may sometimes lose it if she’s not careful enough.
Sketches of tools used (Tablet and pen) Sketches of tools used (Computer and USB cable)
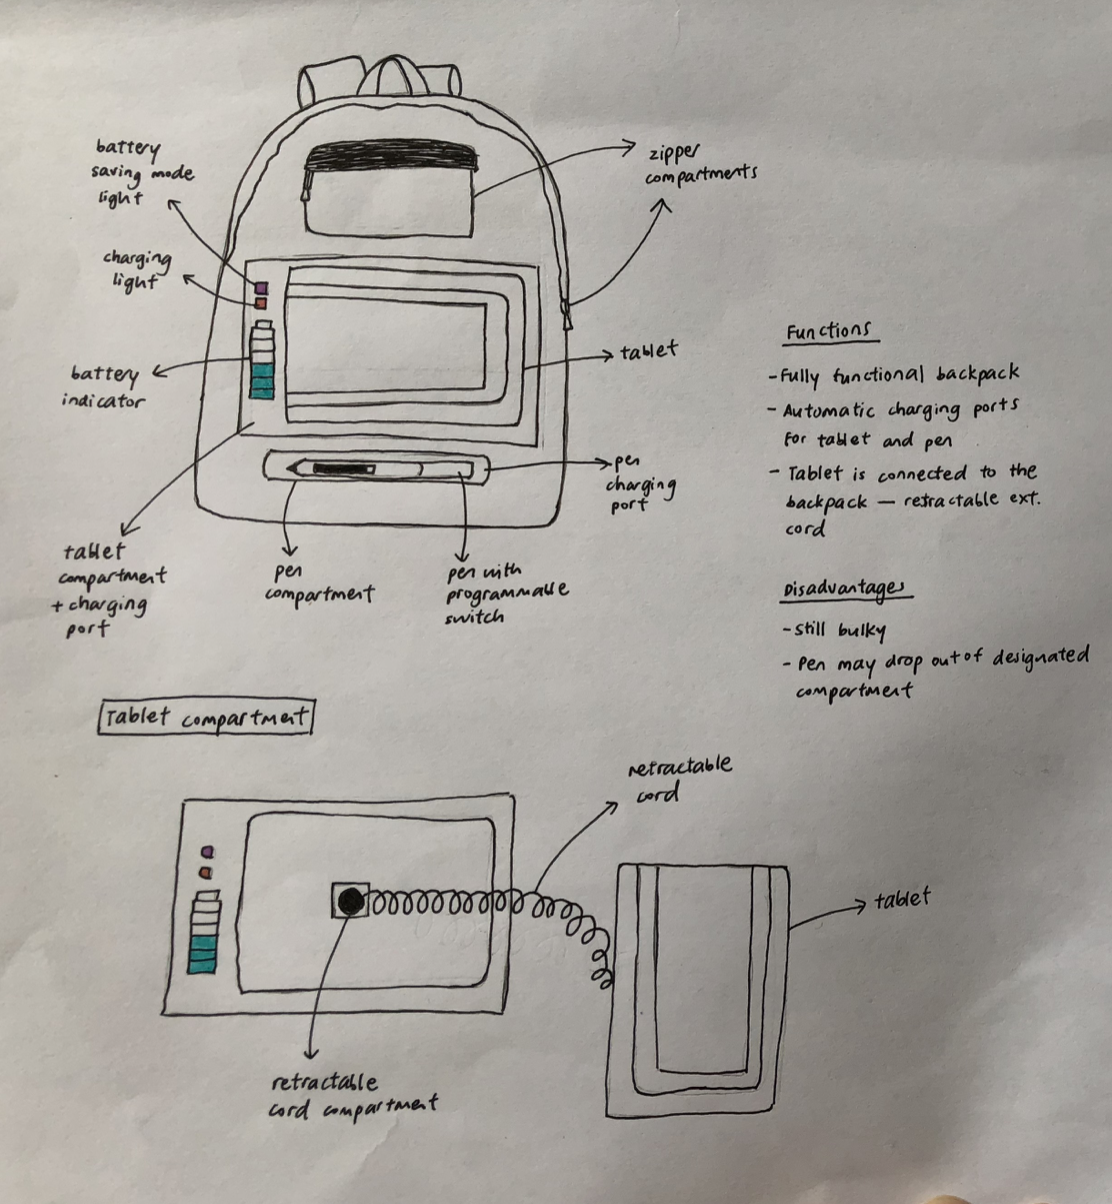
Idea 1 Backpack Pen Tablet
My first idea is to embed automatic charging ports for both the tablet and pen into a fully functional backpack, and this aims to combat the problem of inconvenience. The tablet is connected to the backpack with a retractable extension cord and the user can simply place it back into the charging port once the battery indicator states that its battery is running low.
Although the user can now bring the tablet out on the go, this idea still has a few problems. Firstly, this backpack is still rather bulky. Also, the tablet screen may be scratched when it touches rough surfaces. The pen may also drop out of its designated compartment if it is not securely fastened.
Idea 2 (with model) Wearable Convertible Pen Bracelet
For my second idea, I aim to combat the problem of losing the stylus pen by creating a convertible pen bracelet that the user can wear on the go. The stylus pen can be transformed into a high quality bracelet, couple with a magnetic tip to facilitate the transformation process.
My model (shown below), made out of beads, elastic string and black tape, shows the pen bracelet at its second stage.
Model of Idea 2
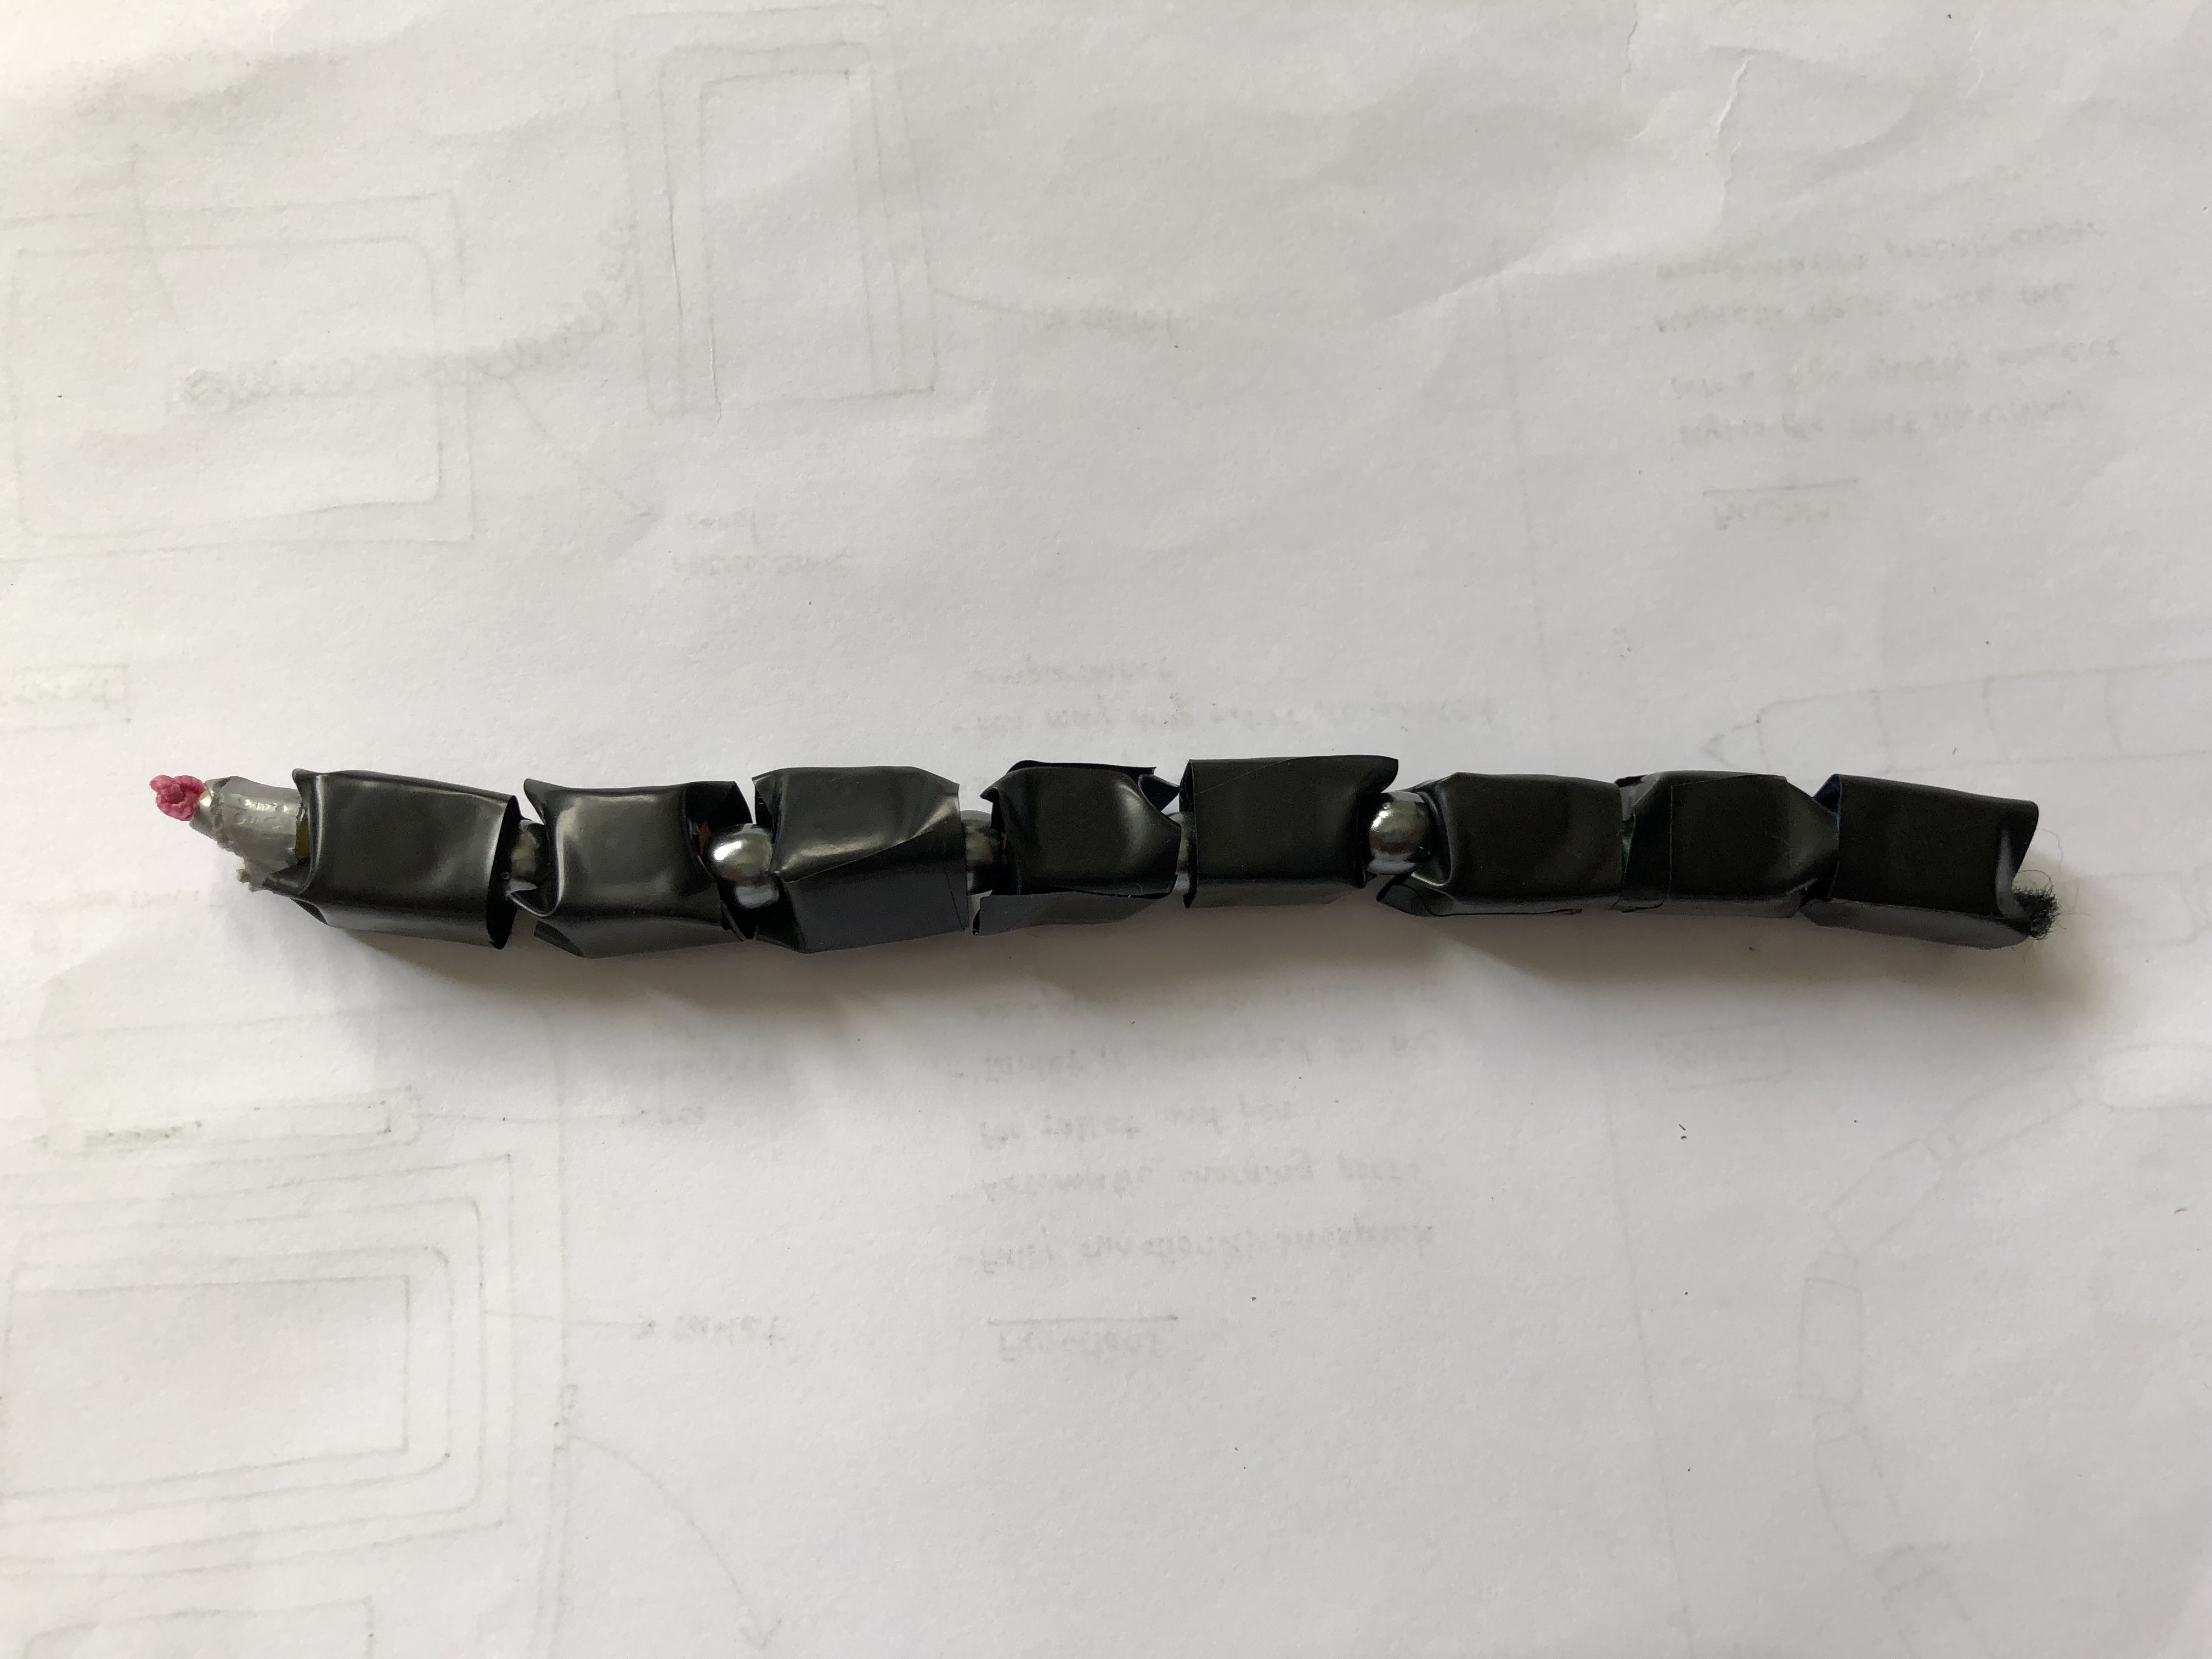
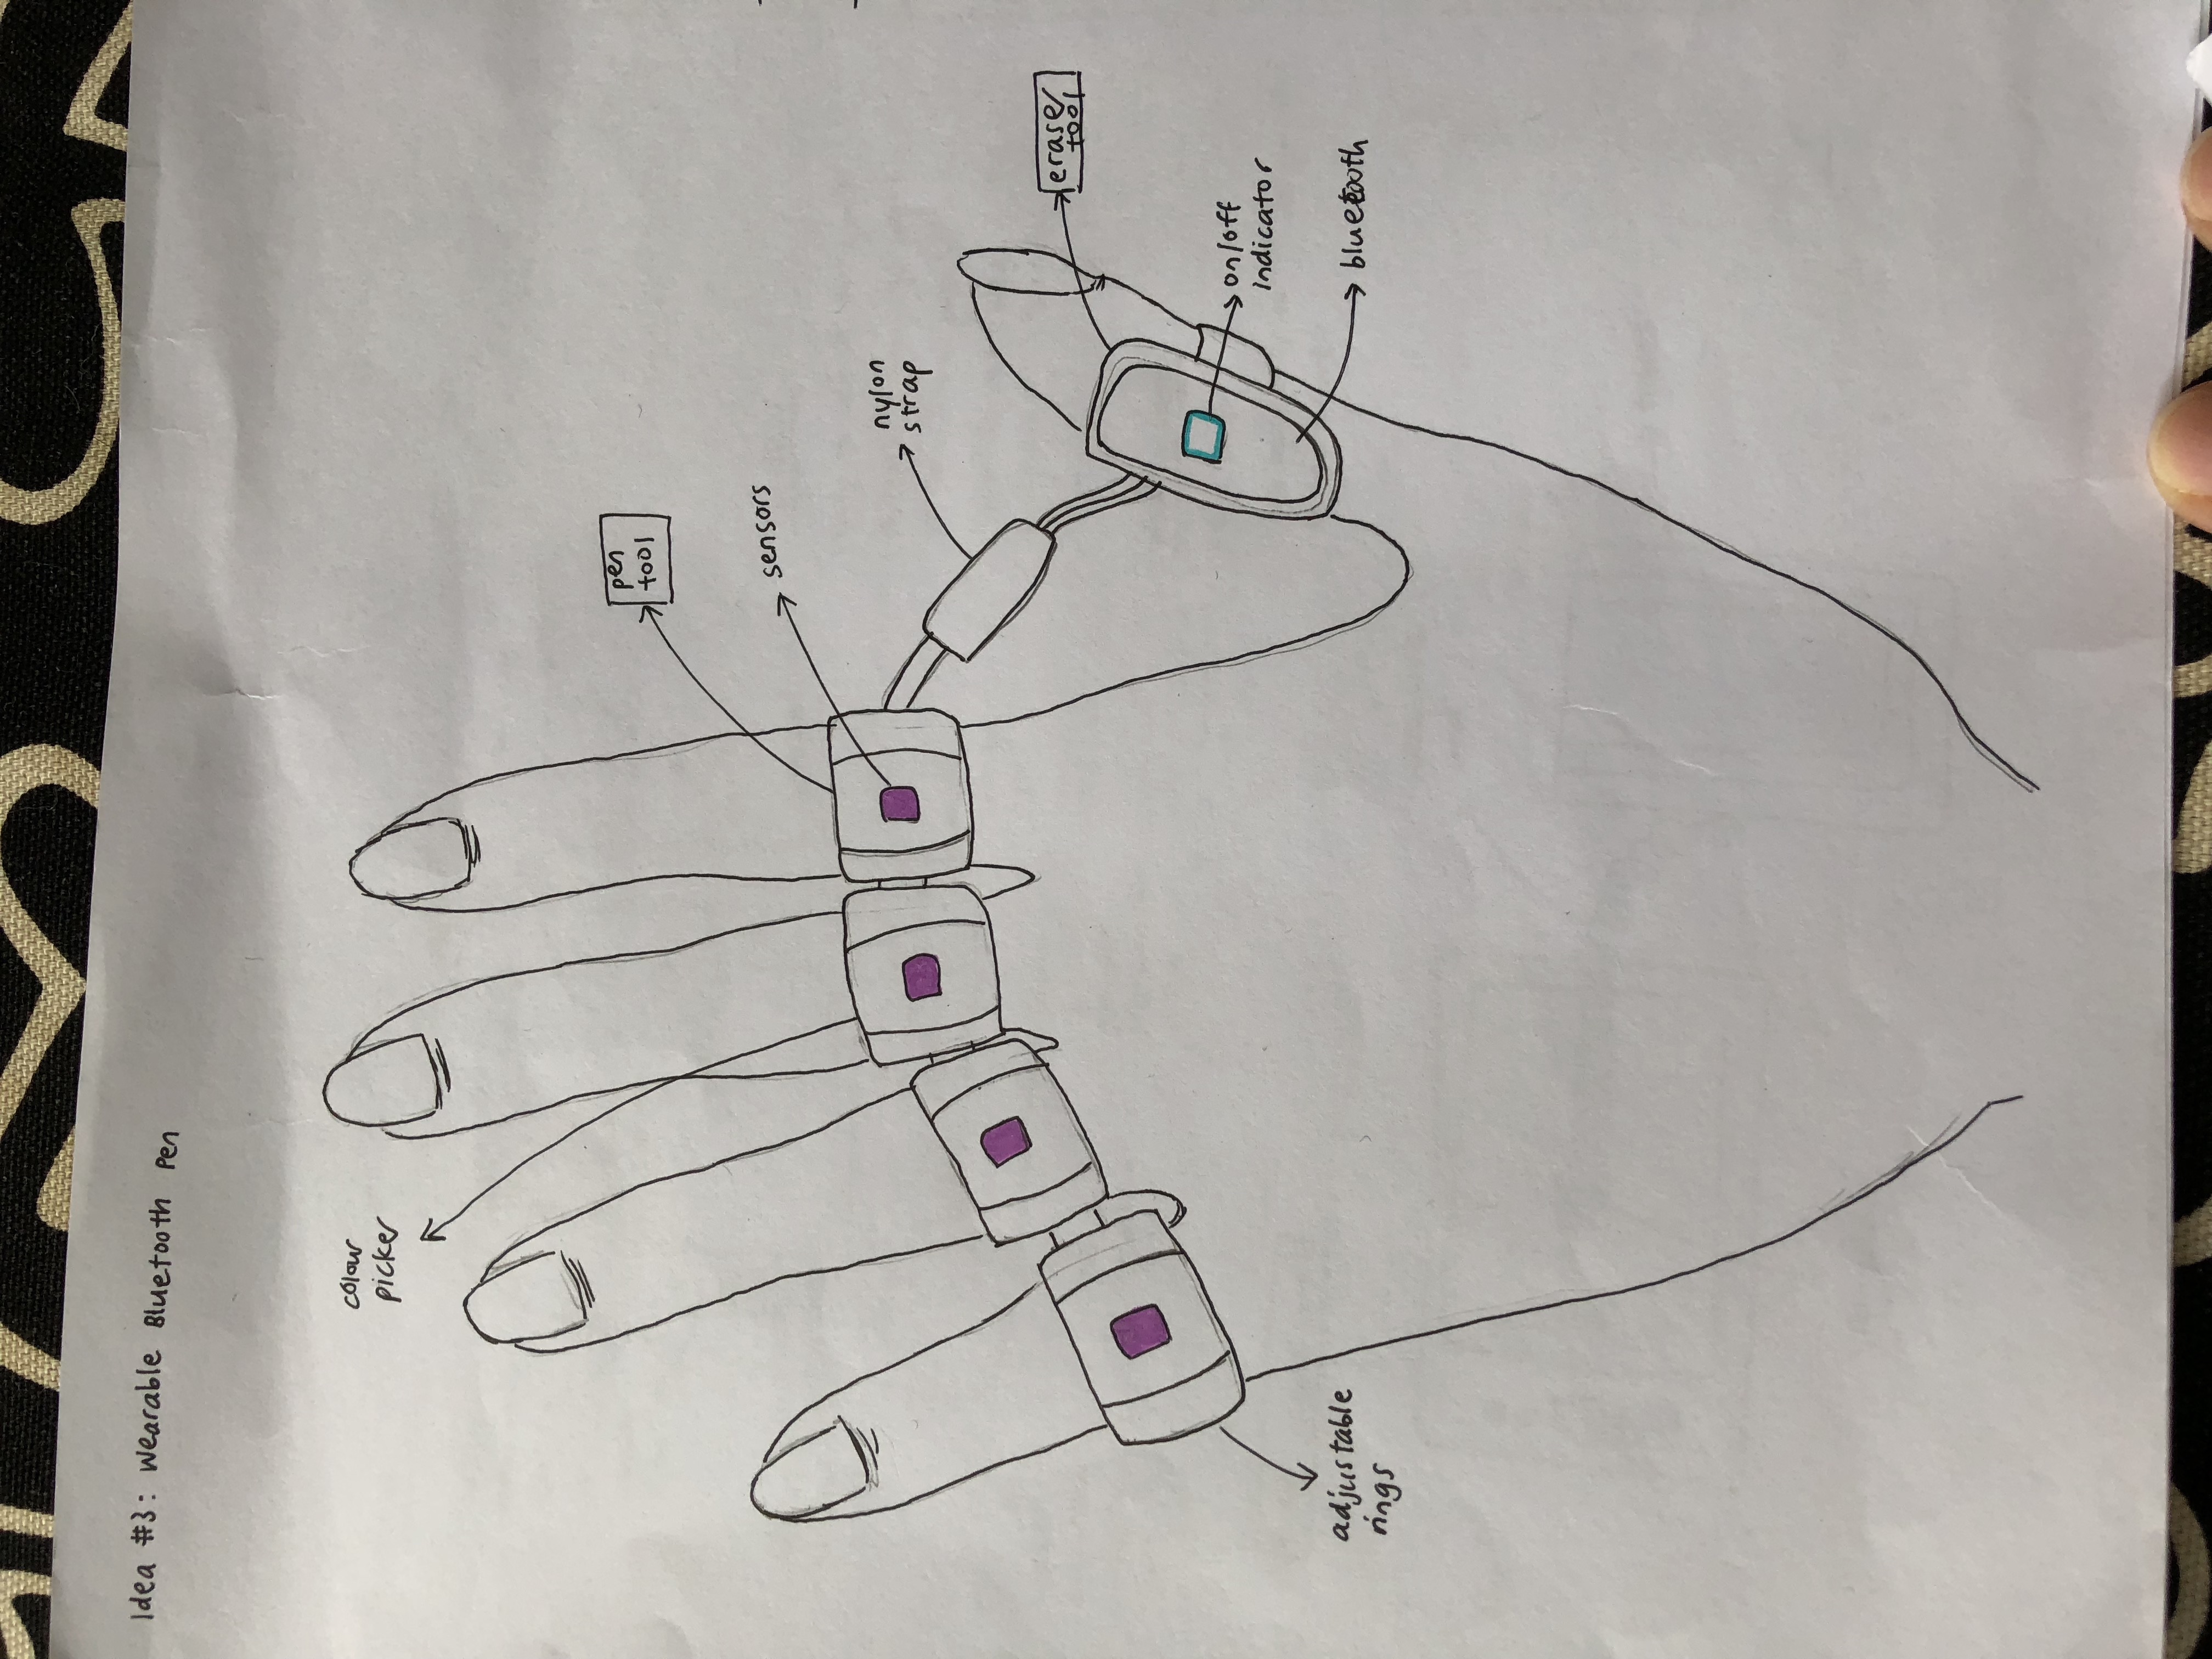
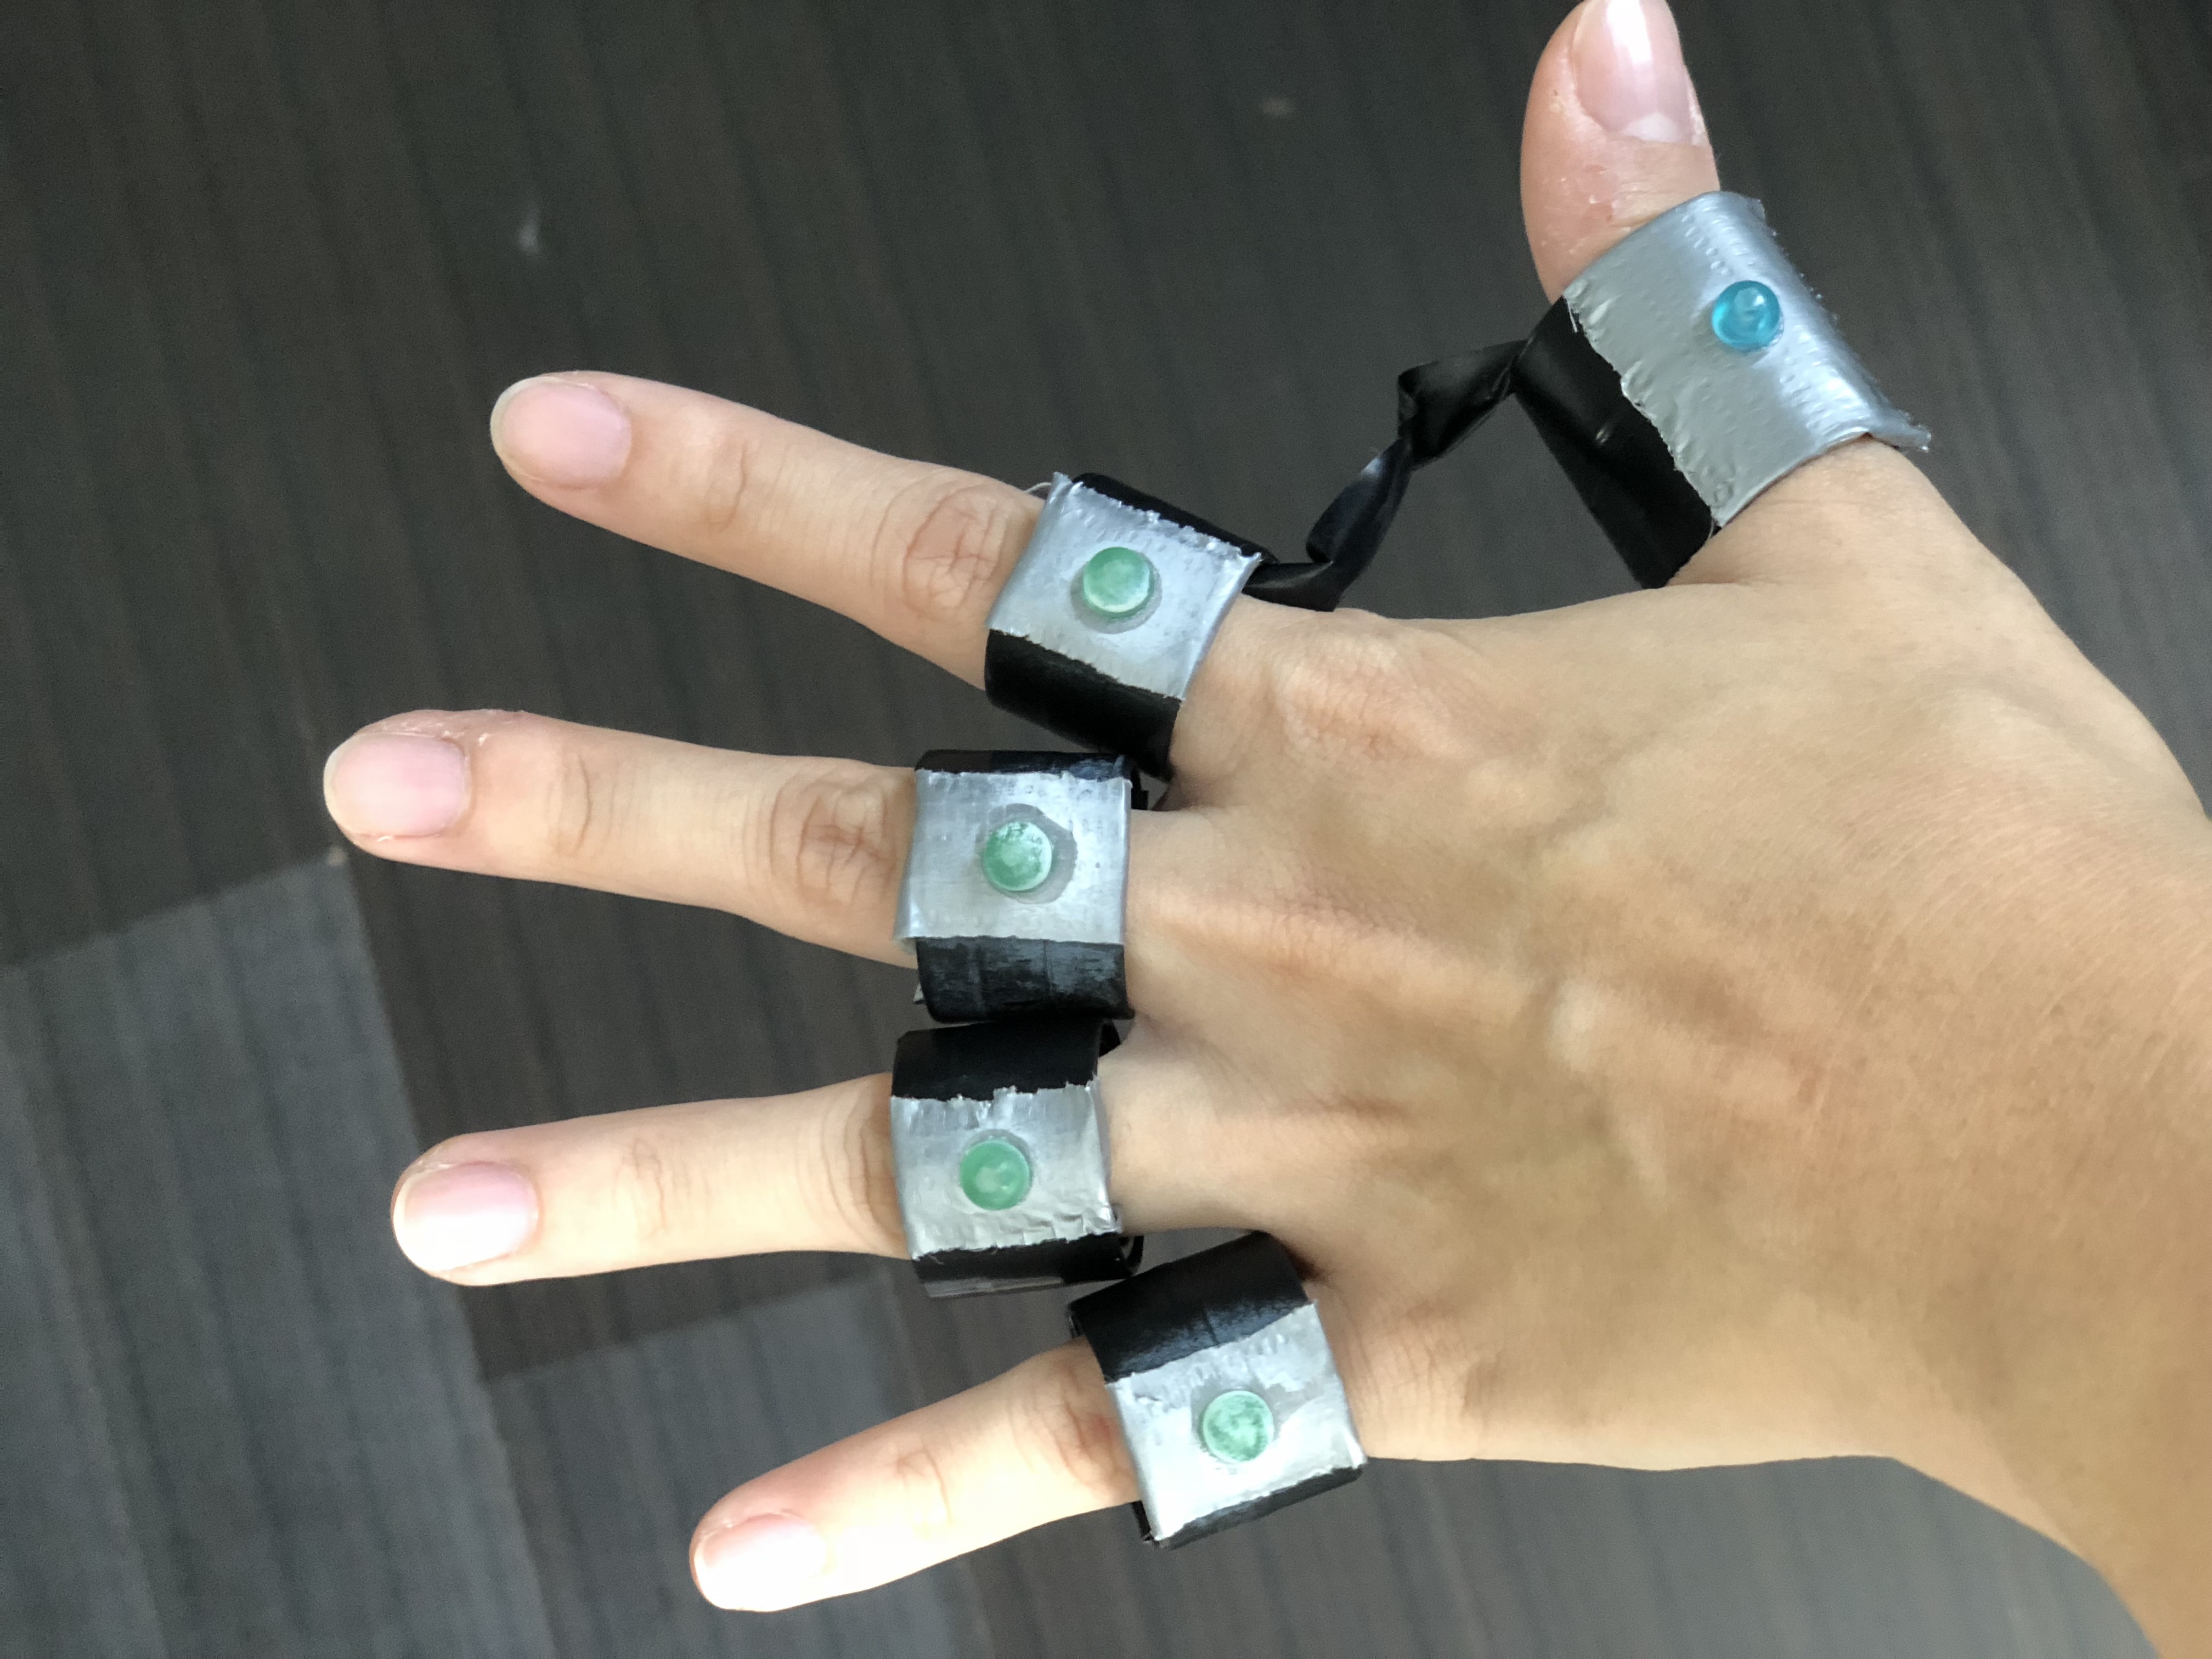
Idea 3 (with prototype) Wearable Bluetooth Pen
Prototype of Idea 3
Last but not least, I created a wearable bluetooth pen with an in-built illustrator software that allows the user to engage in digital painting on the go, as long as there is a flat surface that the user can work with. Each finger represents a different illustrator tool (e.g. the index finger represents the pen tool) and the in-built sensor on each ring senses the user’s finger movements and converts them into the specific tools. The bluetooth function also allows the user to save his or her artworks and sync them to the computer app afterwards. Since the bluetooth pen is battery operated, there will also be a charging case to recharge the device.
However, this idea has its disadvantages as well. Firstly, the user might forget the tools represented by each finger. Also, the usage of fingers might not be precise enough to draw fine lines. Lastly, this device only works on flat surfaces.
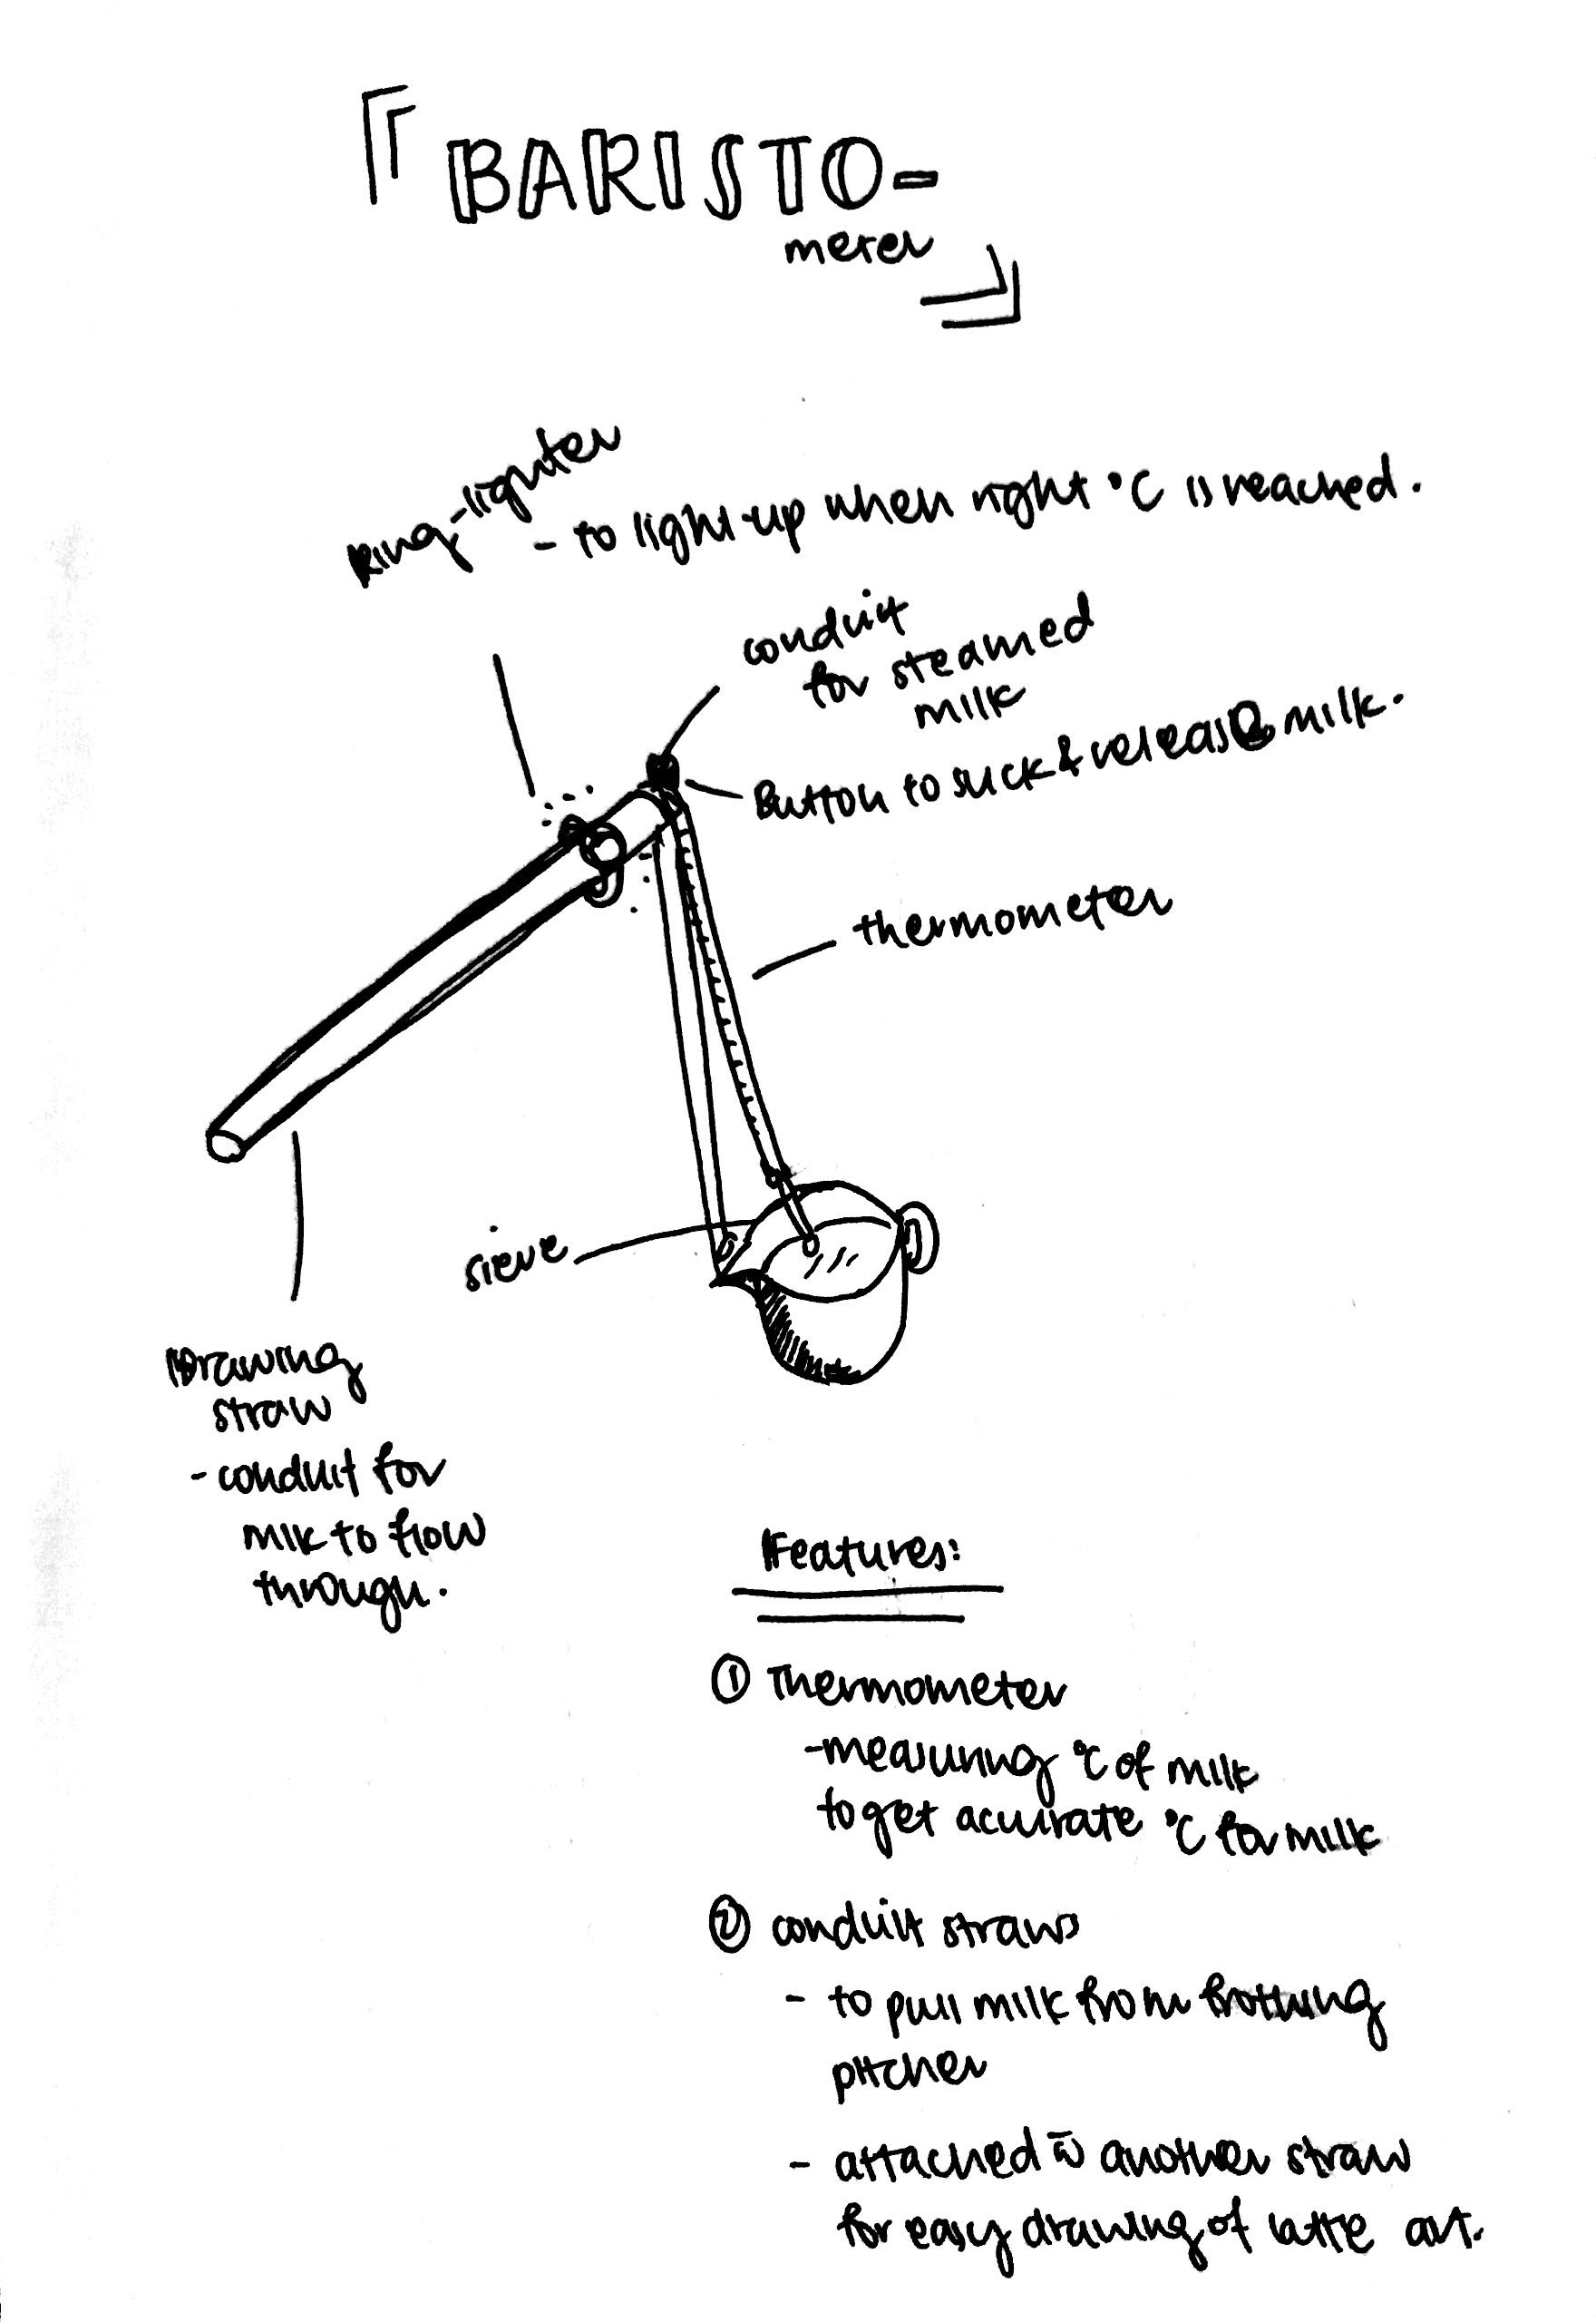
At work, I observed some of my colleagues struggling with latte art mainly because: 1. the milk frothing process (unable to accurately determine the righ temperature for the steamed milk; 2. difficulty in controlling the flow of milk while doing the latte art.
Solution The Baristometer. The idea was to create something that would try to reduce the difficulty in controlling the milk flow while drawing the latte art and getting the right temperature for the milk as accurately as possible. With this in mind, the Baristometer was conceptualised.
First, the end with the thermometer tip will be plunged into the milk pitcher while it is being frothed. As the milk is frothed, the thermometer measures the temperature of the milk and when the optimal temperature is reached, the ring will light up to indicate to the barista that the milk is ready. The button allows the barista to control the flow of the milk: whenever she/he needs milk, the button is pushed and milk is sucked and released through the straw conduit. The conduit allows for better control over the milk flow by allowing the barista to control the amount of milk poured out while drawing the art, with increased precision of where the milk will be poured into.
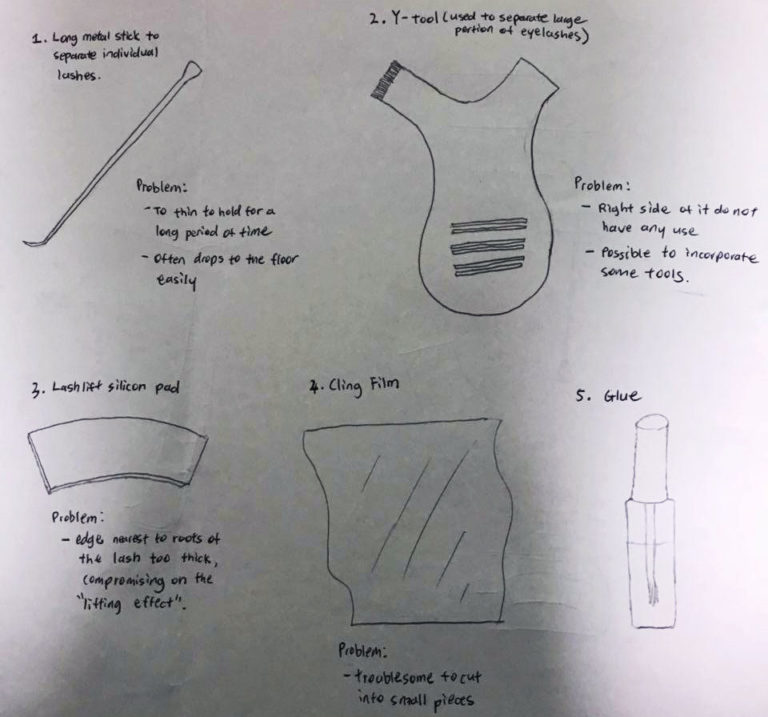
Study of a Creative Practice: Lash Lift Beautician
Earlier this year, I went to have my lash lifted by my friend who is a lash lift beautician. So I approached her for this assignment and she told me about the tools she used and some problems she faced (listed on the image below). Hence, I decided to create a arm band that can hold the required equipment.
Tools Used: – Lash Glue – Lash Separator – Y – Tool (to separate huge chunks of lash) – Silicon Pads (key tool placed on the eyelid where the lash will be lifted on) – Cling Wrap (to prevent residue from falling into the eye) – Lash Tint
(Tools used and some problem faced.)
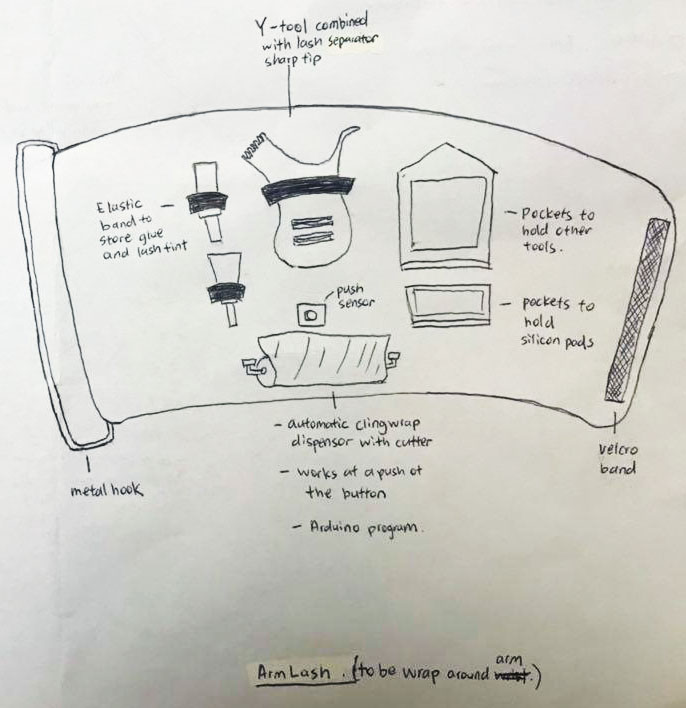
Drawing of Prototype 1:
The Arm Lash is made from waterproof material with a cushion sewn inside for extra comfort. I combined the Y- Tool and the lash separator together to reduce space and to increase efficiency. The individual tool such as the lash glue are attached to the band through an elastic band. There will be two pockets, one to hold the silicon pads. The highlight would be the automatic cling wrap dispenser that works on a push button sensor. The cling wrap can be easily cut with the blades attached to it and its size can be customized by adjusting the settings.
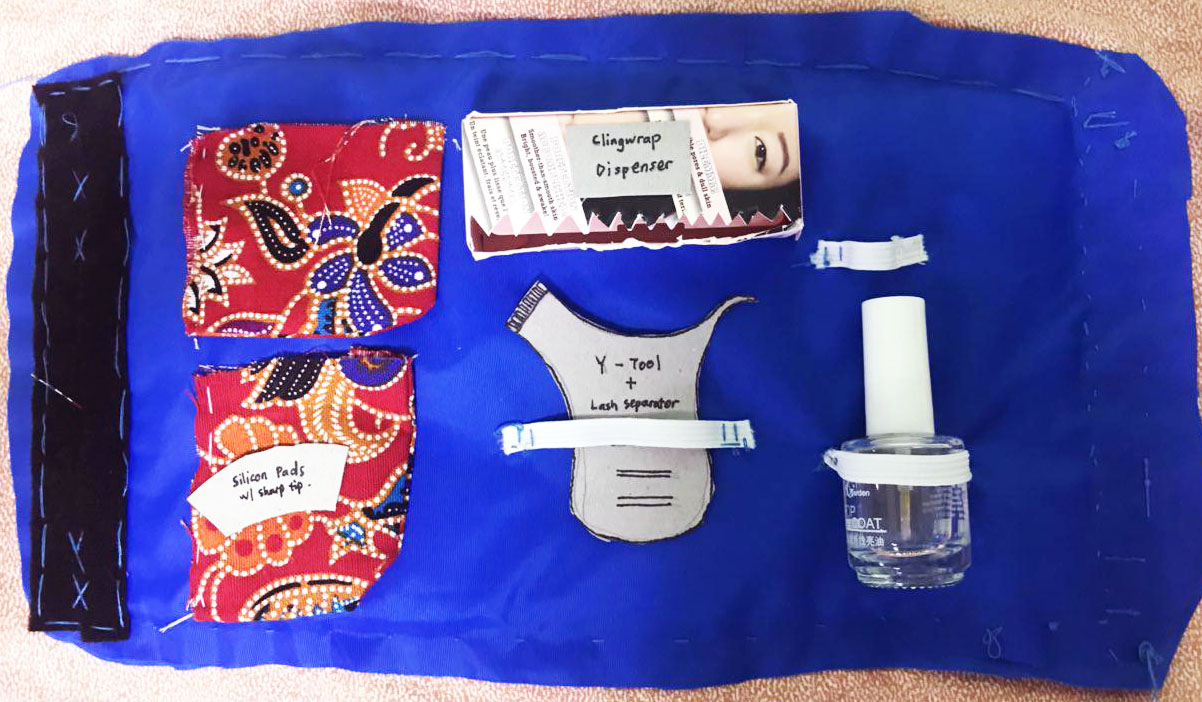
Model of Arm Lash
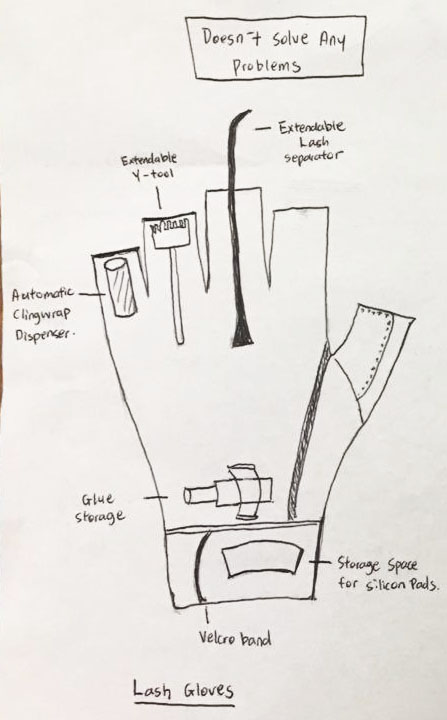
Idea 2: Lash Glove (doesn’t solve any problem)
The initial idea I had does not solve the problem as it is a wearable glove design. It would not work because the process of lash lifting requires the hands and fingers to be nimble and free from restrictions. By having tools attached to the back of the hand and sticking out (although retractable), it will restrict the finger movements and reduce the accuracy.
Since I was always at cafes, I decided to chat with a couple of baristas to understand more about them and their tools.
I drew out 5 tools the baristas used that stood out to me: – Espresso Machine (to brew espresso shots) – Portafilter (attaches to the espresso machines) – Coffee Tamper (to tamper – press the grounded coffee powder into the portafilter basket) – Milk Pitcher (to pour in the milk for lattes and to create latte art) – Coffee Grinder (to grind coffee beans)
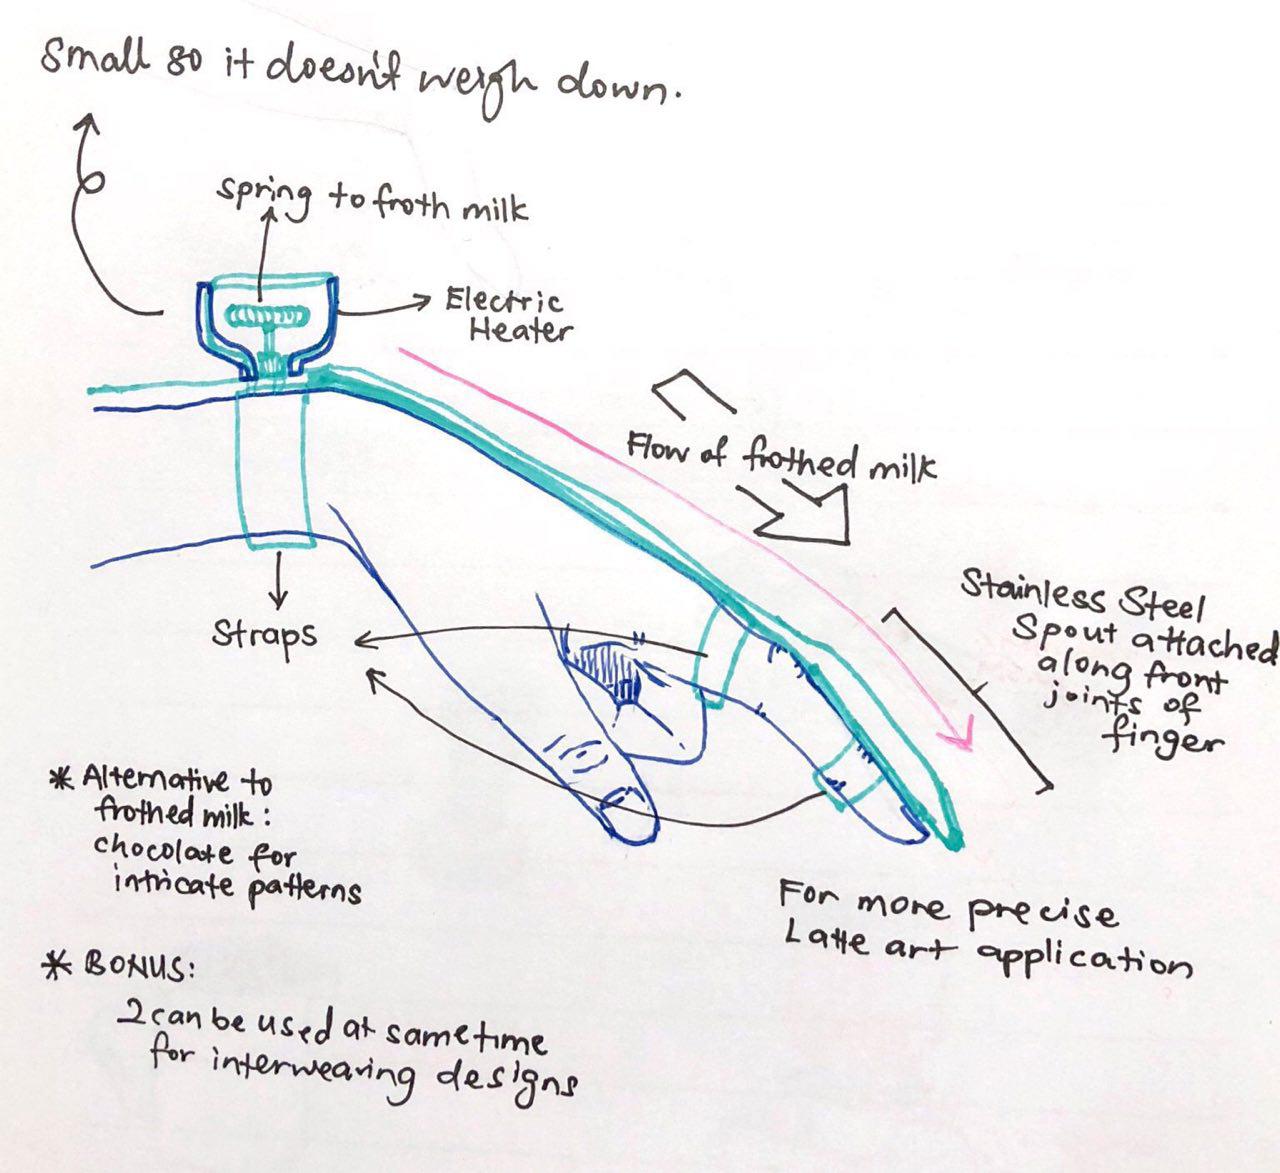
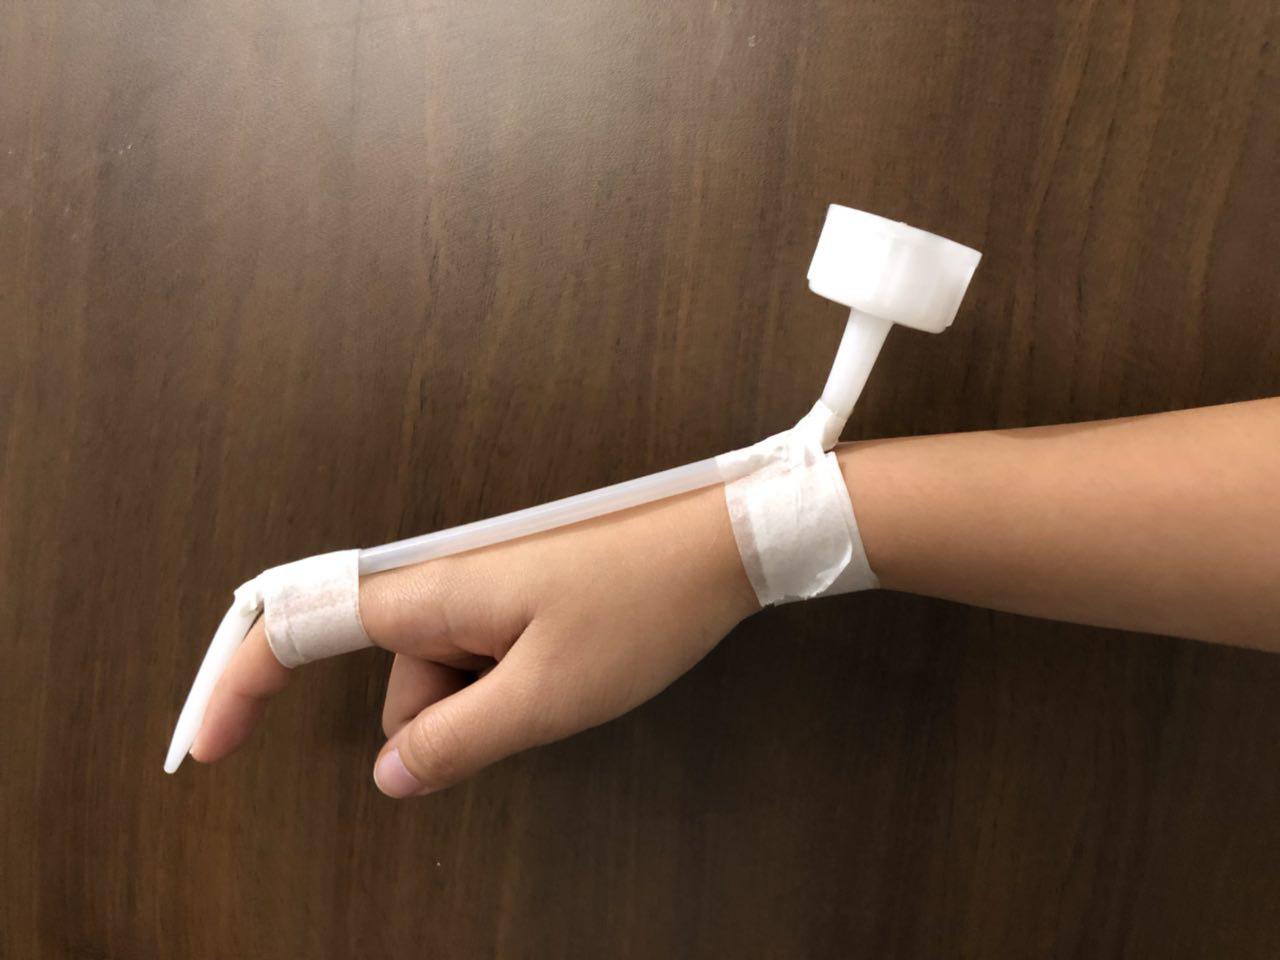
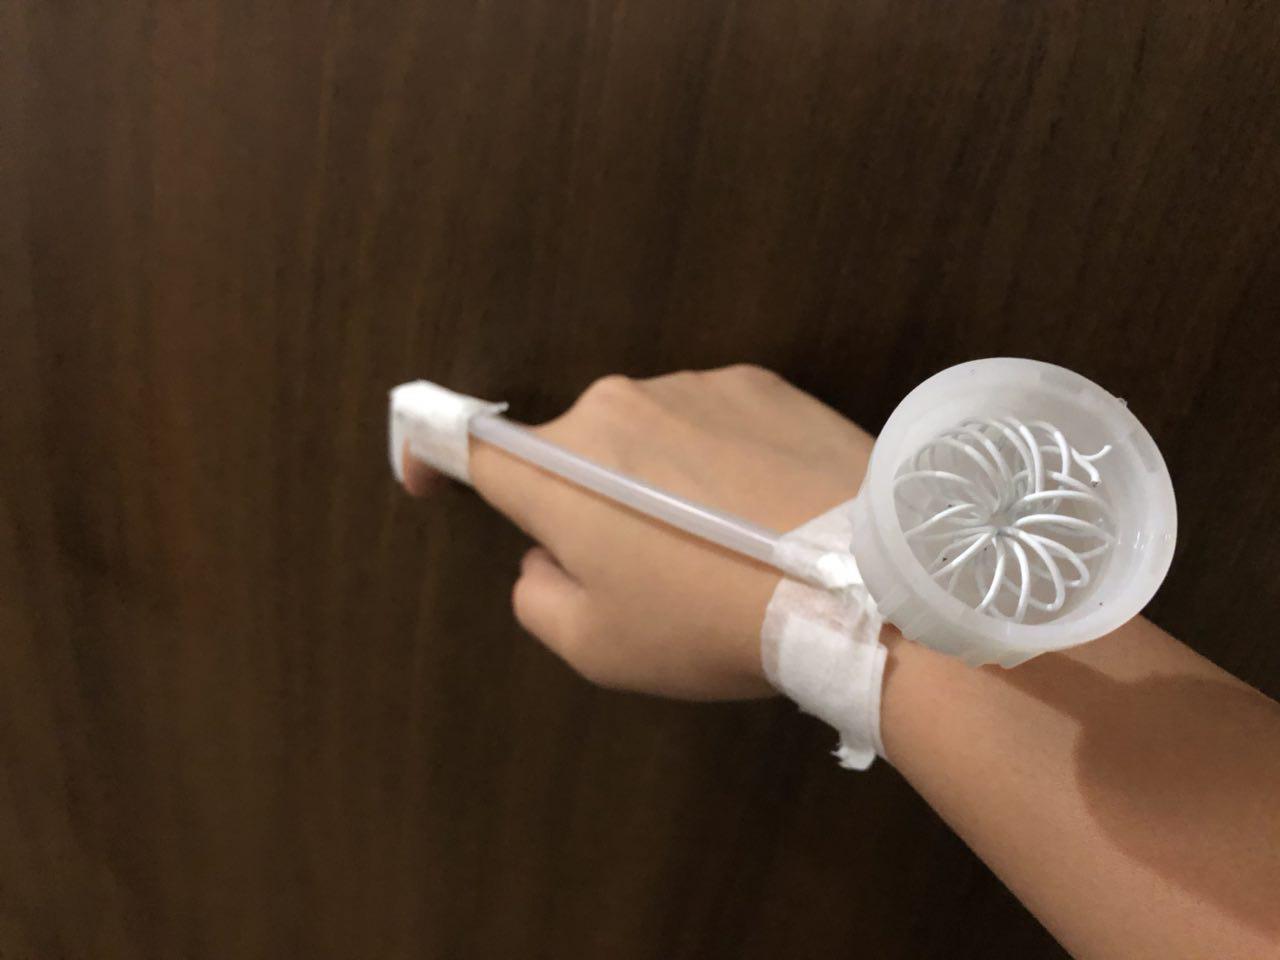
Idea 1: Latte Art Finger Stylus
I wouldn’t say the baristas at the cafe had a problem with making latte art (since that’s what they were trained for after all), but I came up with this idea of having a portable, wearable and possibly easier way to make latte art since it capitalizes on the intuitive gesture. The small well with a spring milk frother has an electric heater (to heat the milk) rests on your wrist and the contours of your hand allows the foam to flow downwards easily. Ideally, the nozzle would be made of stainless steel – like the ones on the Espresso machine and also the material of the milk pitcher Baristas usually use for latte art.
This contraption could attach a second tube/nozzle on another finger so that Baristas could use two fingers to make interweaving patterns. Alternative to milk, perhaps chocolate would do well with this invention too.
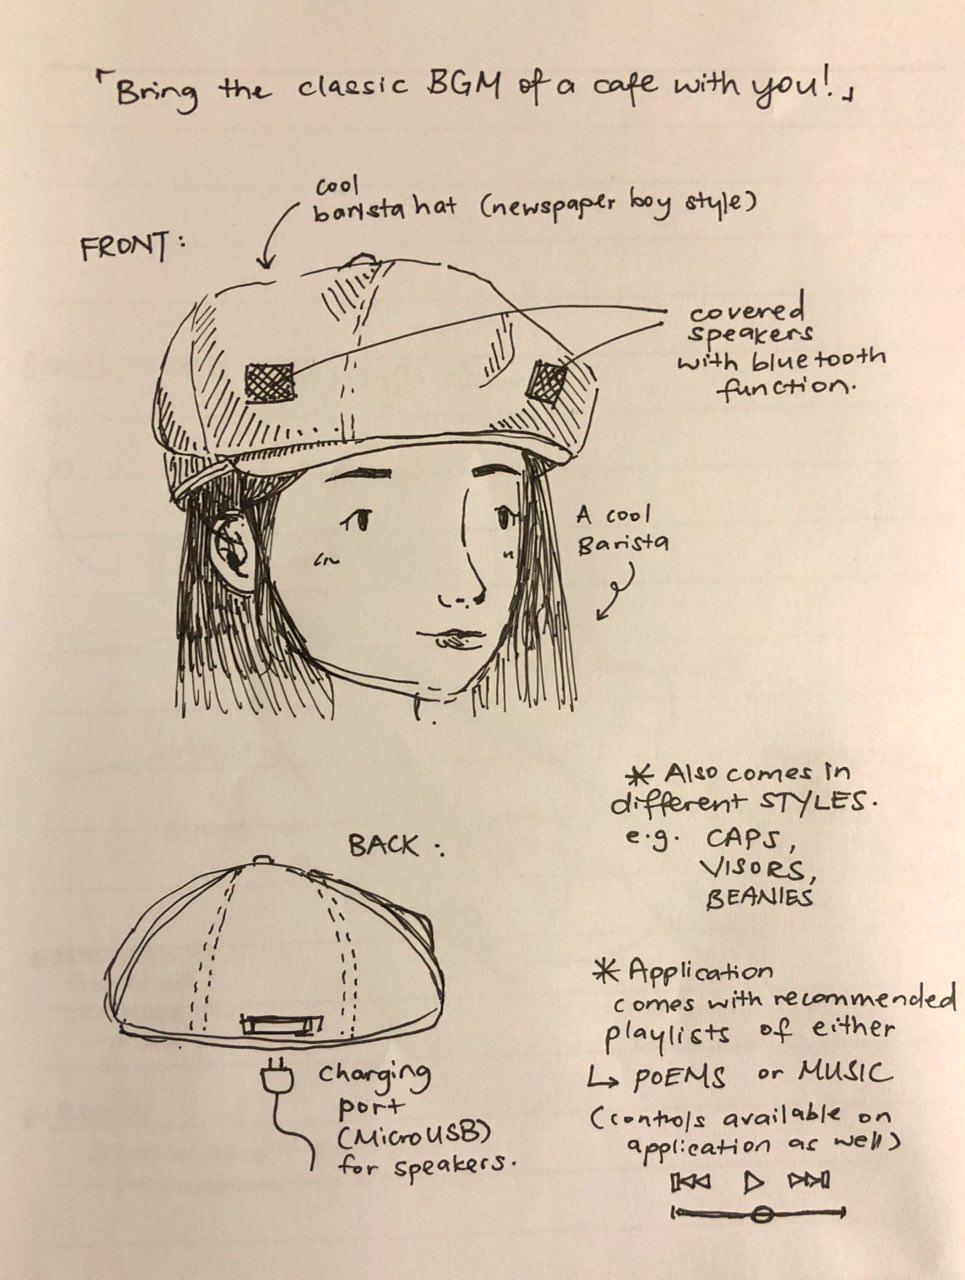
Prototype 2: Portable Cafe BGM Hats
One of the baristas I talked to in a cafe briefly chuckled about how he became a barista because he wanted to look cool. I used this thought along with the idea of how important cafe music was to set an ambiance. This Cafe Background Music (BGM) Hat helps baristas bring around a cool aura by playing music directly from the hat. It connects to an application via Bluetooth that comes with a playlist of poetry or chill music.
I tested this by attaching my wireless Bluetooth-connected earpieces to a hat (only on the outside for a prototype) and blasted music. (my images have been corrupted and hence I currently don’t have any for them) It worked but it wasn’t loud enough and if I had to work on this further, I would look into making small speakers light enough not to weigh down the hat.
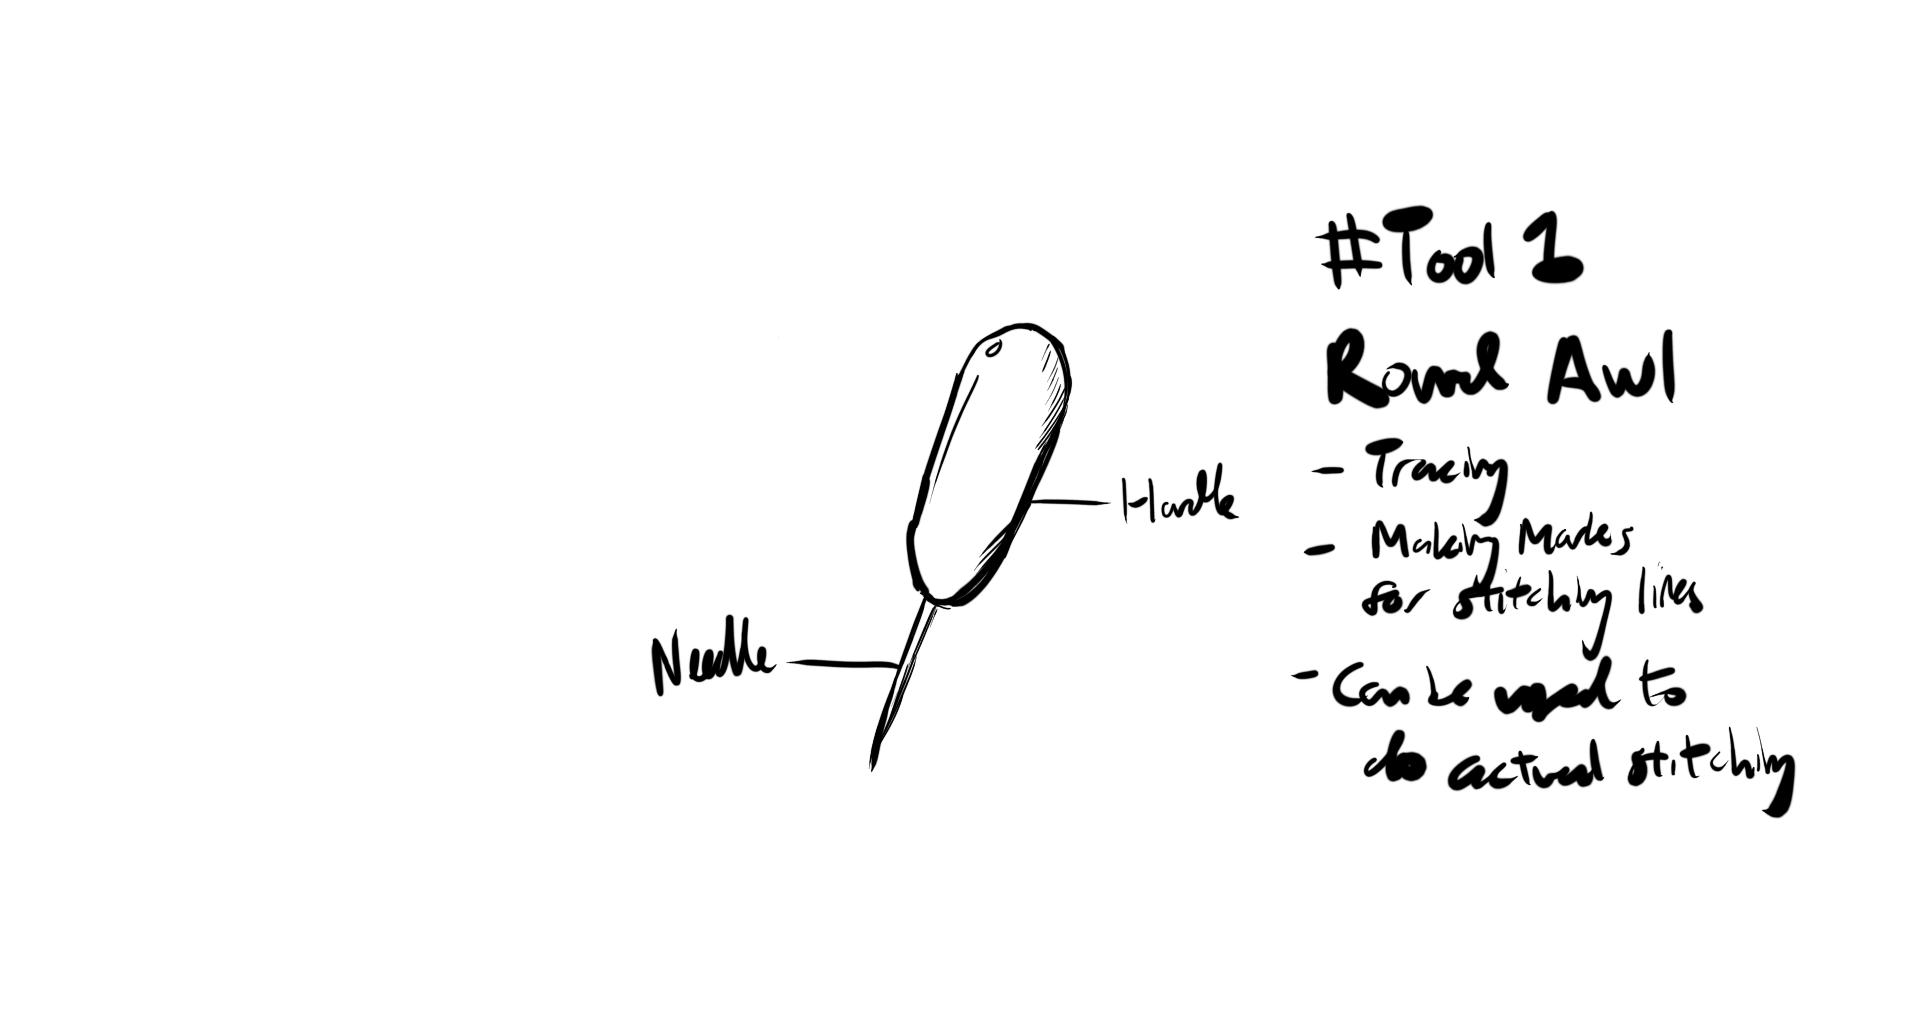
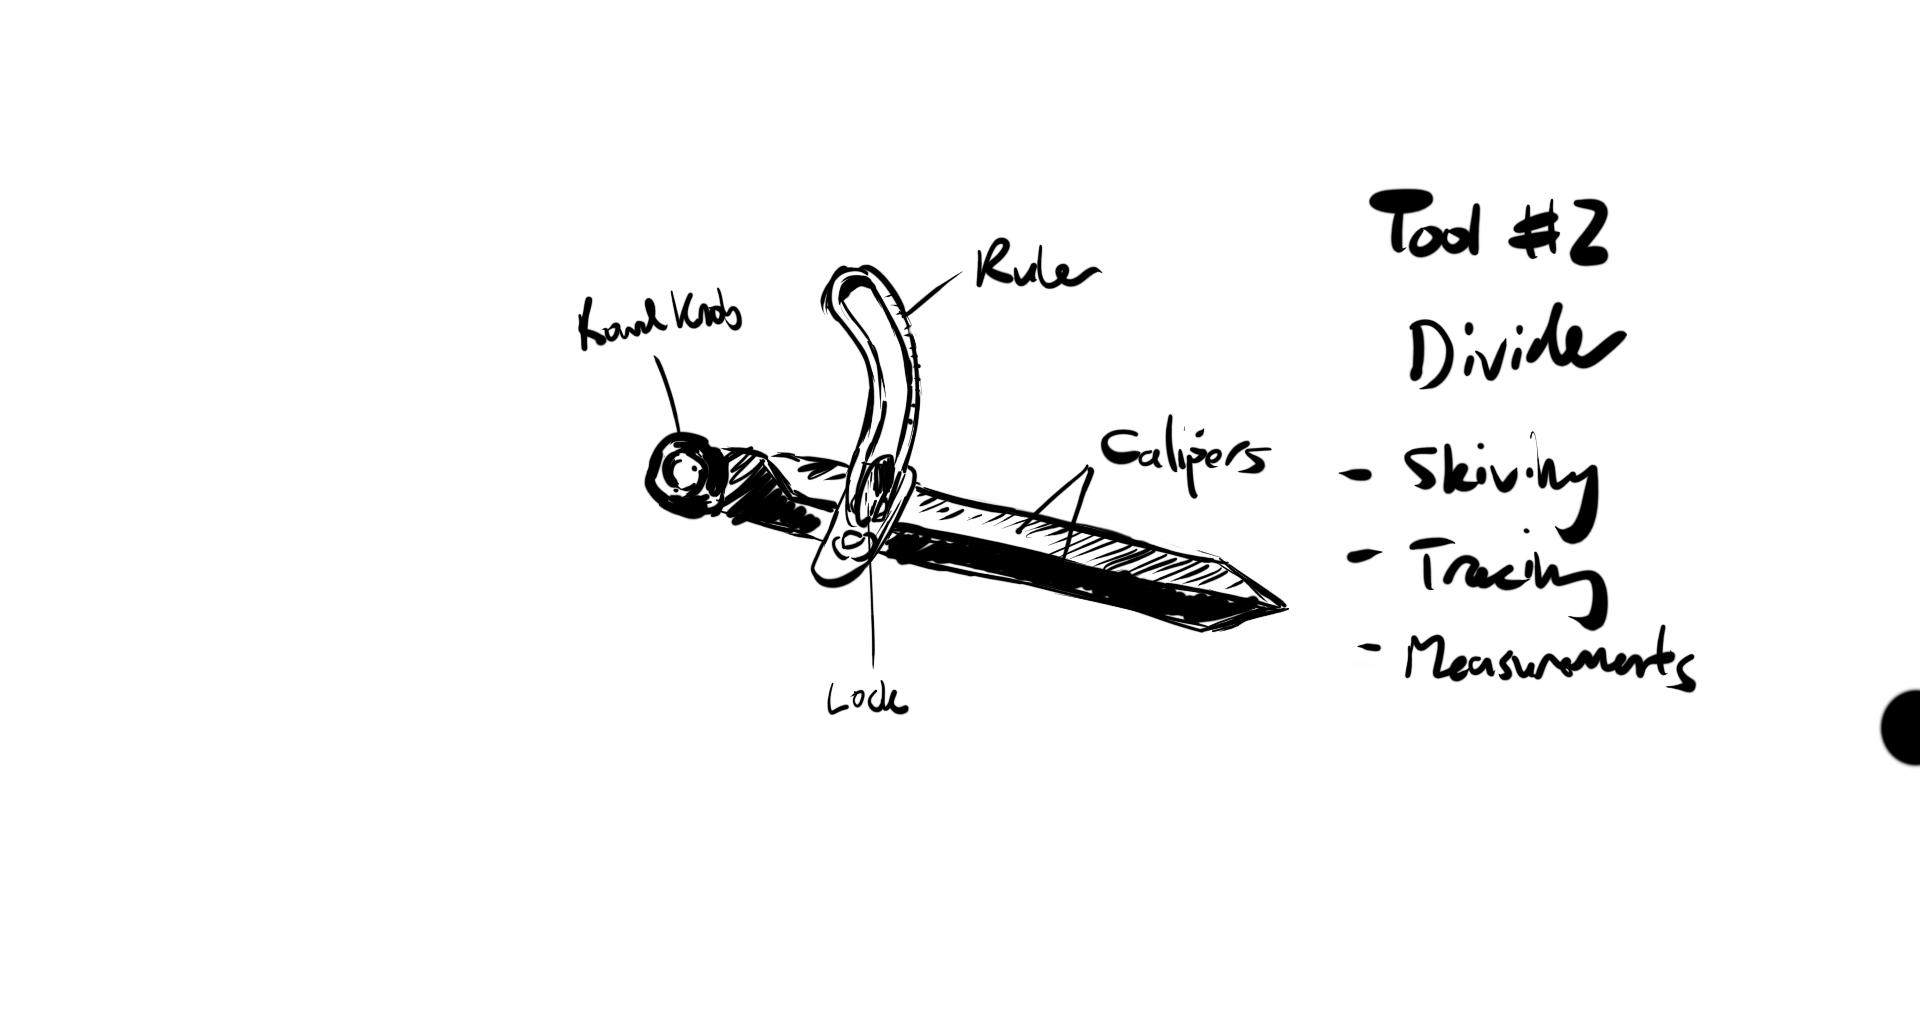
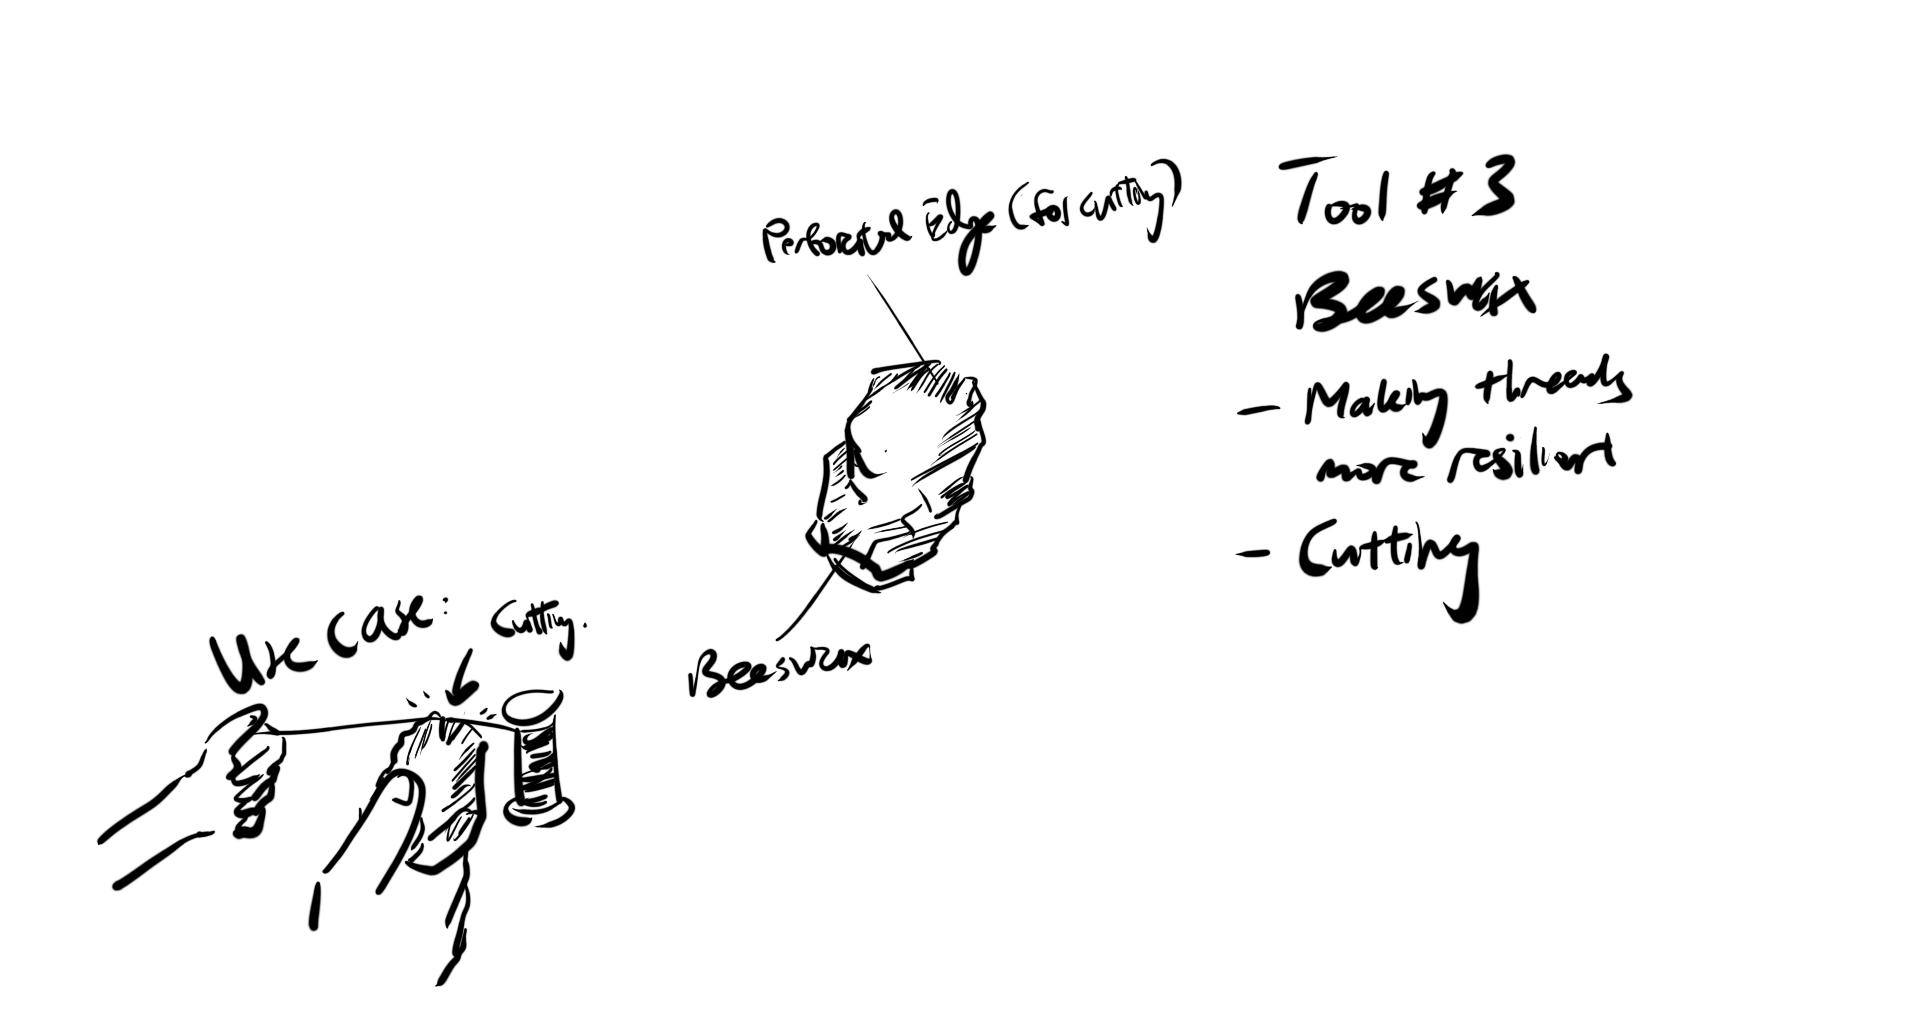
ToolsUsed 1. Round Awl 2. Divider 3. Beeswax 4. Pricking Iron 5. Cheese Boy (Glue Container)
The Round Awl utilizes skiving to make markings on the leather.The Divider is useful for skiving as well, but more importantly, measurements.Beeswax have a special quality of enhancing leather threads and making them more resilient.The Pricking Iron is useful for fragile leathers as it smooths the fur residue through heat.The Cheese Boy provides special air-tight concealment as the type of glue used in leather easily hardens.
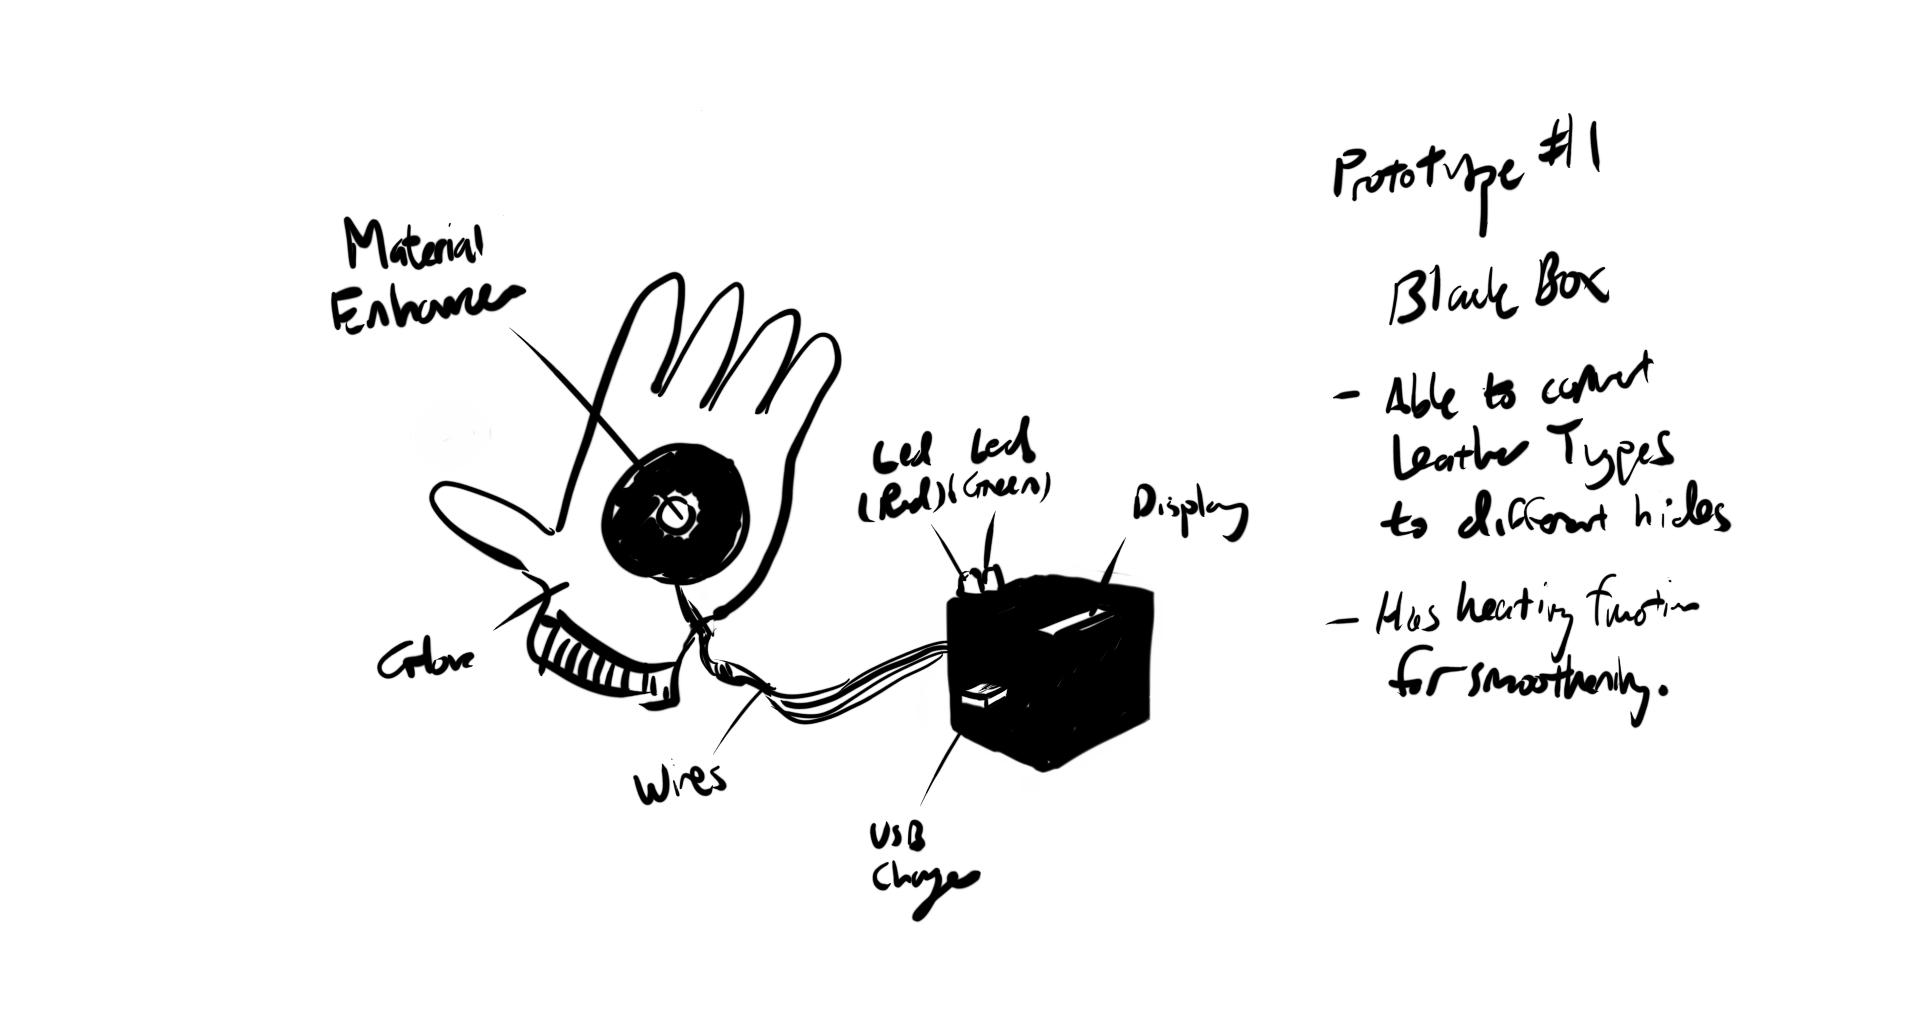
Model For the model design, I focused on enhancing the futuristic experience of the Pricking Iron, whereby instead of simply smoothing out surfaces on the leather. The product is also a wearable which allows for better control over the areas in which the user wants to target for smoothing. Furthermore, the product also tells the user what type of leather is being used and is shown on the display. The LED lights of red and green inform the user of the heat applied and whether the task is complete and also as indicators for when the product is fully charged and ready for use. Delving a little further into the fiction, the product could potentially transform leathers on command to the type the user wants.
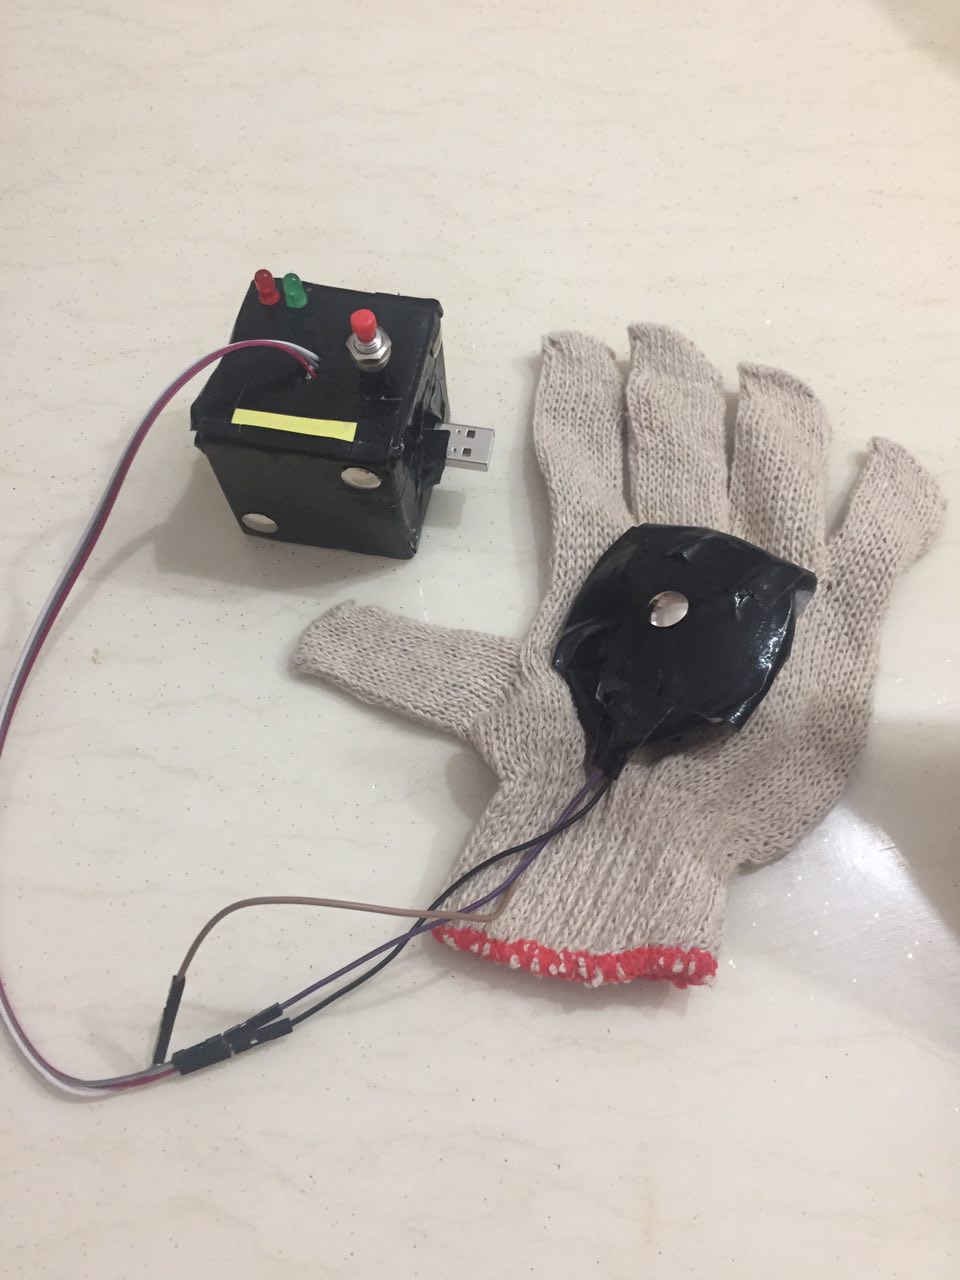
Model SketchWorking Model
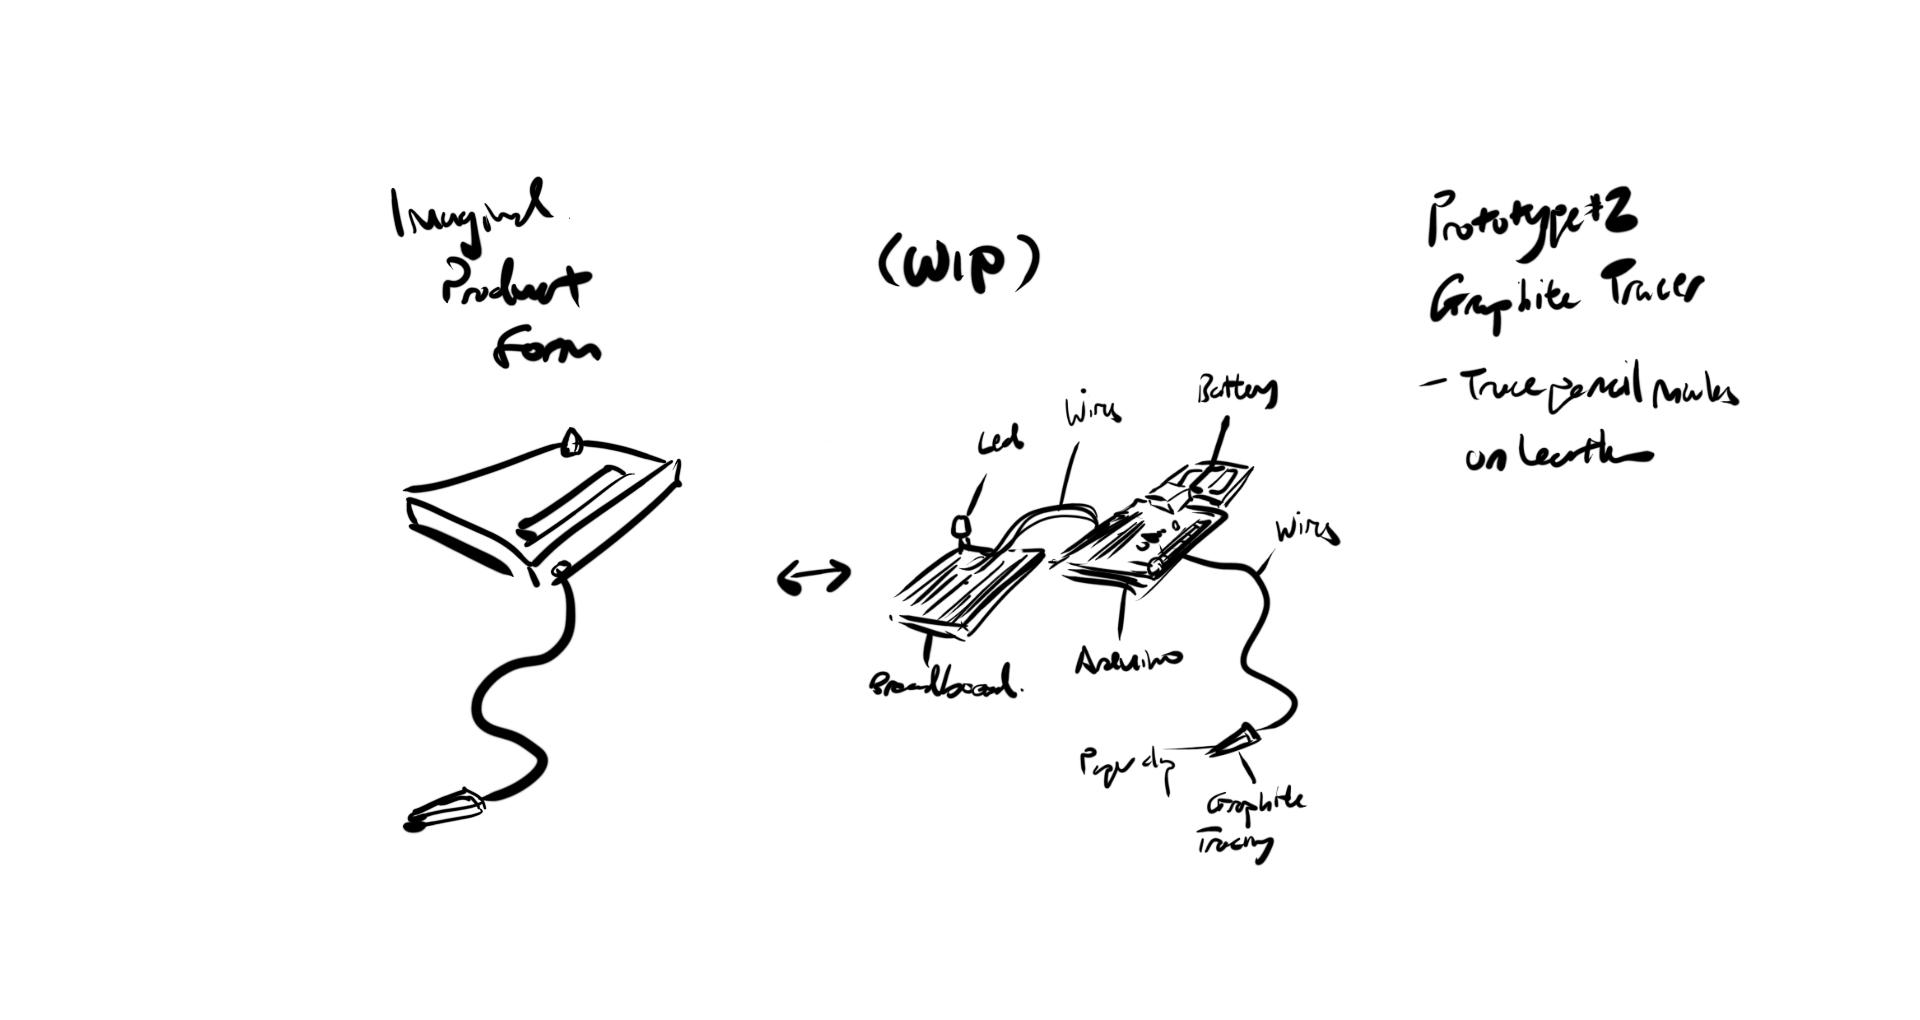
Prototype For the prototype, I wanted to make something that was actually useful to leather makers. So I focused on the act of skiving and tracing, inspired from the Round Awl and the Divider. Skiving is the act of making marks on the leather for tracing and cutting. However, skiving long and intricate designs on leather tend to result in the skives made disappearing before the trace is complete hence leather makers sometimes utilize pencil markings instead. To aid this act of cutting along pencil markings, I made this prototype to perform with capacitive touch, whereby so long as the knife used by the user is tracing and cutting the pencil mark accurately, the LED light will continue to stay lit. The moment it turns off, it means that the knife has gone out of the line, and the user can stop and adjust, resulting in a cleaner and more accurate cut of the leather.
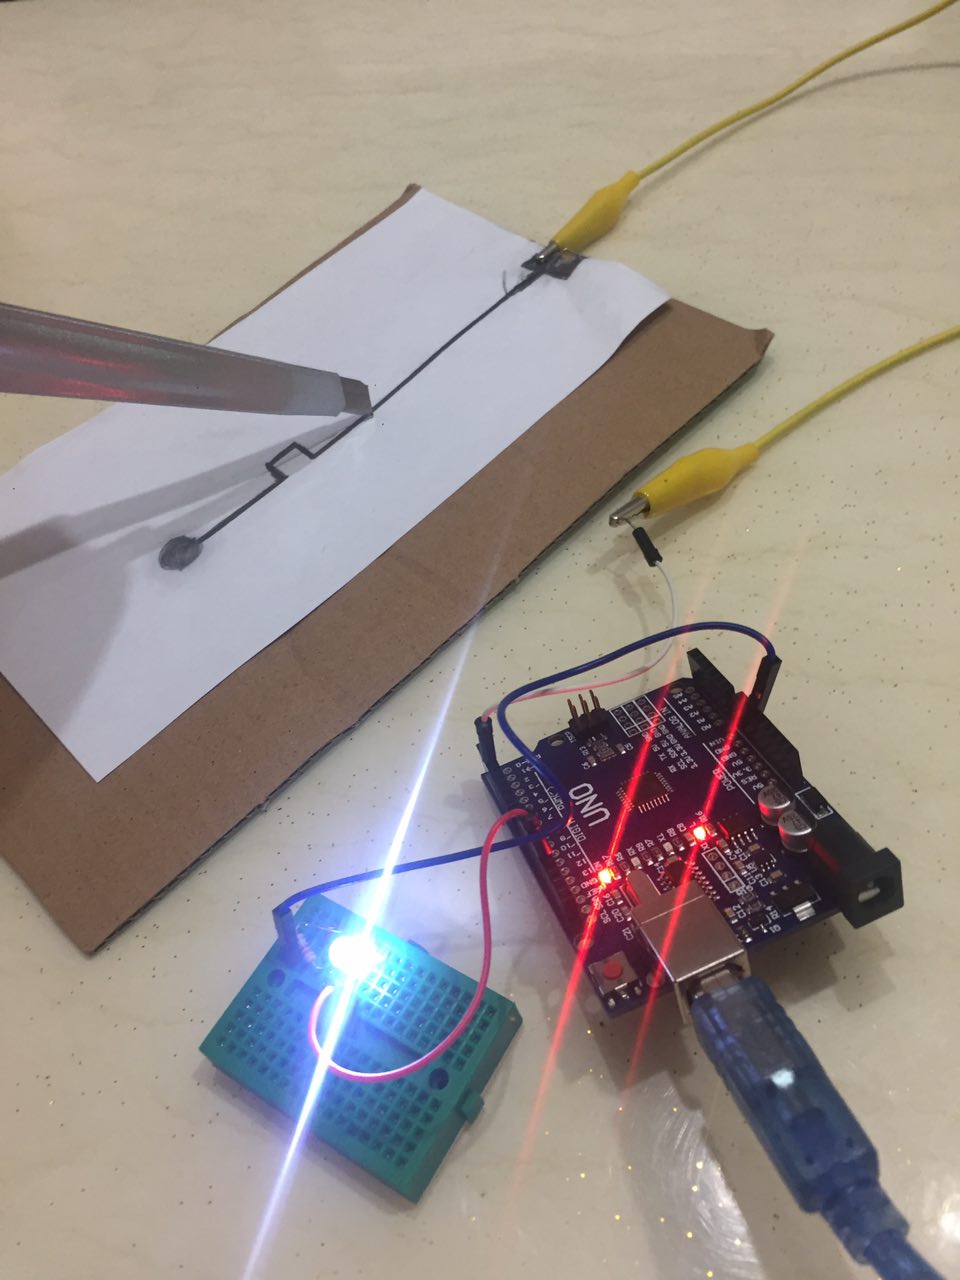
Prototype SketchWorking Prototype
Reflections Thanks to the exhibition, I was able to glean some useful feedback on my prototype. Instead of using light as a feedback to my user, sound would be a better choice as it removes the aspect of dividing the attention of the user from the focused act of tracing and cutting. After looking at the works of others, I also began to realize that my works are also too grounded in reality and I need to expand the fictional aspect of them as well to create a genuine story world that is not only believable but also fantastic.
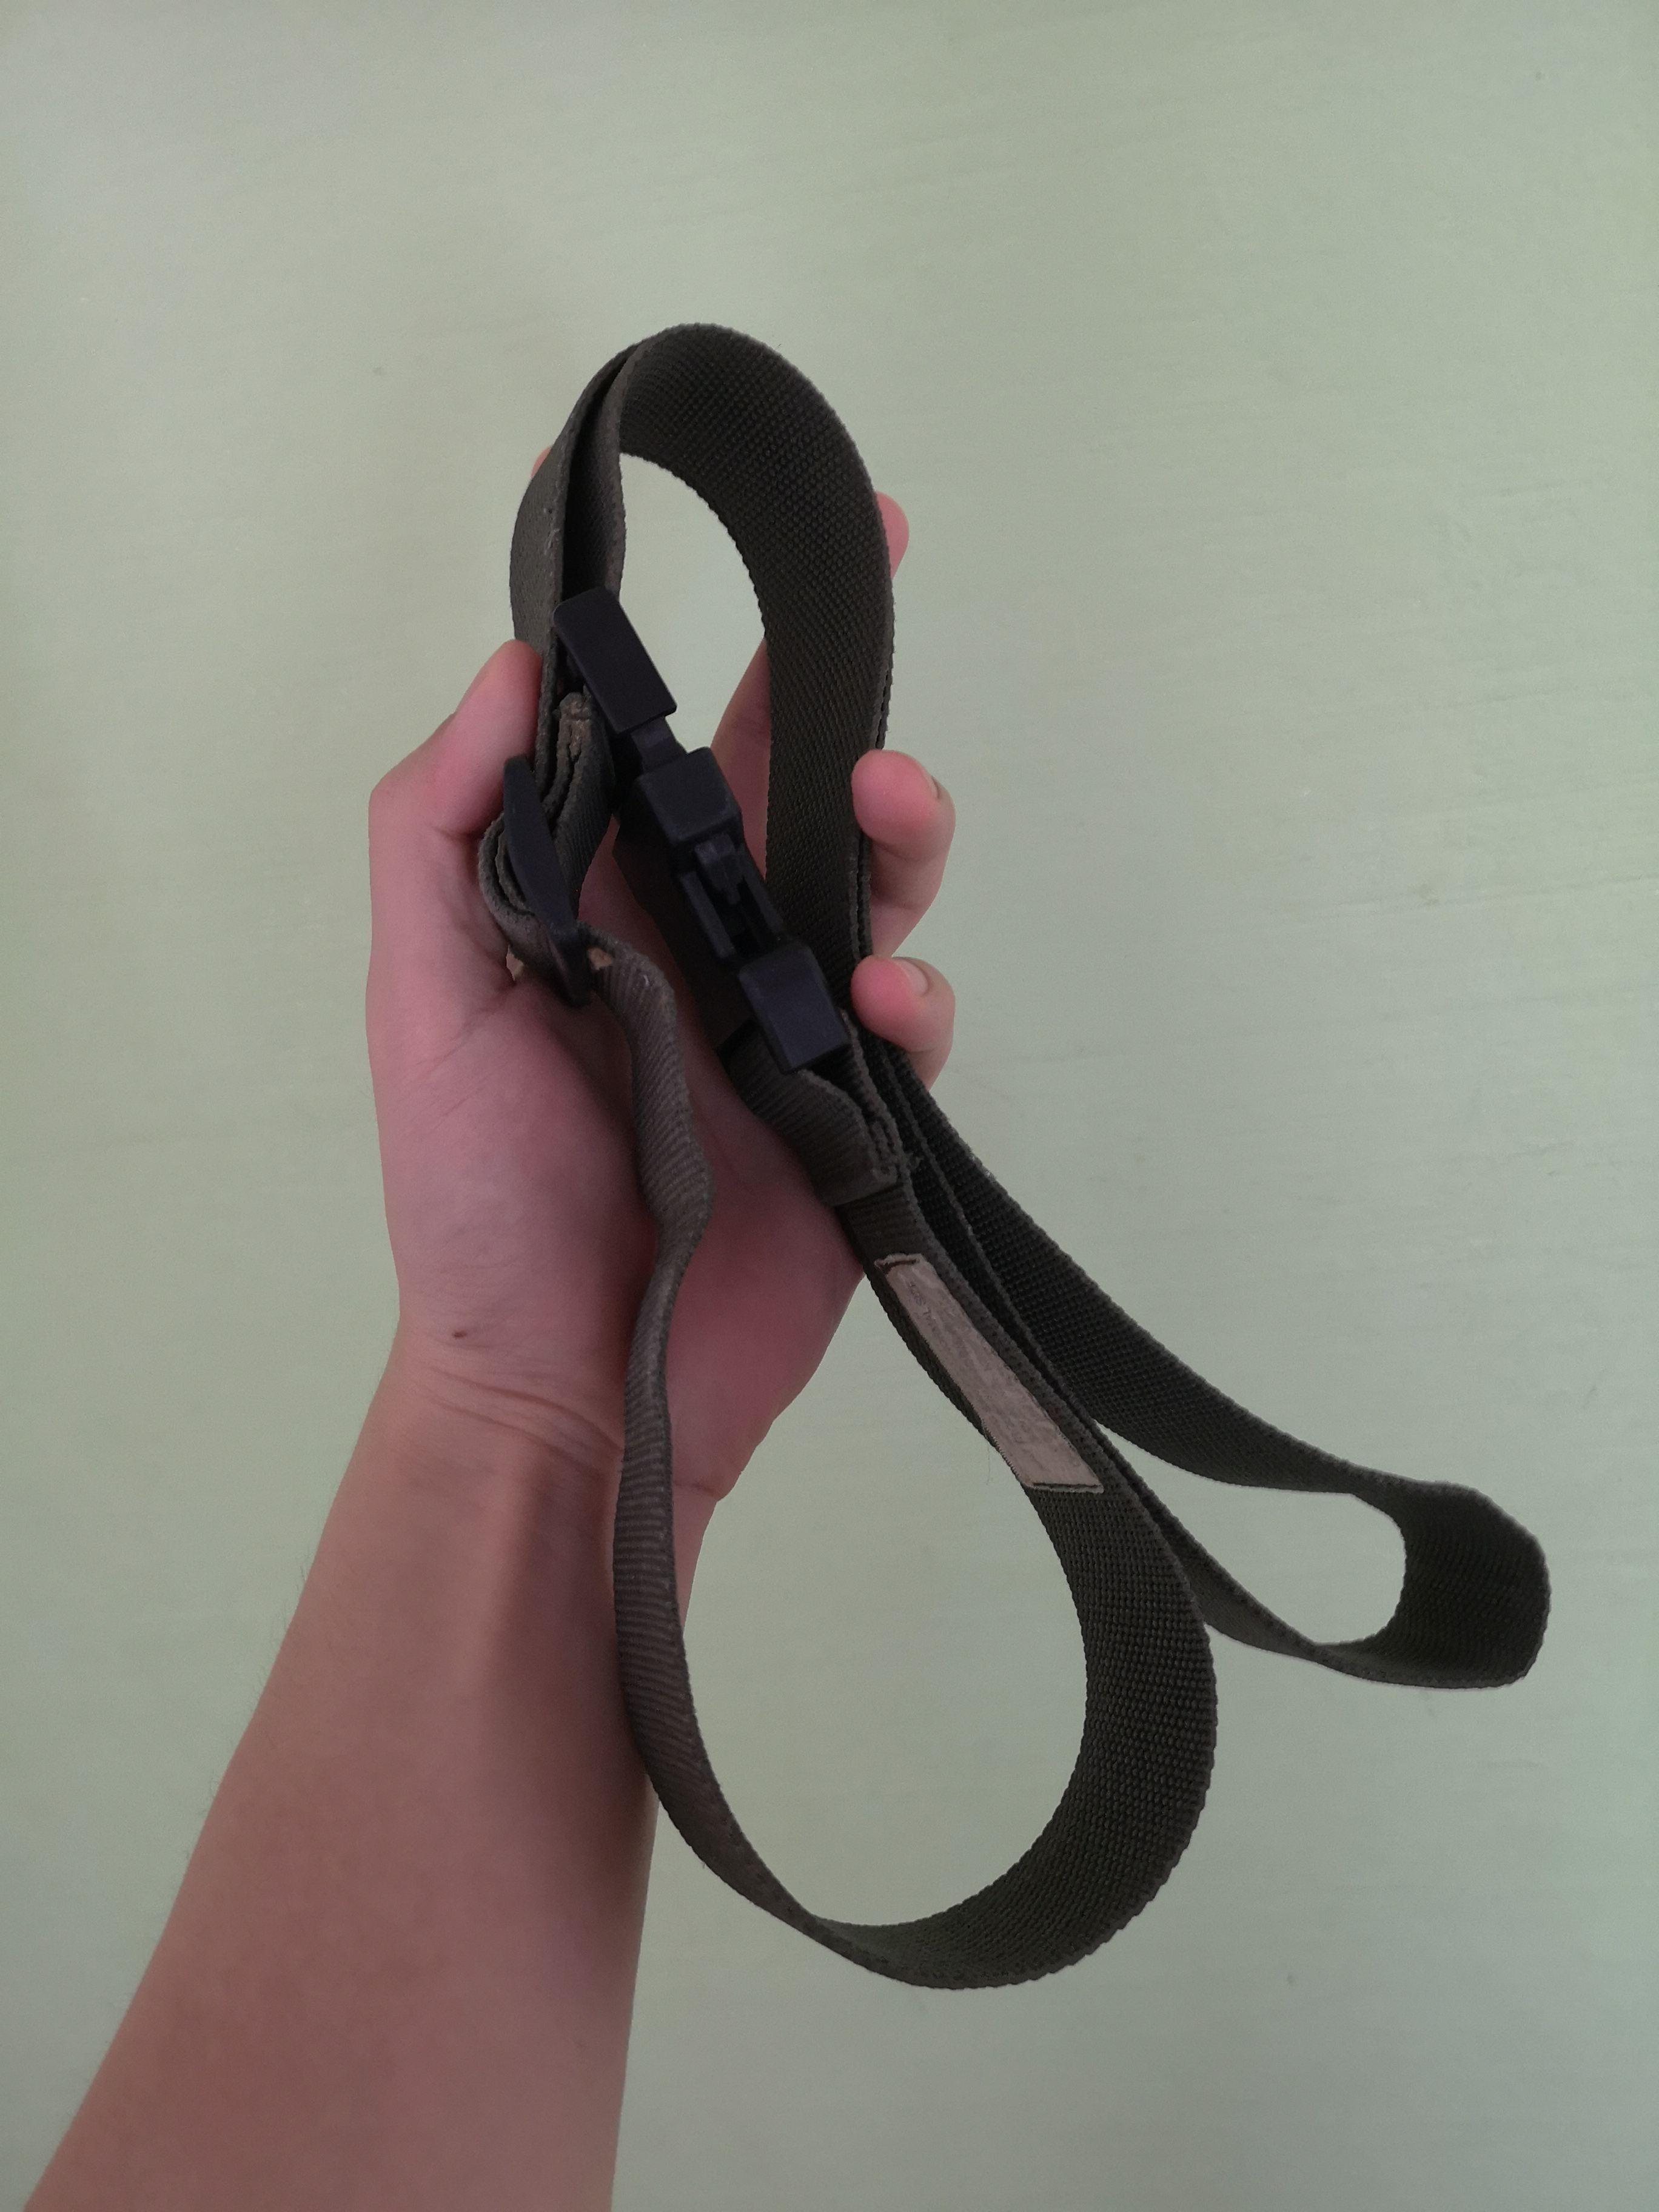
The idea for this “solution” was to create a device that would restrict the movement of a dancer’s arms. I attended a Waltz class, and in this class we had to keep our arms up in a specific position for long periods of time. Dancers use elastic bands to stretch and train muscles, so I decided to create a prototype for a device that would serve to help dancers train their arm muscles by forcing them to have a harder time keeping their arms up. I mimicked the position of the elastic band that would go around the arms of a dancer using two belts attached to a body suit.