Online Documentation:
https://ministryoftattoo.wixsite.com/home
Print Documentation:
https://drive.google.com/open?id=1cYDO8ktzb0ymI_nN7zqmQpjvDt-G6hNP
Product Video:
https://drive.google.com/open?id=1Wb M3BKZDCw9edVR18QgU_k3o1O5gnoA

Based on work by Hannah Perner-Wilson, Andrew Quitmeyer, Rad students, and more!
Online Documentation:
https://ministryoftattoo.wixsite.com/home
Print Documentation:
https://drive.google.com/open?id=1cYDO8ktzb0ymI_nN7zqmQpjvDt-G6hNP
Product Video:
https://drive.google.com/open?id=1Wb M3BKZDCw9edVR18QgU_k3o1O5gnoA
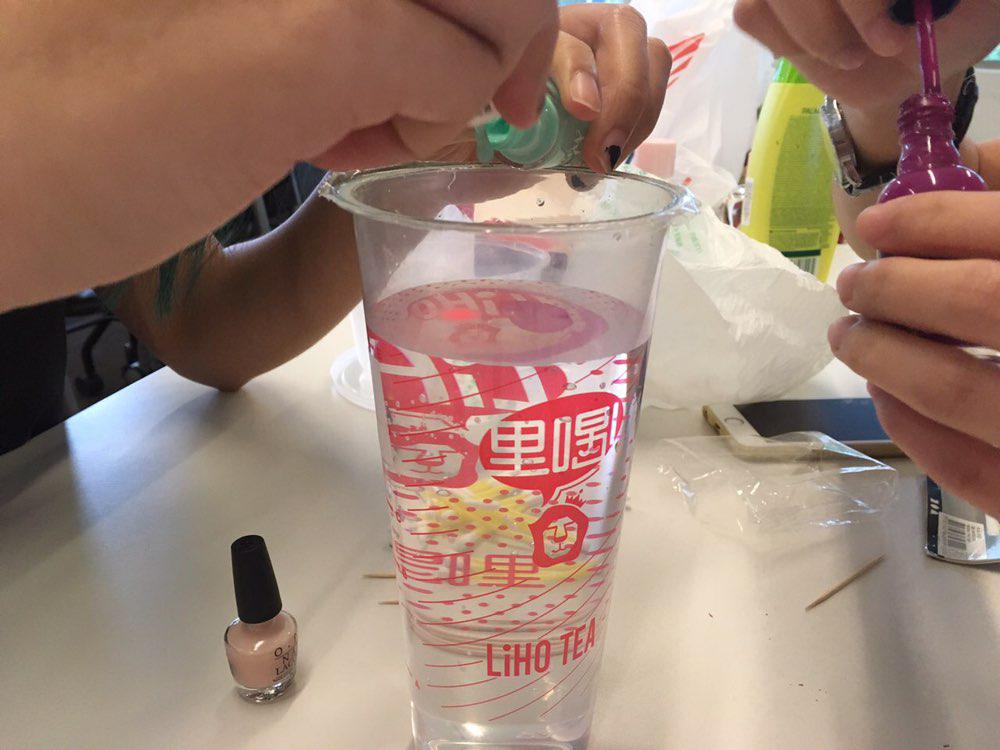
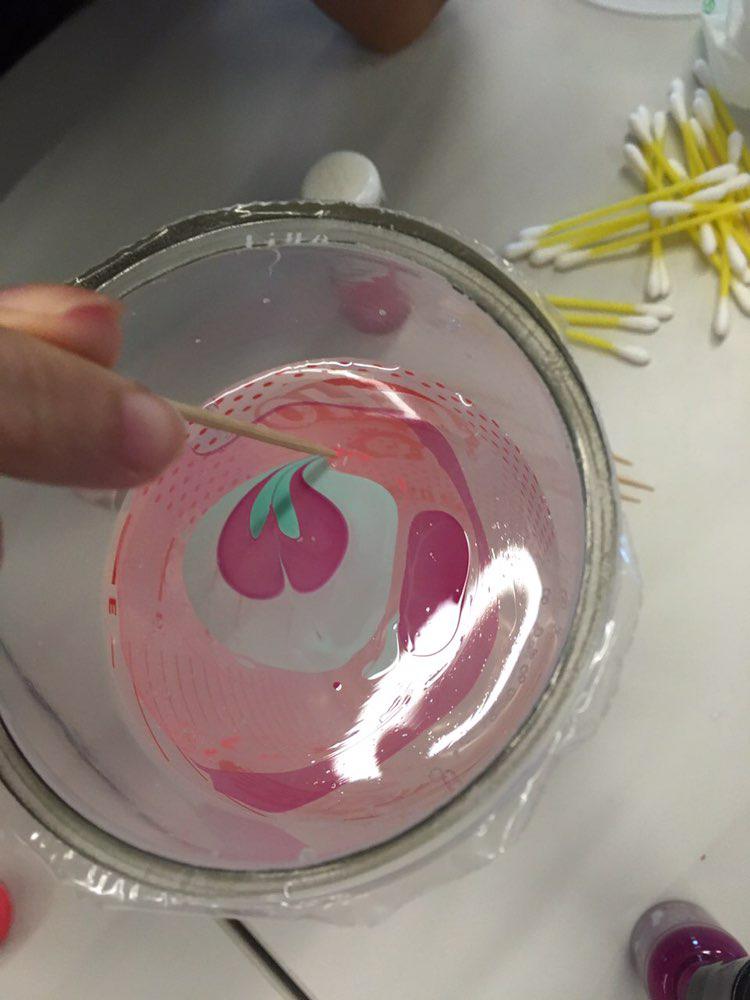
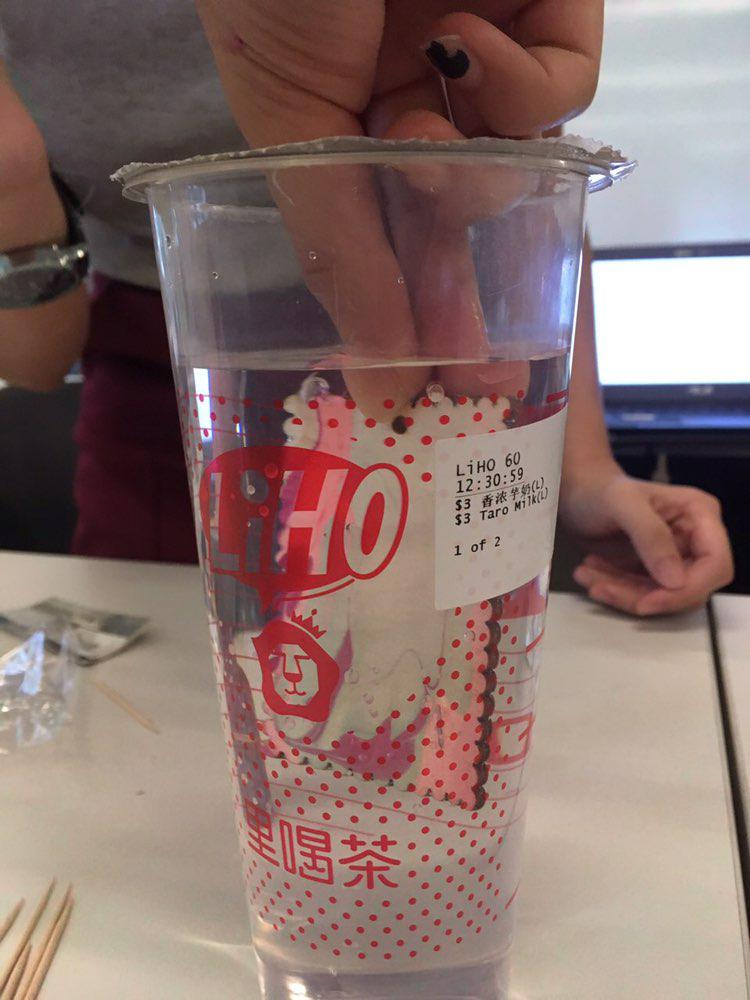
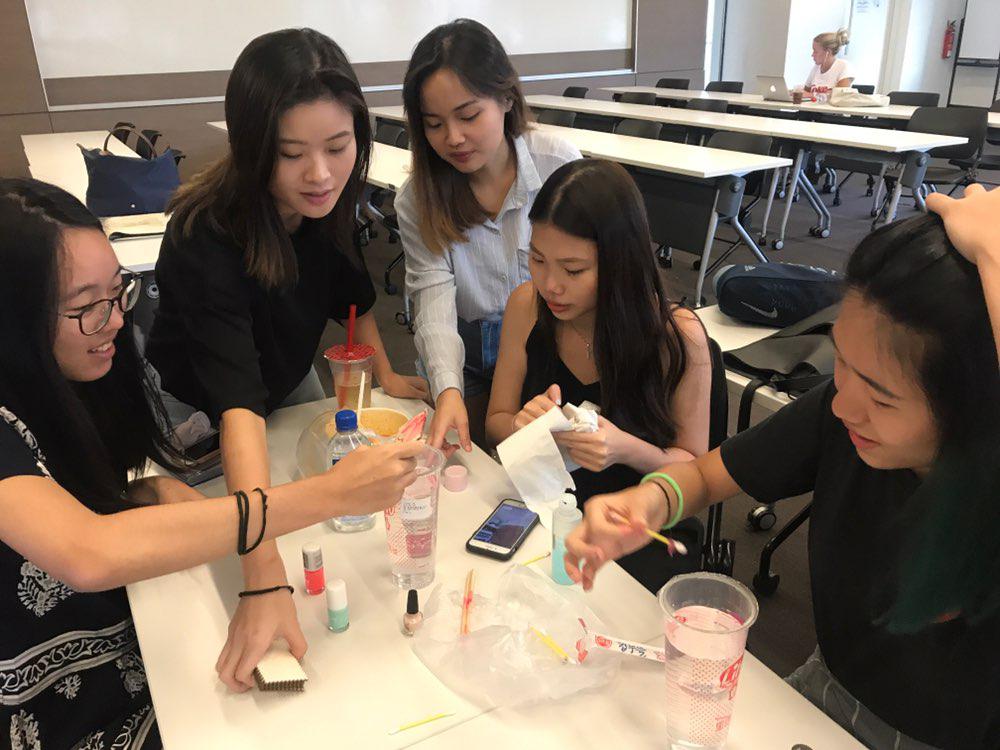
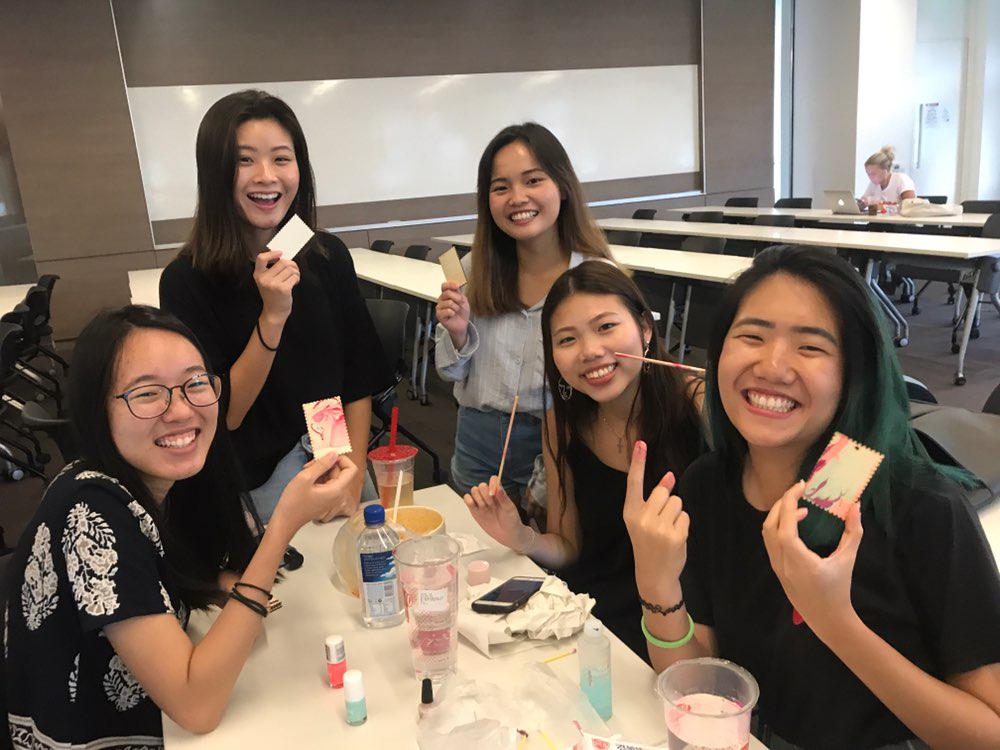
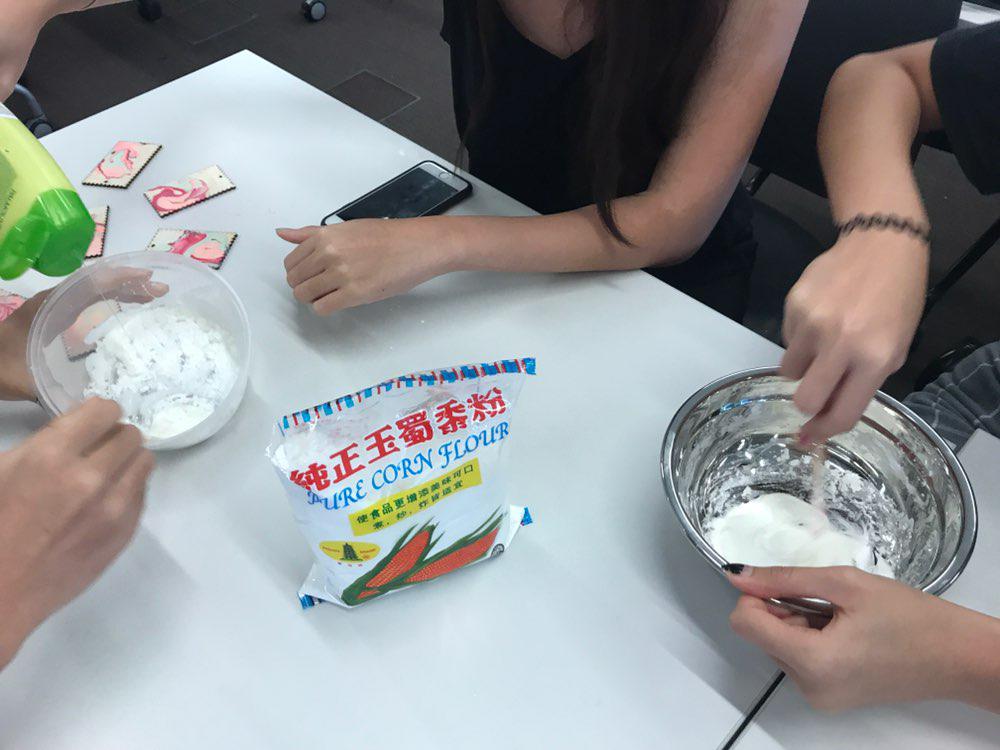
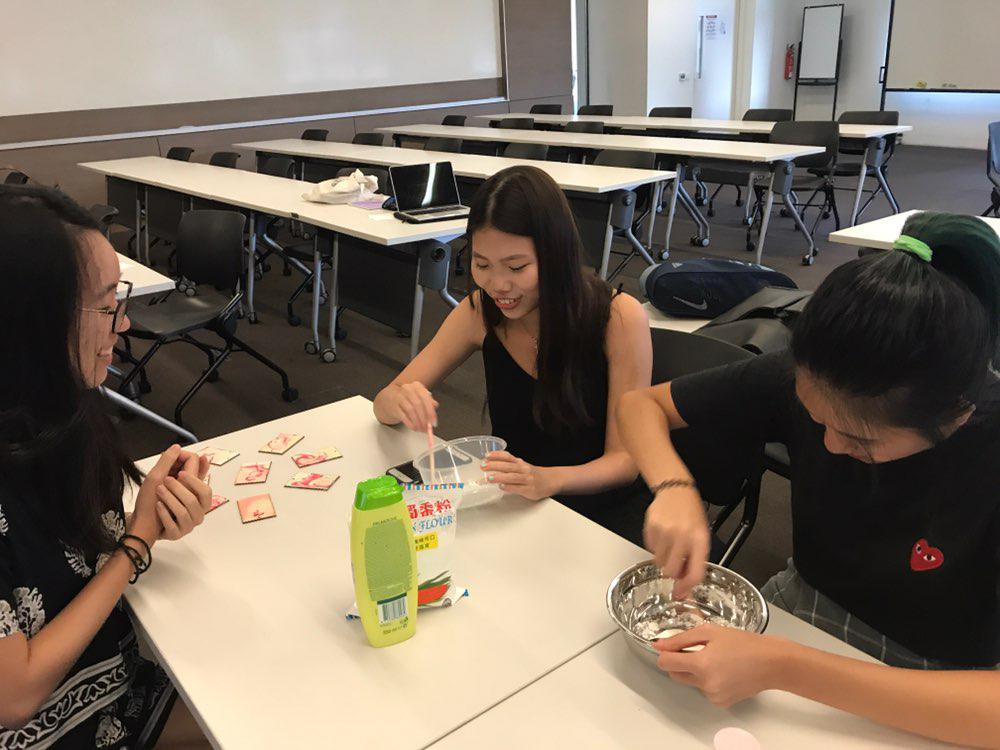
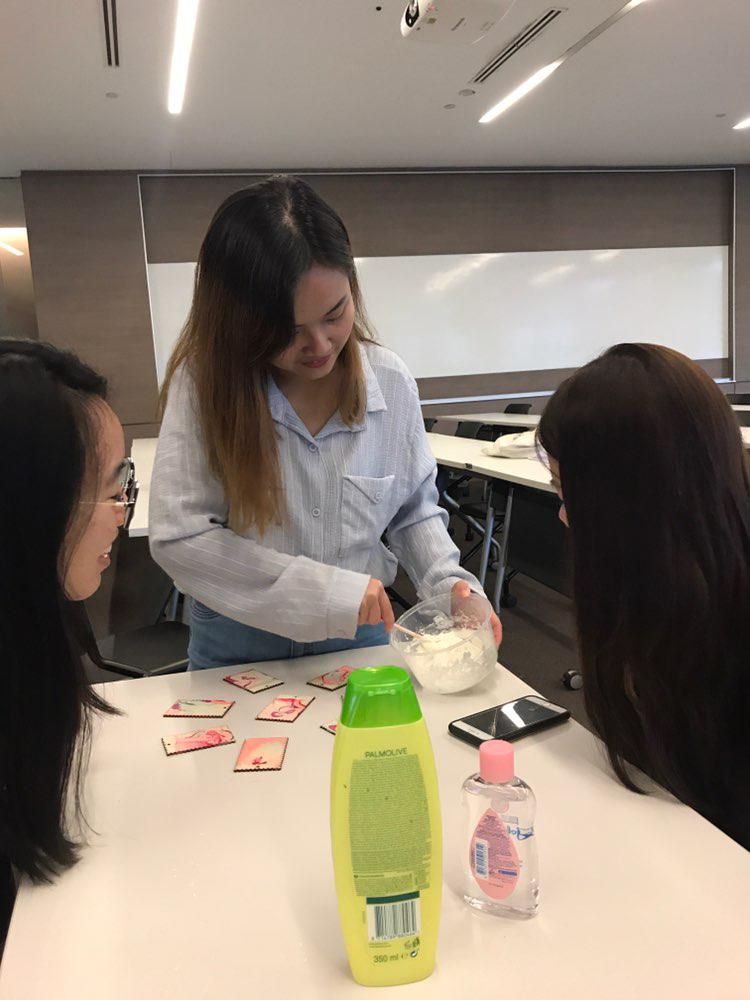
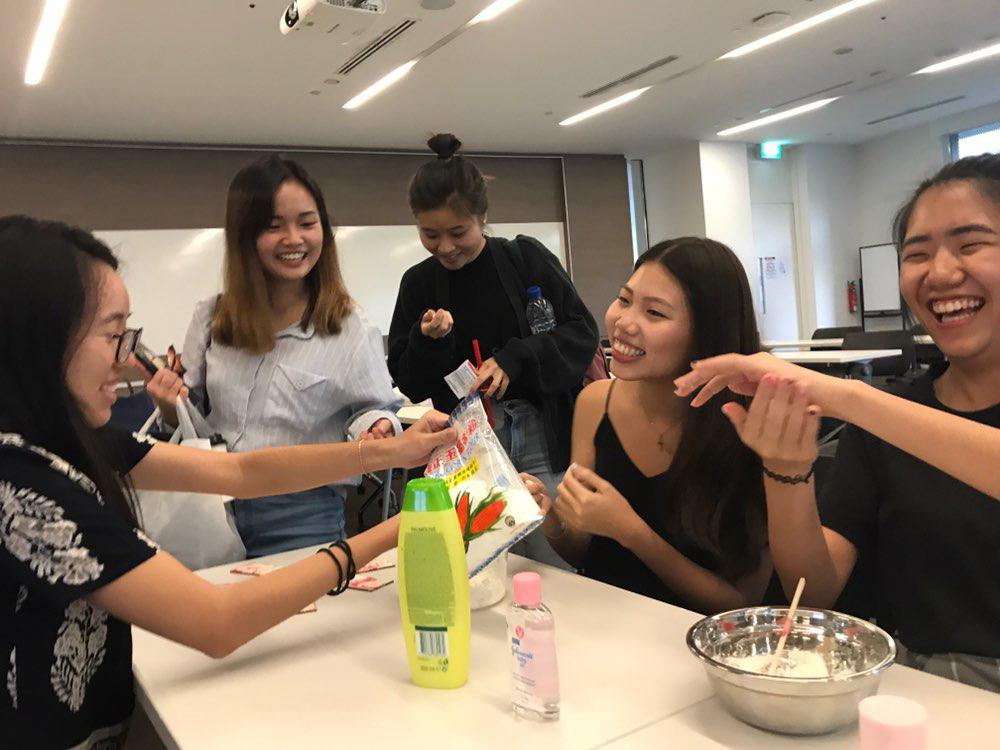
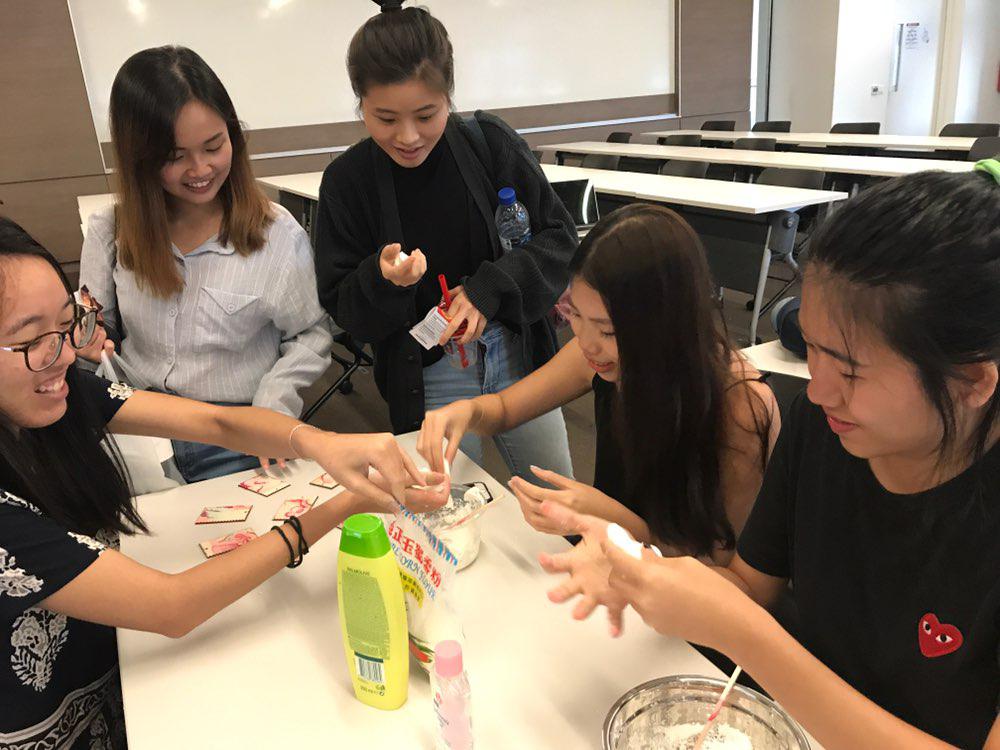
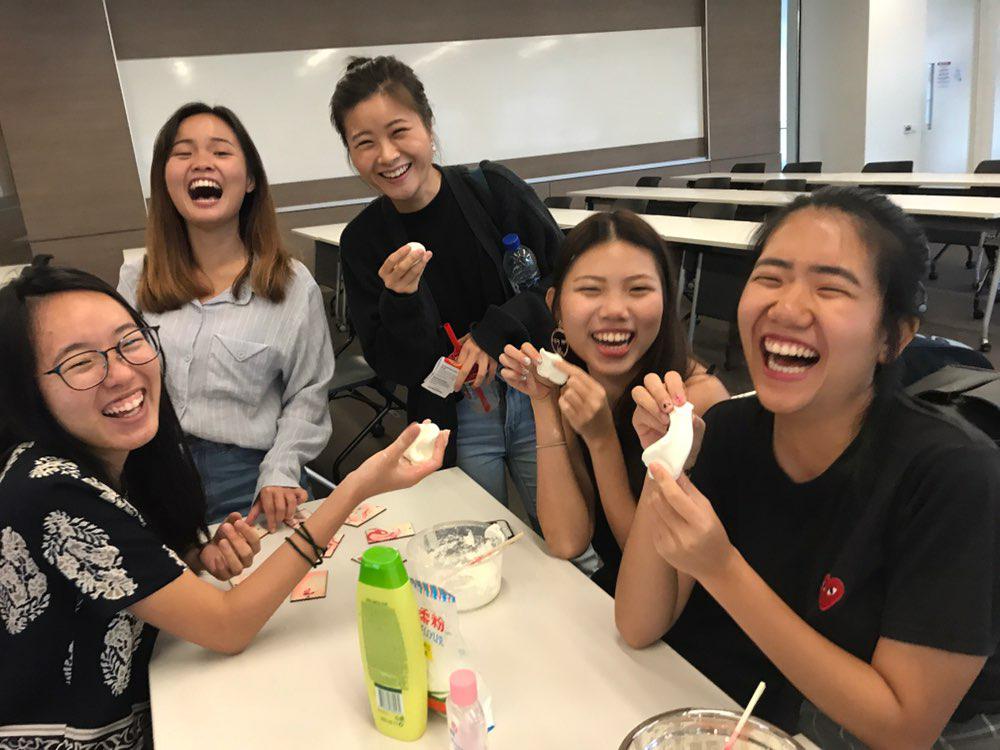
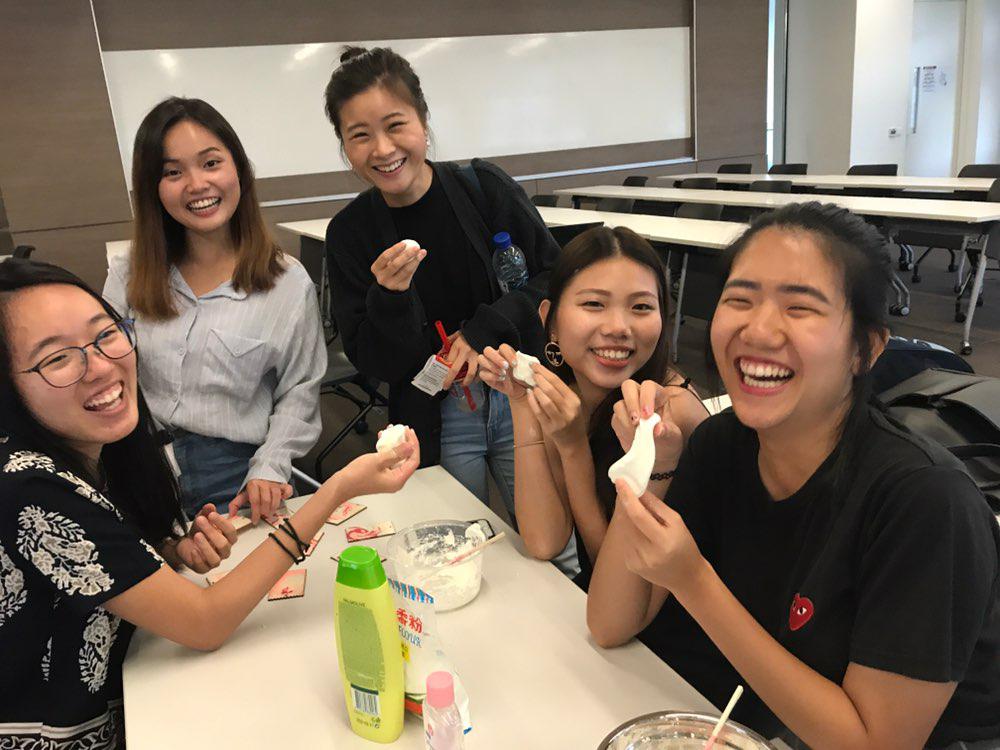
On Week 11, we conducted an outside-of-class workshop on Sensory Art. Sensory Art consists of hands-on activities that relate to our senses (touch, sight, sound, smell, etc). With materials that can be easily found at home, you get to stimulate your creativity and engage in free play. For this workshop, we had two different activities – Nail polish marbling and Butter soap making.
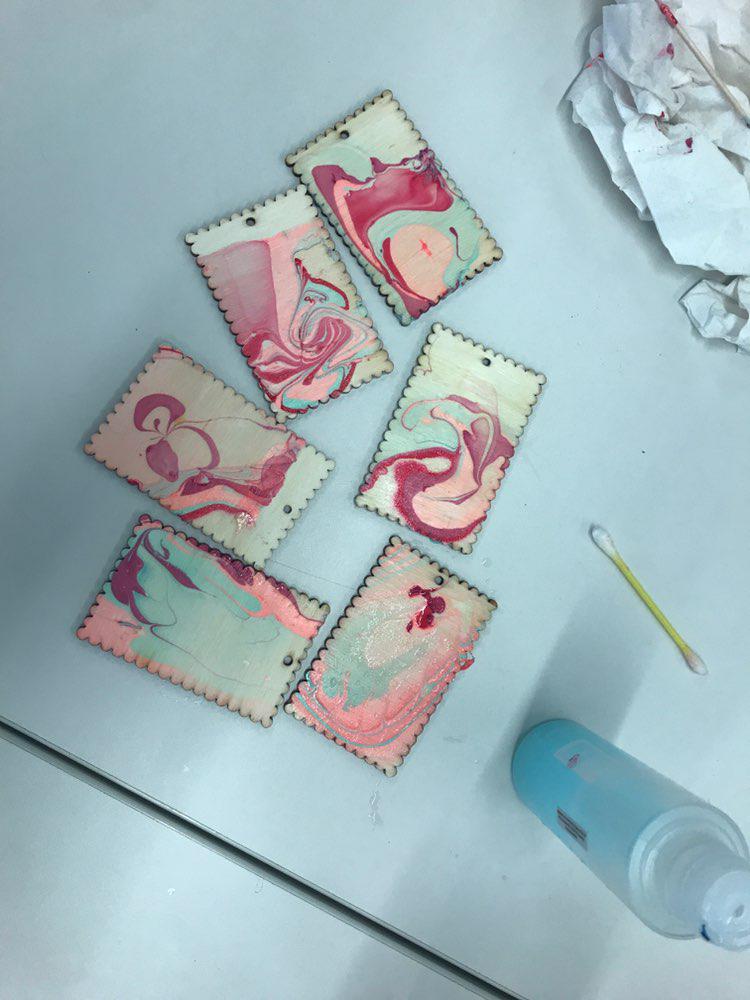
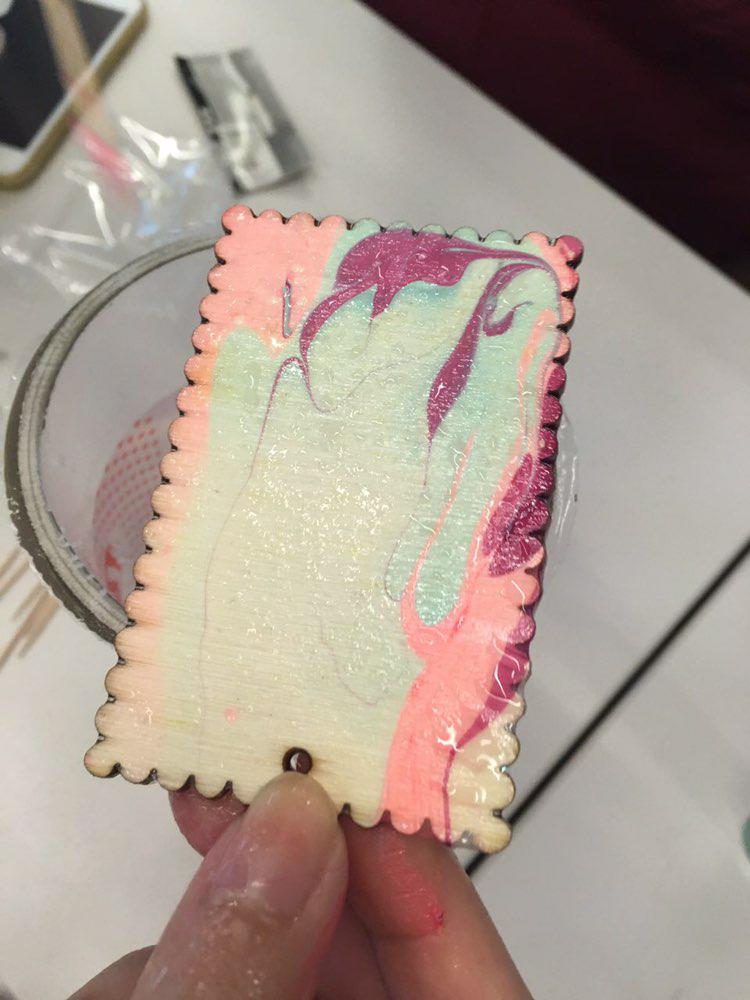
Nail Polish Marbling
Materials used: Cup, Water, Nail polish, Toothpicks, Item to marble

Butter Soap Making
Materials used: Container, Shampoo, Corn starch, Baby oil
The movie that I watched was Mr. Nobody (2009). It is about Nemo Nobody (yep, that’s his name) a 117-year-old- man who is the last mortal on Earth after the human race achieved quasi-immortality. Before he dies, he recounts his “past” when he had to make a critical decision and we get to examine the speculative narrative of alternative life paths he could have lived with three different women. Essentially, it is a story about choice and the ‘what ifs’ of life.
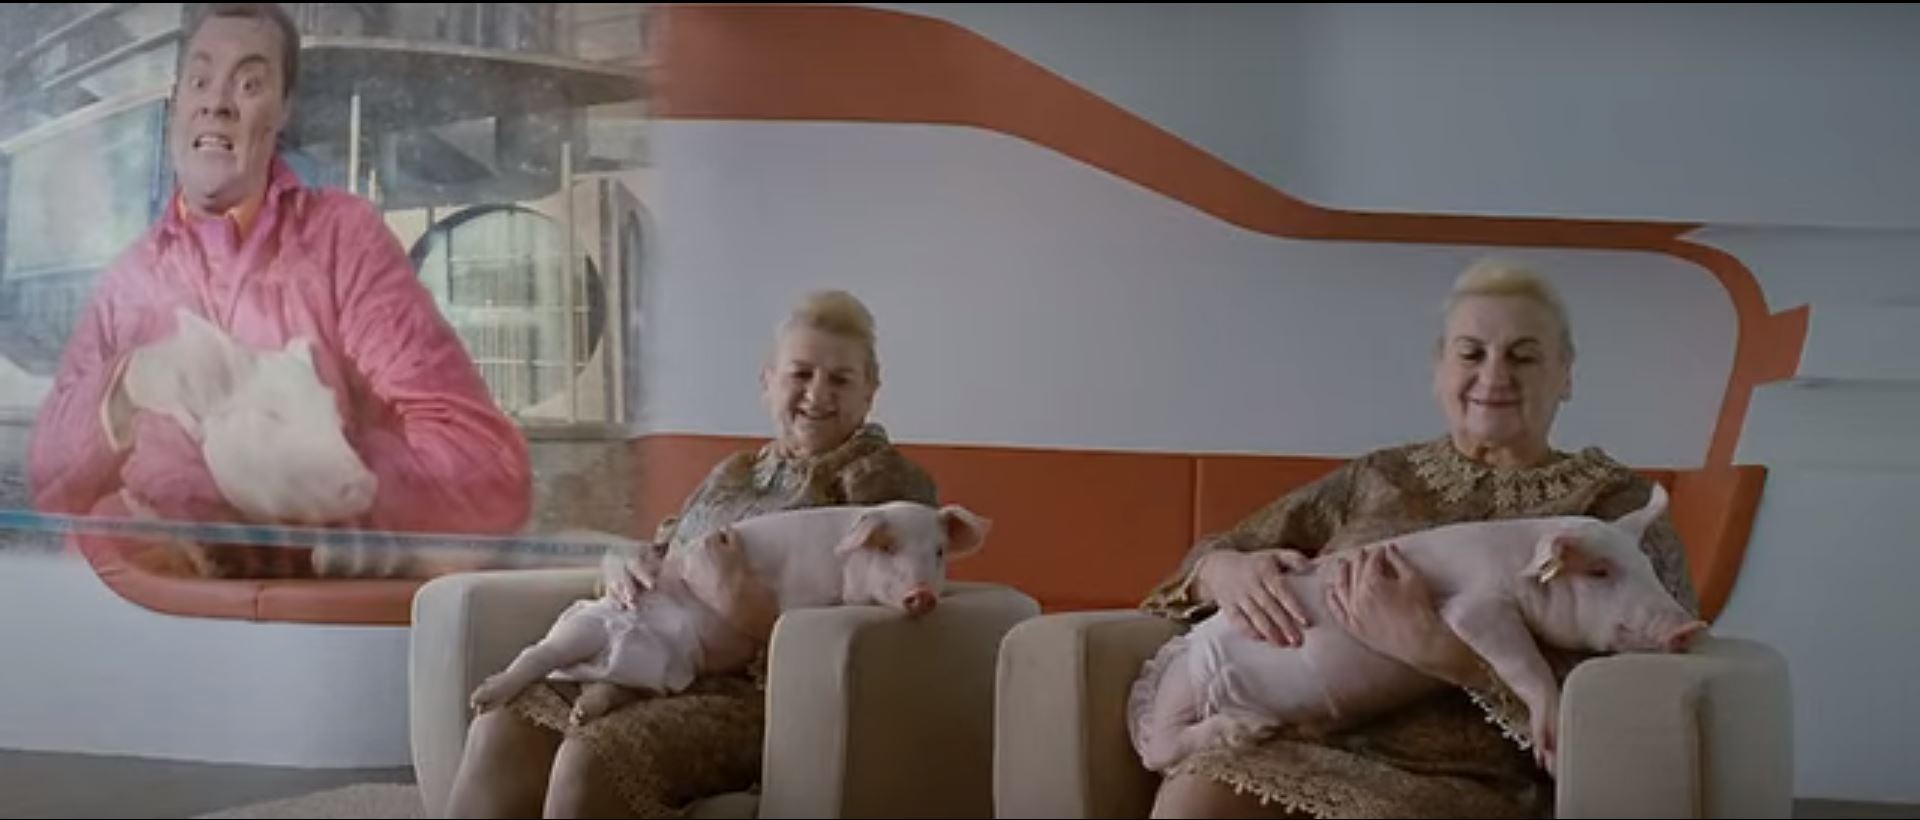
A small design decision that I noticed was the use of genetic pigs as the immortality technology in the year of 2092. Every person (except Nemo) has genetically compatible pet pigs. Instead of food, the pigs are harvested for stem cells which allow an endless renewal of cells and thus, everlasting life for humanity.
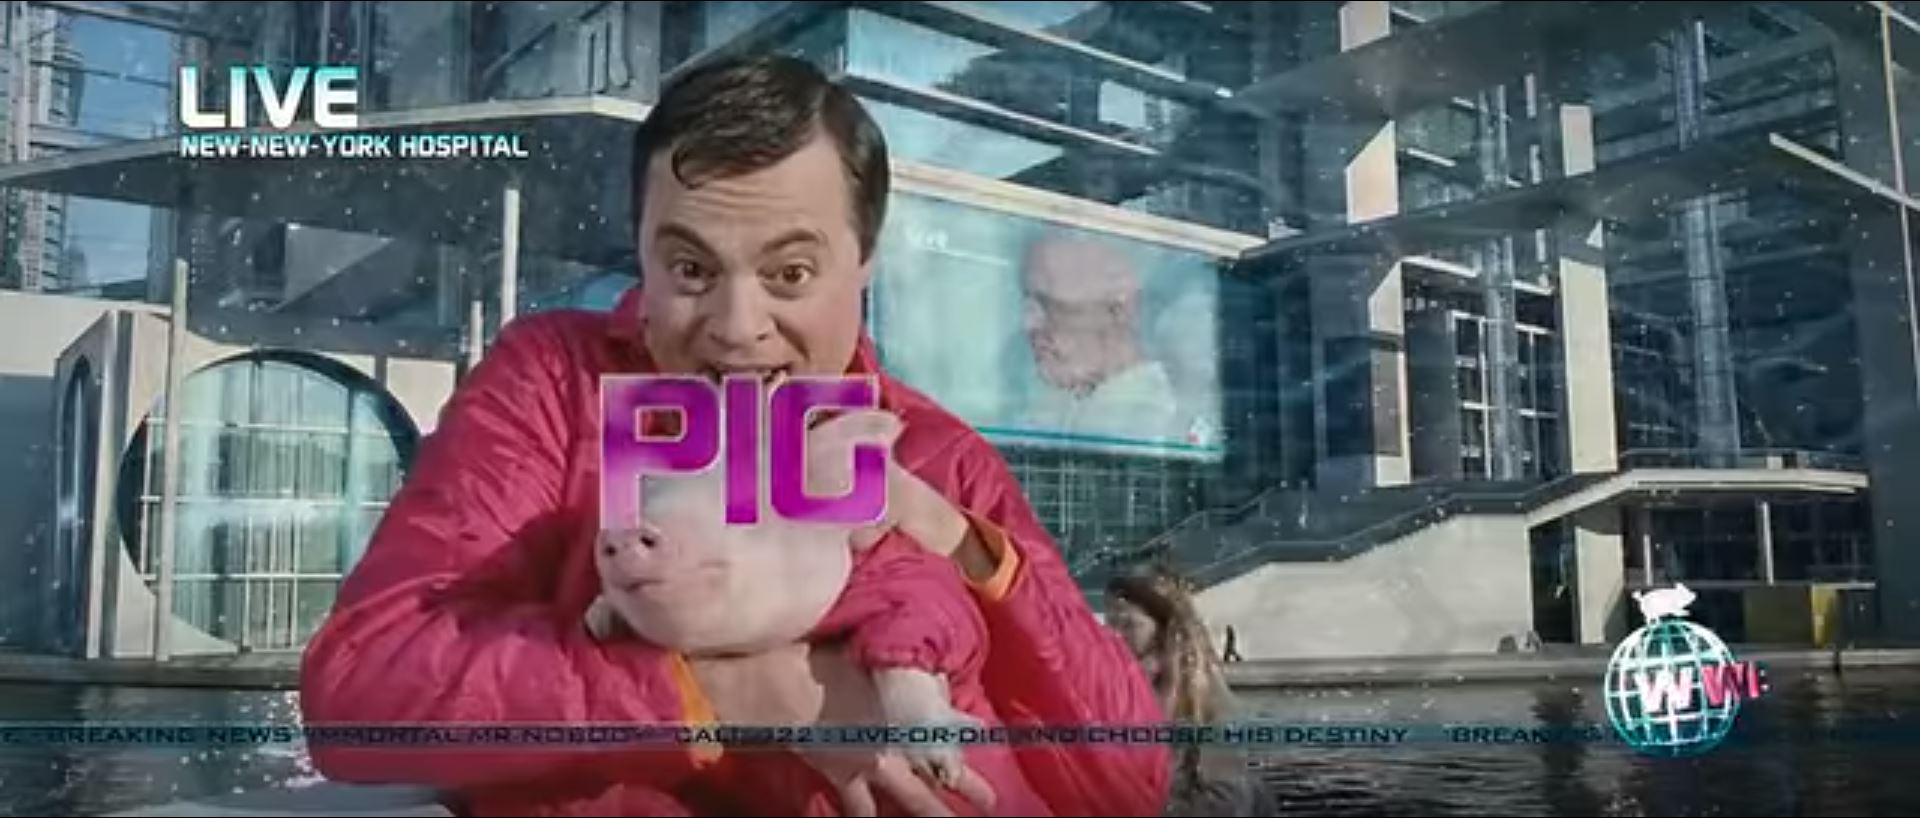
Watch the whole futuristic world set-up here: https://www.youtube.com/watch?v=h1OzVk8XnZc
Show watched: Black Mirror (Season 4, Episode 2) – Arkangel
The premise of Arkangel is that parents can install a chip in their child’s head, granting them something akin to omnipresence. With the chip and an accompanying linked tablet, parents can see what their child sees, ‘blur’ out things that they deem harmful or stressful to their child and track their location at all times. The episode centers around the device that is presented like any other mobile application on a tablet: sleek, clean and beautifully designed.
However, I noticed the small design decision made on how the chip is implanted into the child’s head. Instead of having to bring a knife to the scalp or showing any blood, they designed the implant device as a small cylindrical tube with a sharp needle-like structure at one end.
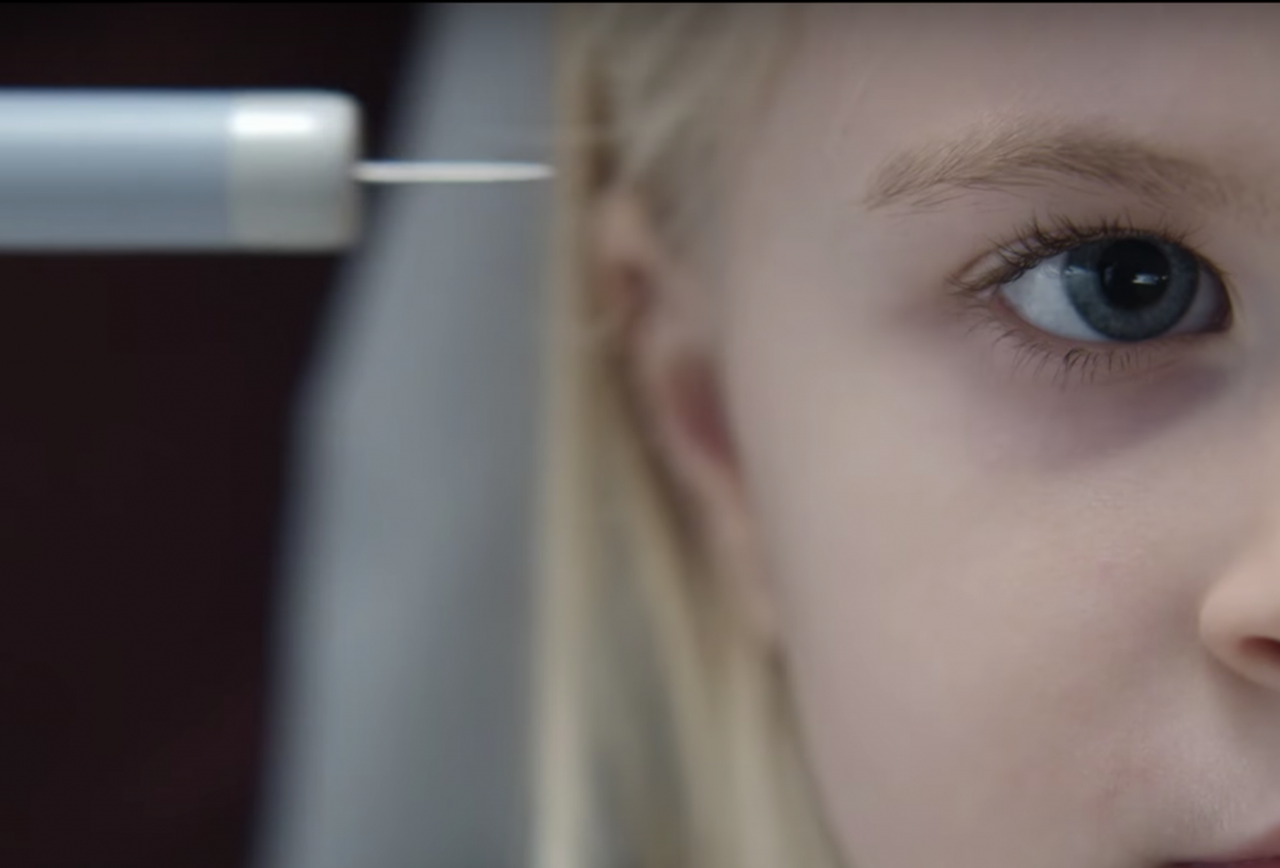

The device is brought to the child’s temple and pressed firmly against their scalp, with no signs of discomfort or pain exhibited by the child. This design falls in line with how advanced the technology is. Additionally, the lack of blood or any incision required during the implant process suggests how the programme is geared towards children.
Storyworld Genre
Science Fiction
Storyworld Description
Once considered a stigma in society, tattoos have become the norm for everyone. What better way for those in power to keep track of each and every individual’s life, by having them emblazon their life story across their own body? Gone is the need to dig up personal documents, financial statements or medical records to figure out the background of a person. Just look at their body! Dictated by the ruling party, every milestone in life will be commemorated with a suitable tattoo. Just graduated? Get a tattoo. Got a promotion? Get a tattoo. Got into a relationship, or just came out of a break up? Get a tattoo. People no longer hire clowns or face painters at birthday parties, but a tattoo artist instead. Responding to the drastic increase in demand, tattoo artists are constantly on call and have developed a wearable worksite that enables them to take appointments outside of their traditional studio setting.
Sociological Issue
Technological Development
Creative Practice
Tattooing
Sociological Issues
Technological Development
Storyworld Genre
Science-fiction
[OLD] Storyworld Description
Once considered a stigma in society, tattoos have become the norm for everyone. What better way for those in power to keep track of each and every individual’s life, by having them emblazon their life story across their own body? Gone is the need to dig up personal documents, financial statements or medical records to figure out the background of a person. Just look at their body! Dictated by the ruling party, every milestone in life will be commemorated with a suitable tattoo. Just graduated? Get a tattoo. Got a promotion? Get a tattoo. Got into a relationship, or just came out of a break up? Get a tattoo. People no longer hire clowns or face painters at birthday parties, but a tattoo artist instead. Responding to the drastic increase in demand, tattoo artists are constantly on call and have developed a wearable worksite that enables them to take appointments outside of their traditional studio setting.
[REVISED] Storyworld Description
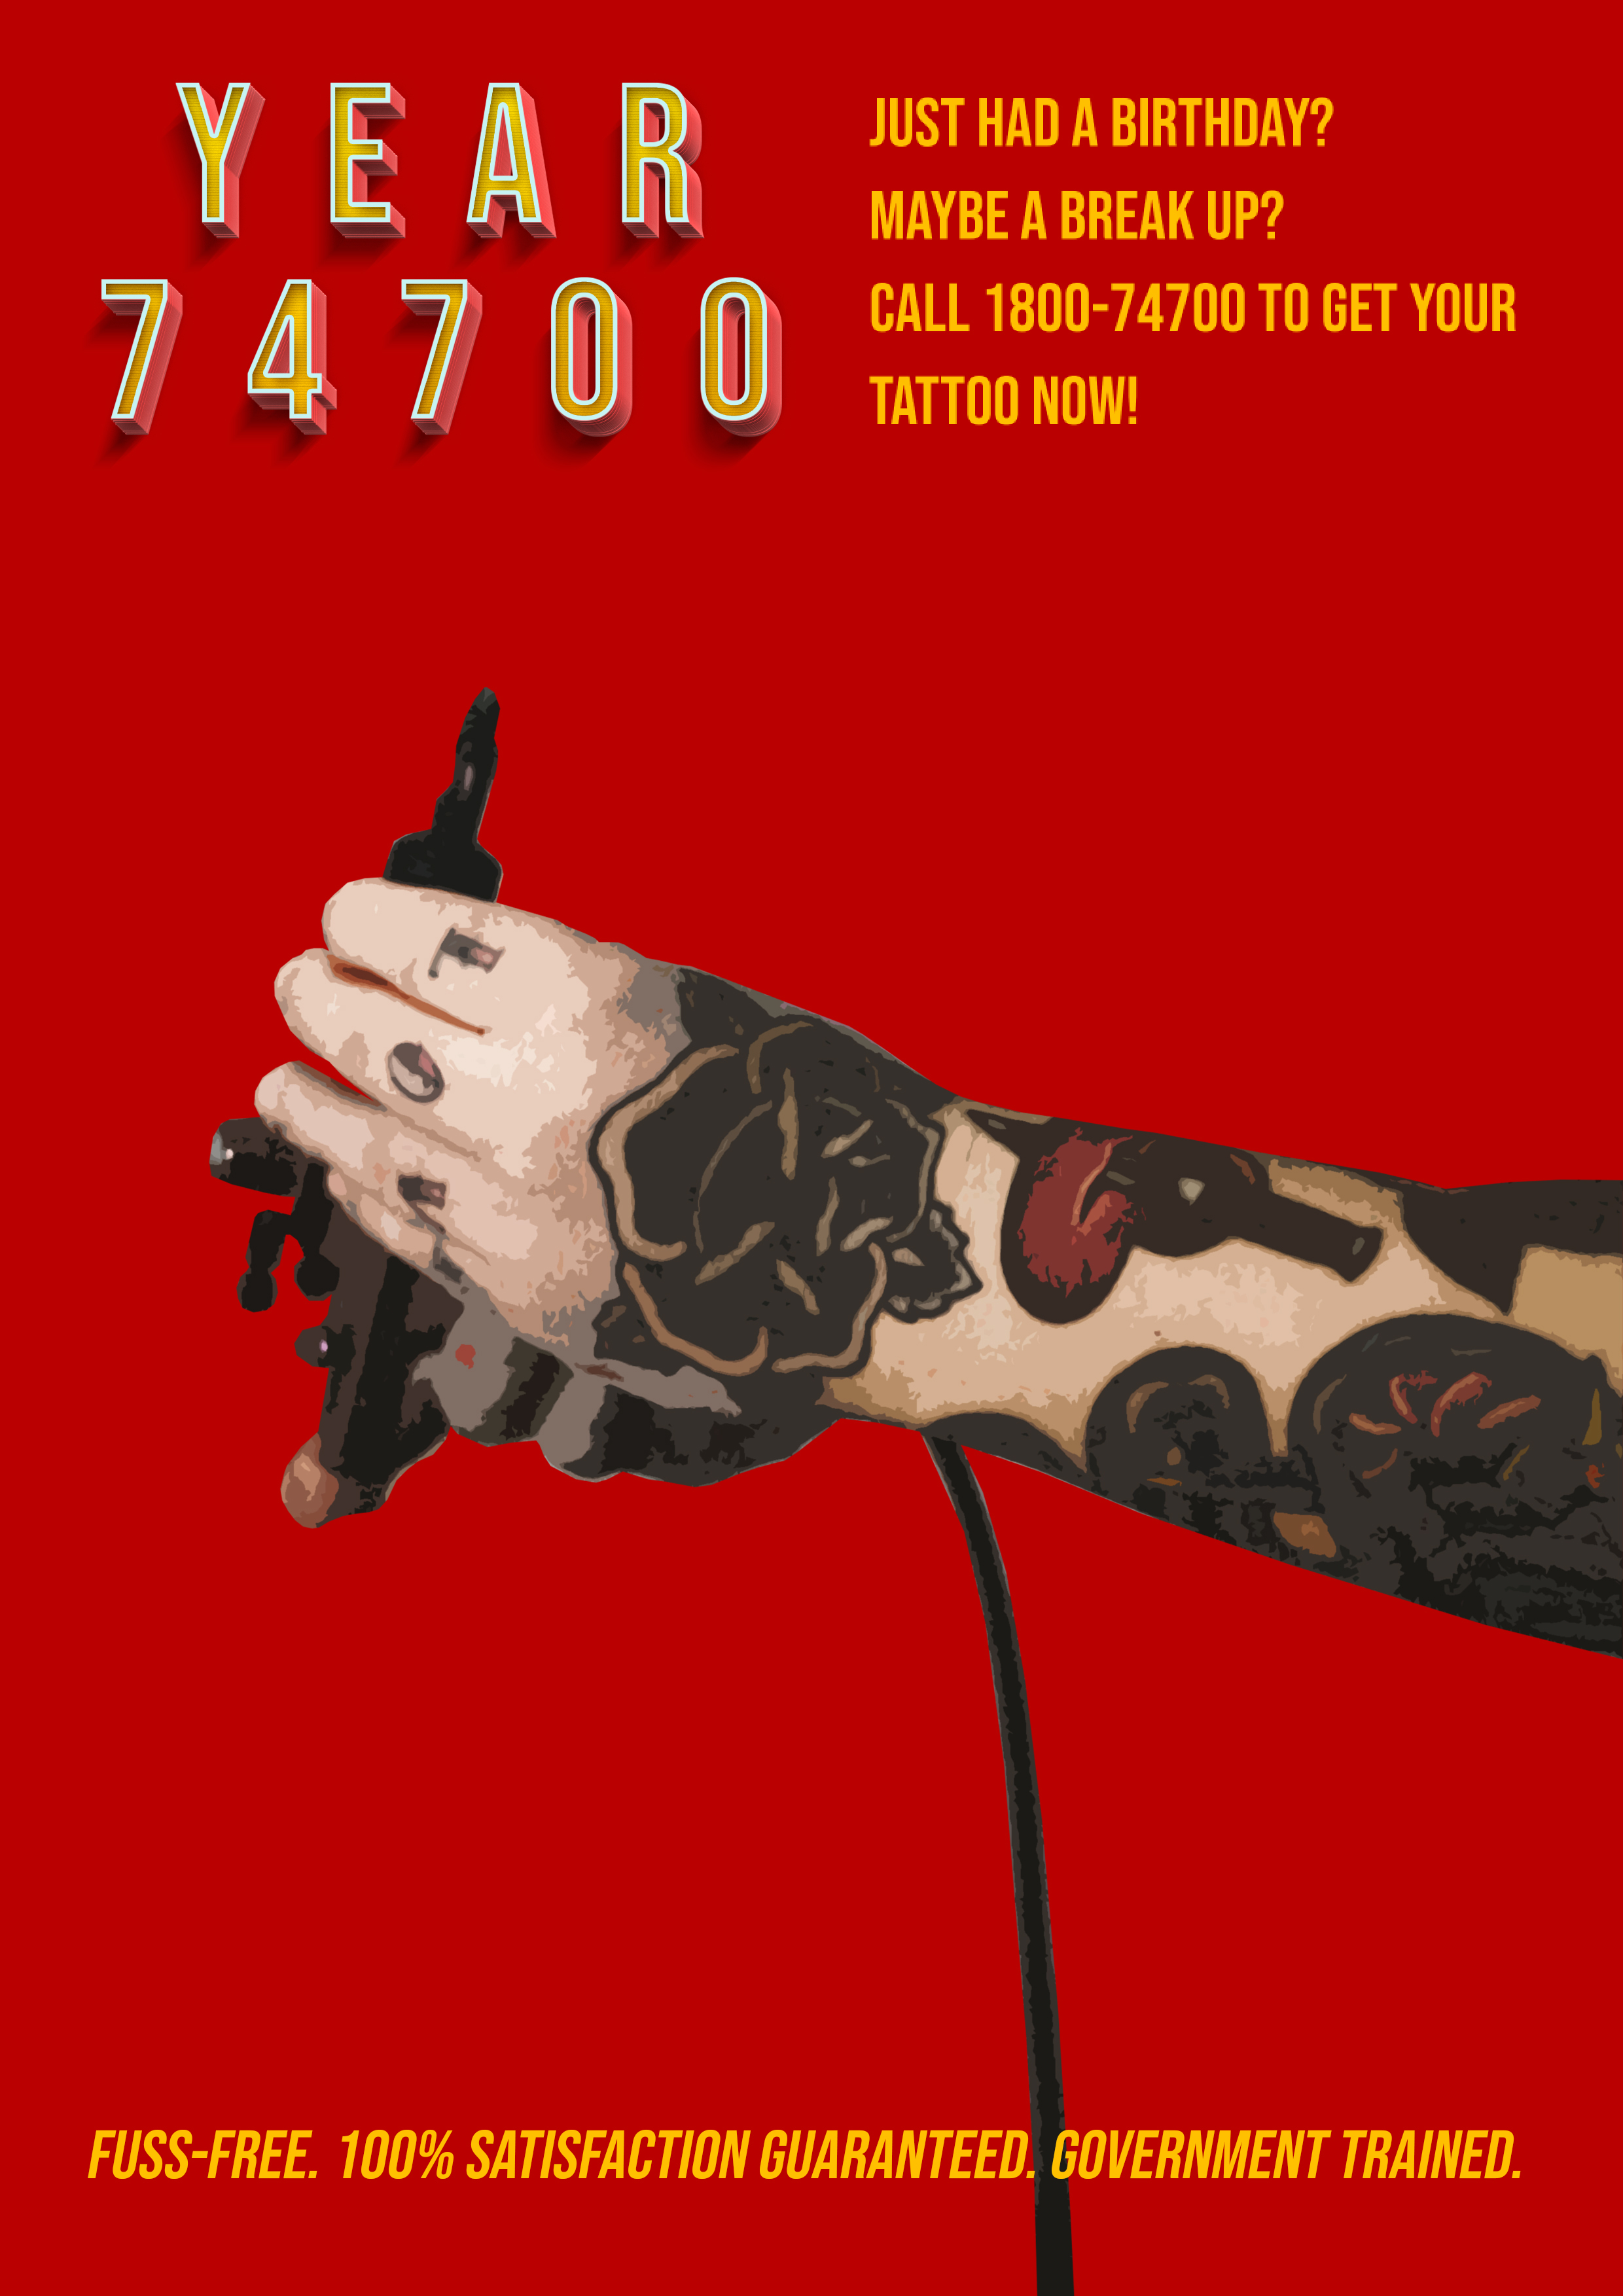
It’s the year 74700 and tattoos are no longer taboo. In fact, body modification goes beyond art and self-expression. It is a means of functionality for different life stages, at all ages. In this new world, parading information about yourself has extended beyond the online space. Skin becomes a medium where we wear our factual and personal identity on our sleeves. We update our tattoos just like social media, like Facebook or Twitter statuses.
For every milestone, there is a tattoo. It’s become a societal norm to get a tattoo whenever someone wants to share a personal event – anything from a break up, to getting a new pet.
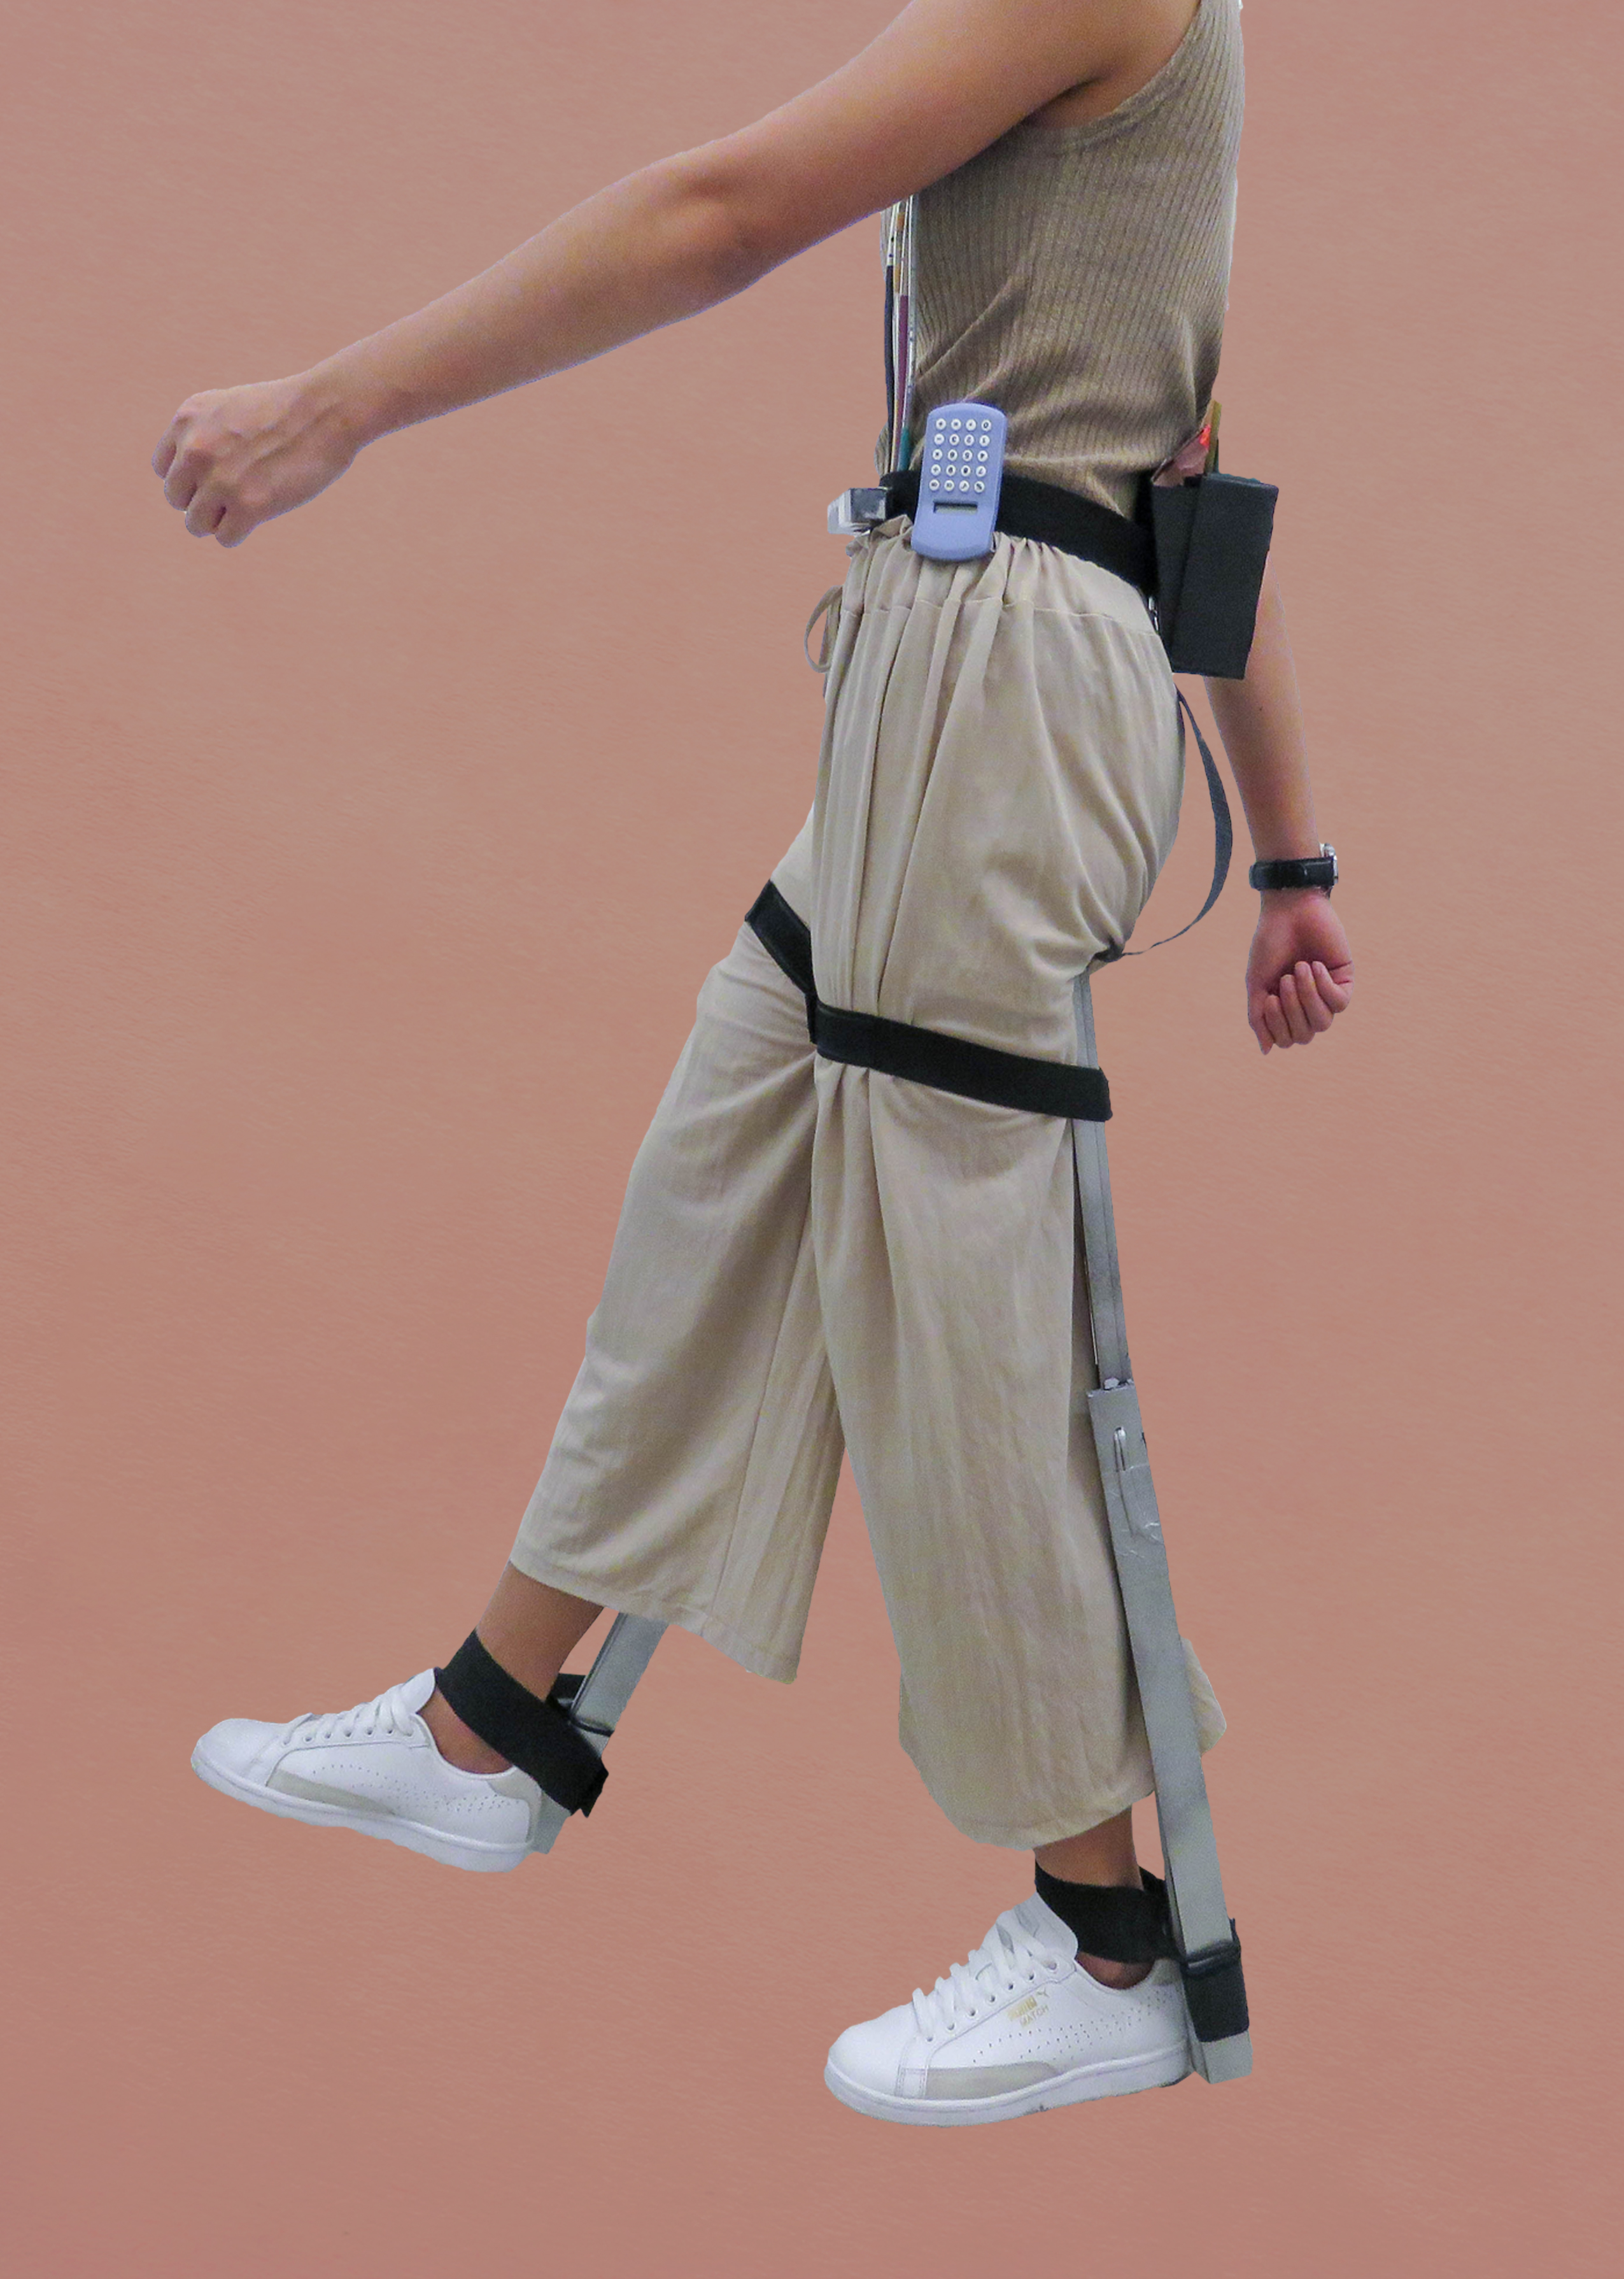
In addition, the law also ordains that people ‘update’ their skin (within one working day) when they change in age, education, career and health. What better way for those in power to keep track of each and every individual’s life by having them emblazon their life story across their own body? Gone is the need to dig up personal records. Considered as civil servants, tattoo artists are highly trained and respected professionals who are expected to get the job done in the most efficient and precise manner. They are easily distinguished by the latest wearable gear – Verte 74700, a hybrid exoskeleton-toolkit that carries the essential instruments of the tattoo trade while keeping their balance and posture in check.
With so many people to tattoo daily, tattoo artists are high in demand. But in this fast-paced society, there is limited time for people to make their way to tattoo studios. Not only that, they also have to constantly monitor their health and well-being because there’s no time for them to feel ill. Hence, tattoo artists have adapted to working on-the-go – ready to give anyone a new skin.
Cover Art
Microfiction #1
In the middle of a cold, faded-brown bench sat John, sprawled in a deflated manner. He threw his head back and looked up.
“Was the sky always like this? Boring. Blank. Blue,” he thought.
His arms spread lifelessly by his side. His arms which were cluttered with tattoos – A number 26 (his age), a gear (degree in mechanical engineering), the GoFast logo (automobile company he works in) and a milk carton with a huge red cross (lactose intolerant). But this one tattoo – a cloud with the initials J ❤️ E – felt uncomfortably pressed against his skin.
It was about time to let this cloud go. A miserable sigh escaped his lips as he took out his phone and made the necessary call. The screen lit up: “Booking confirmed!”
Within minutes, an all-too familiar figure donned in their advanced gear approached him. John have had gotten so many tattoos in his life, but this might just be the most painful one yet.
Microfiction #2
She glanced at her watch, waiting for the last chorus of ‘Happy Birthday’ to die down around the room. Same old, same old.
Caitlyn had been assigned to this family for years — had seen how the parents aged over time, and how their children grew from little infants to the young adults they were now. This was their youngest daughter’s coming of age party as she stepped into adulthood at the age of 21.
It took awhile for everyone to settle down, with the birthday girl taking seat centerstage. Caitlyn tightened her Verte 74700 around her waist as she made her way to her client – her exoskeleton supporting her as she let her weight drop, sitting on air. For coming-of-age tattoos, they always took at least an hour.
“Ready?” she asked, while swiftly popping the ink holders open. The girl nodded eagerly. Caitlyn shot the girl a smile. So many years of tattooing but seeing the excitement in their eyes never gets tiring.
She reached for her tattoo machine that was attached to her side. Hopefully her back wouldn’t ache too much by the time she was done. She still had five other appointments before the day came to an end.
After exploring three practitioners, I decided to design a probe with regard to painting. Similar to Zi Lin, I was also inspired by the recent news of NUS undergraduate who made tools for the visually impaired to cook.
Since painting is such a visual activity, I keen to invent a tool to make it more accessible to the visually impaired. During my practitioner observation, my friend always made sure to mix all her paints first. She was able to easily pick out the paint tubes she needed, and squeeze the right amount of paint before swatching them to test. This task might seem simple, but to a blind person, it could be of utmost difficulty. Hence, I looked into producing a color mixing kit.
Contents + Rationale

In order to make it easier for the visually impaired to identify the color of individual paint tubes, I wanted to label the tubes with braille. However, for obvious reasons (1. I don’t know braille 2. I don’t know people who read braille), I decided to use a embossing tool to label the tubes. Ideally, however, the tubes would be labelled with both the letters and braille.

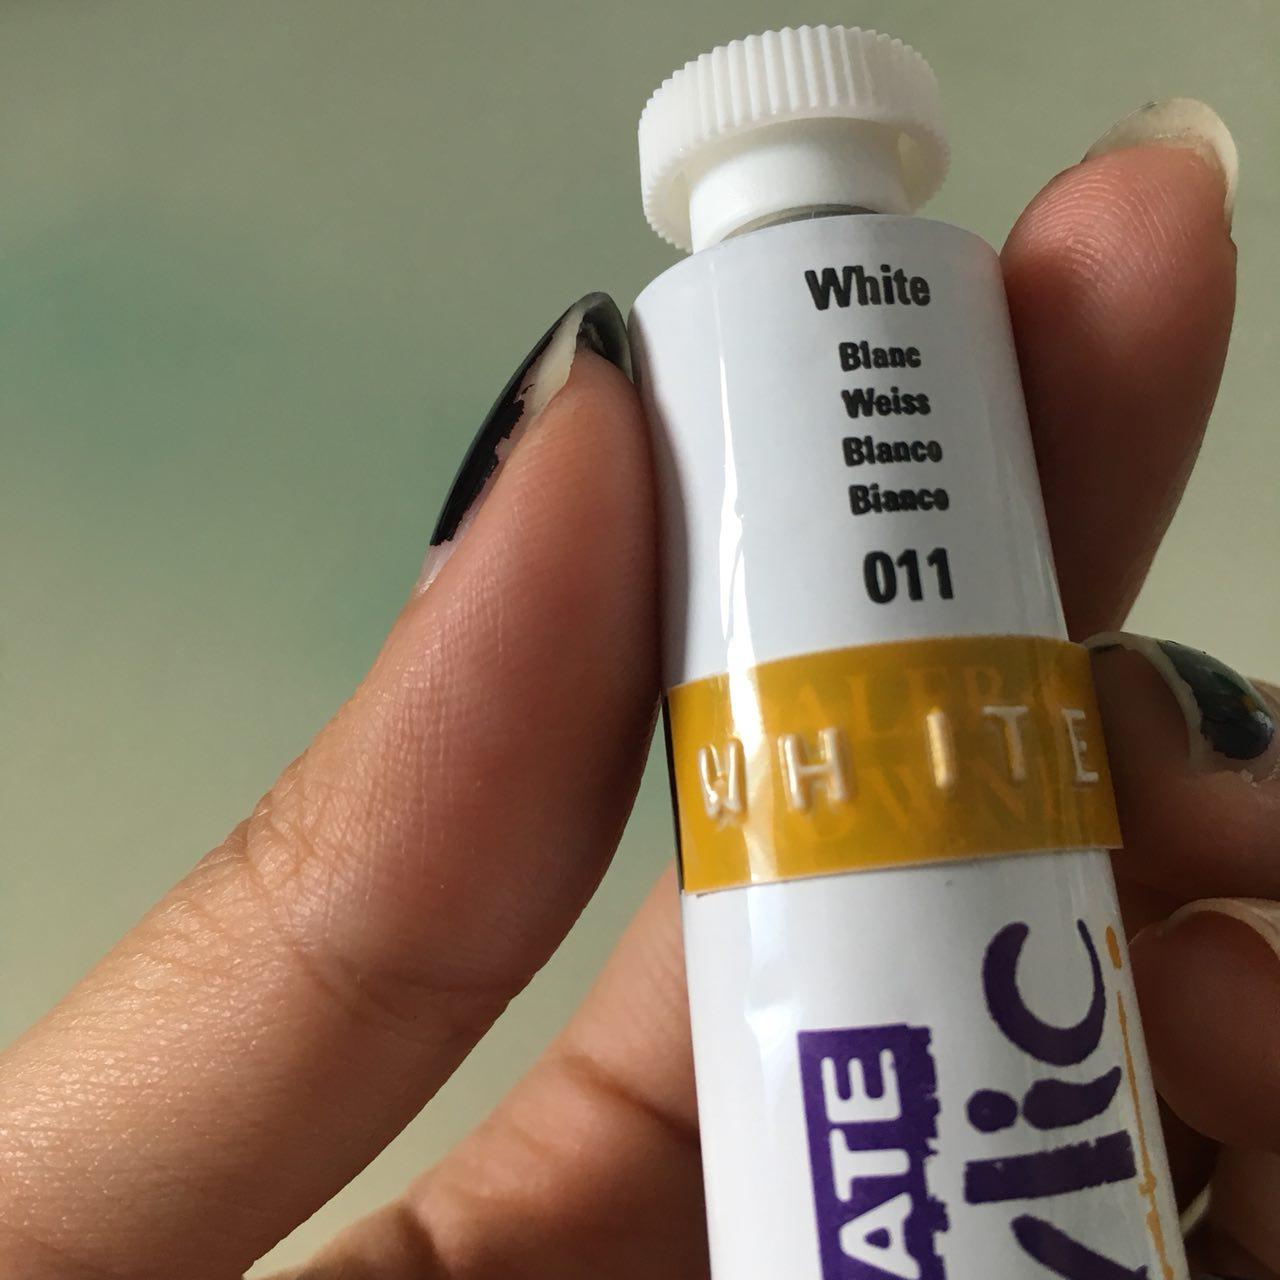
This made the labels more textured and would allow for people to read it, whether or not they knew how to read braille. By running your fingers over the labels, you could make out what word it was.
As mentioned previously, mixing paints is an integral part of the painting process. However, if one is blind or visually impaired, they may find it difficult to tell how much paint they need for a certain color. Hence, I came up with a color recipe card that uses the same concept as the labeling of tubes to guide painters in mixing their paints.
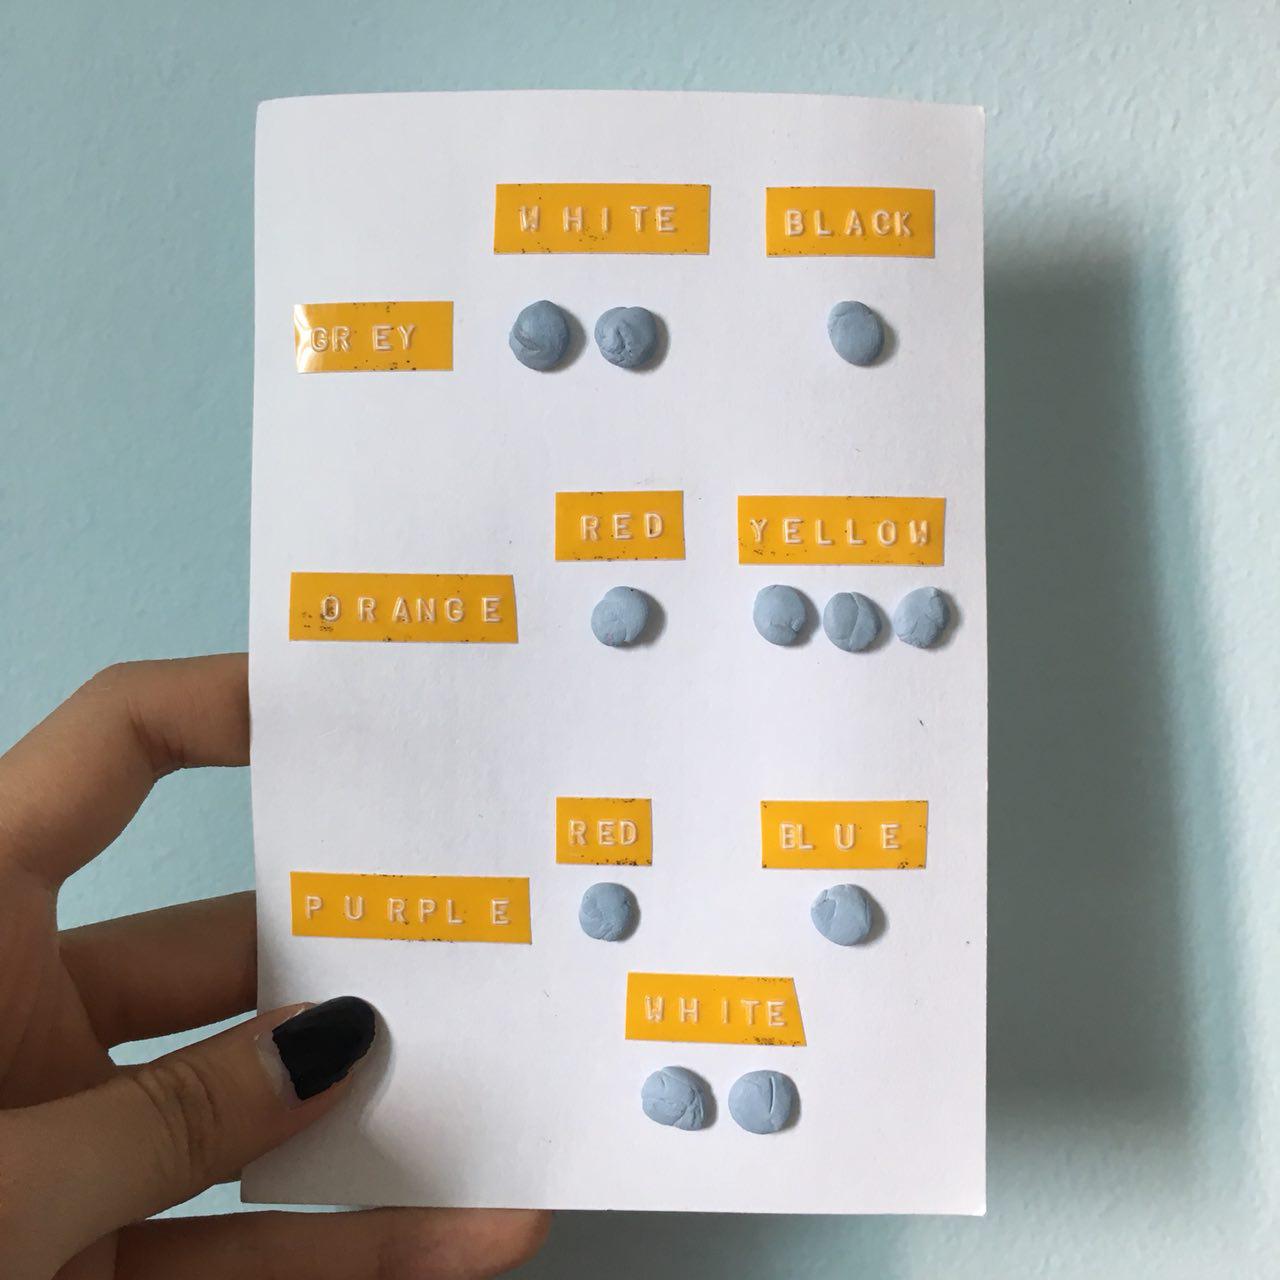
Once more, this would ideally be labeled with braille as well! Following this recipe card, the painter would be able to know the proportions of paint to use in order to make the necessary color.
Accompanying my kit, is this instruction card.

Experience with Probes
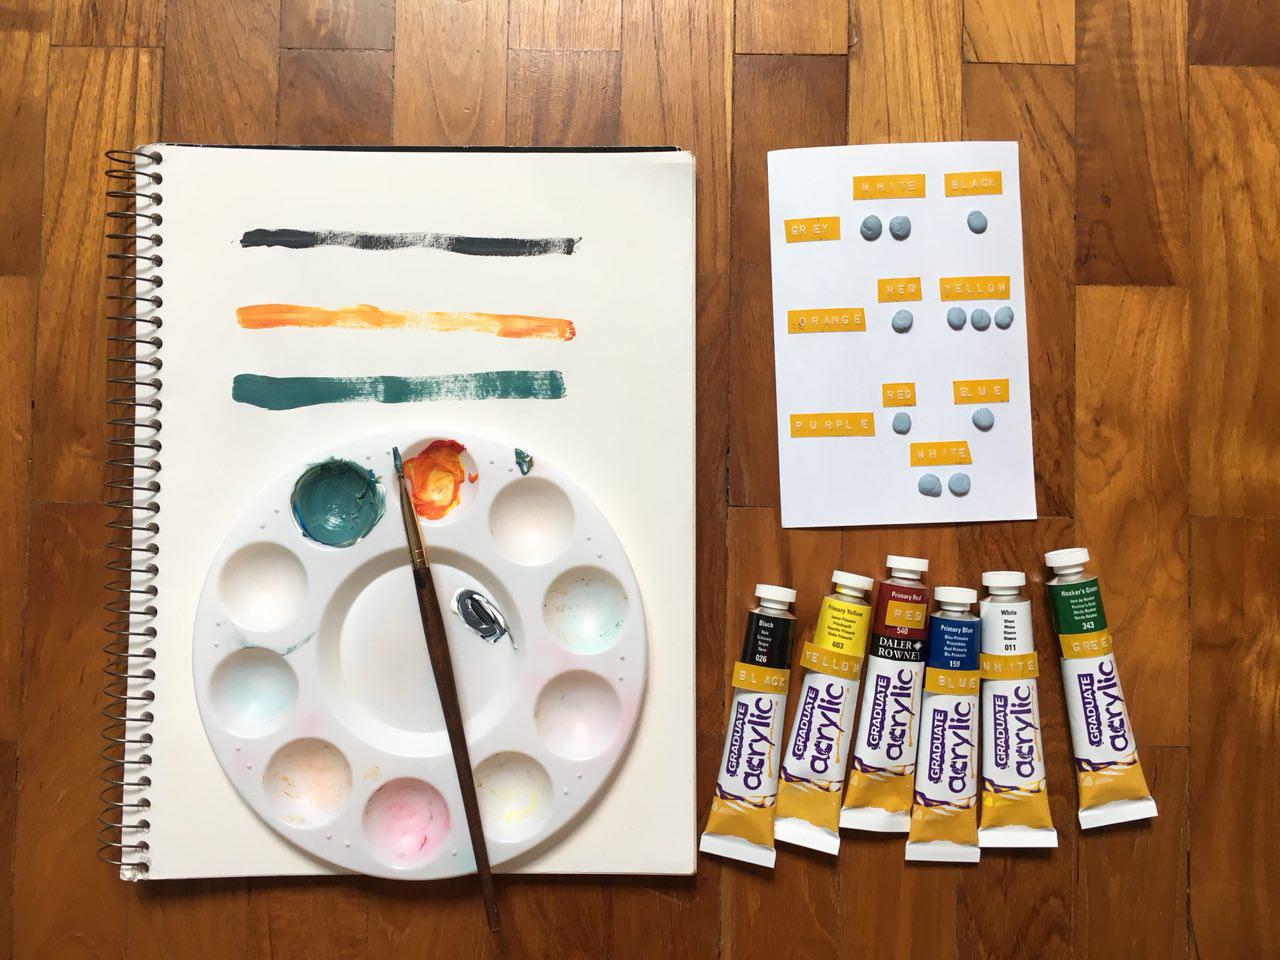
Unfortunately, I was unable to meet up with the original practitioner to get her to test out my kit. However, I did get other people to try it out! Here are some of my findings.
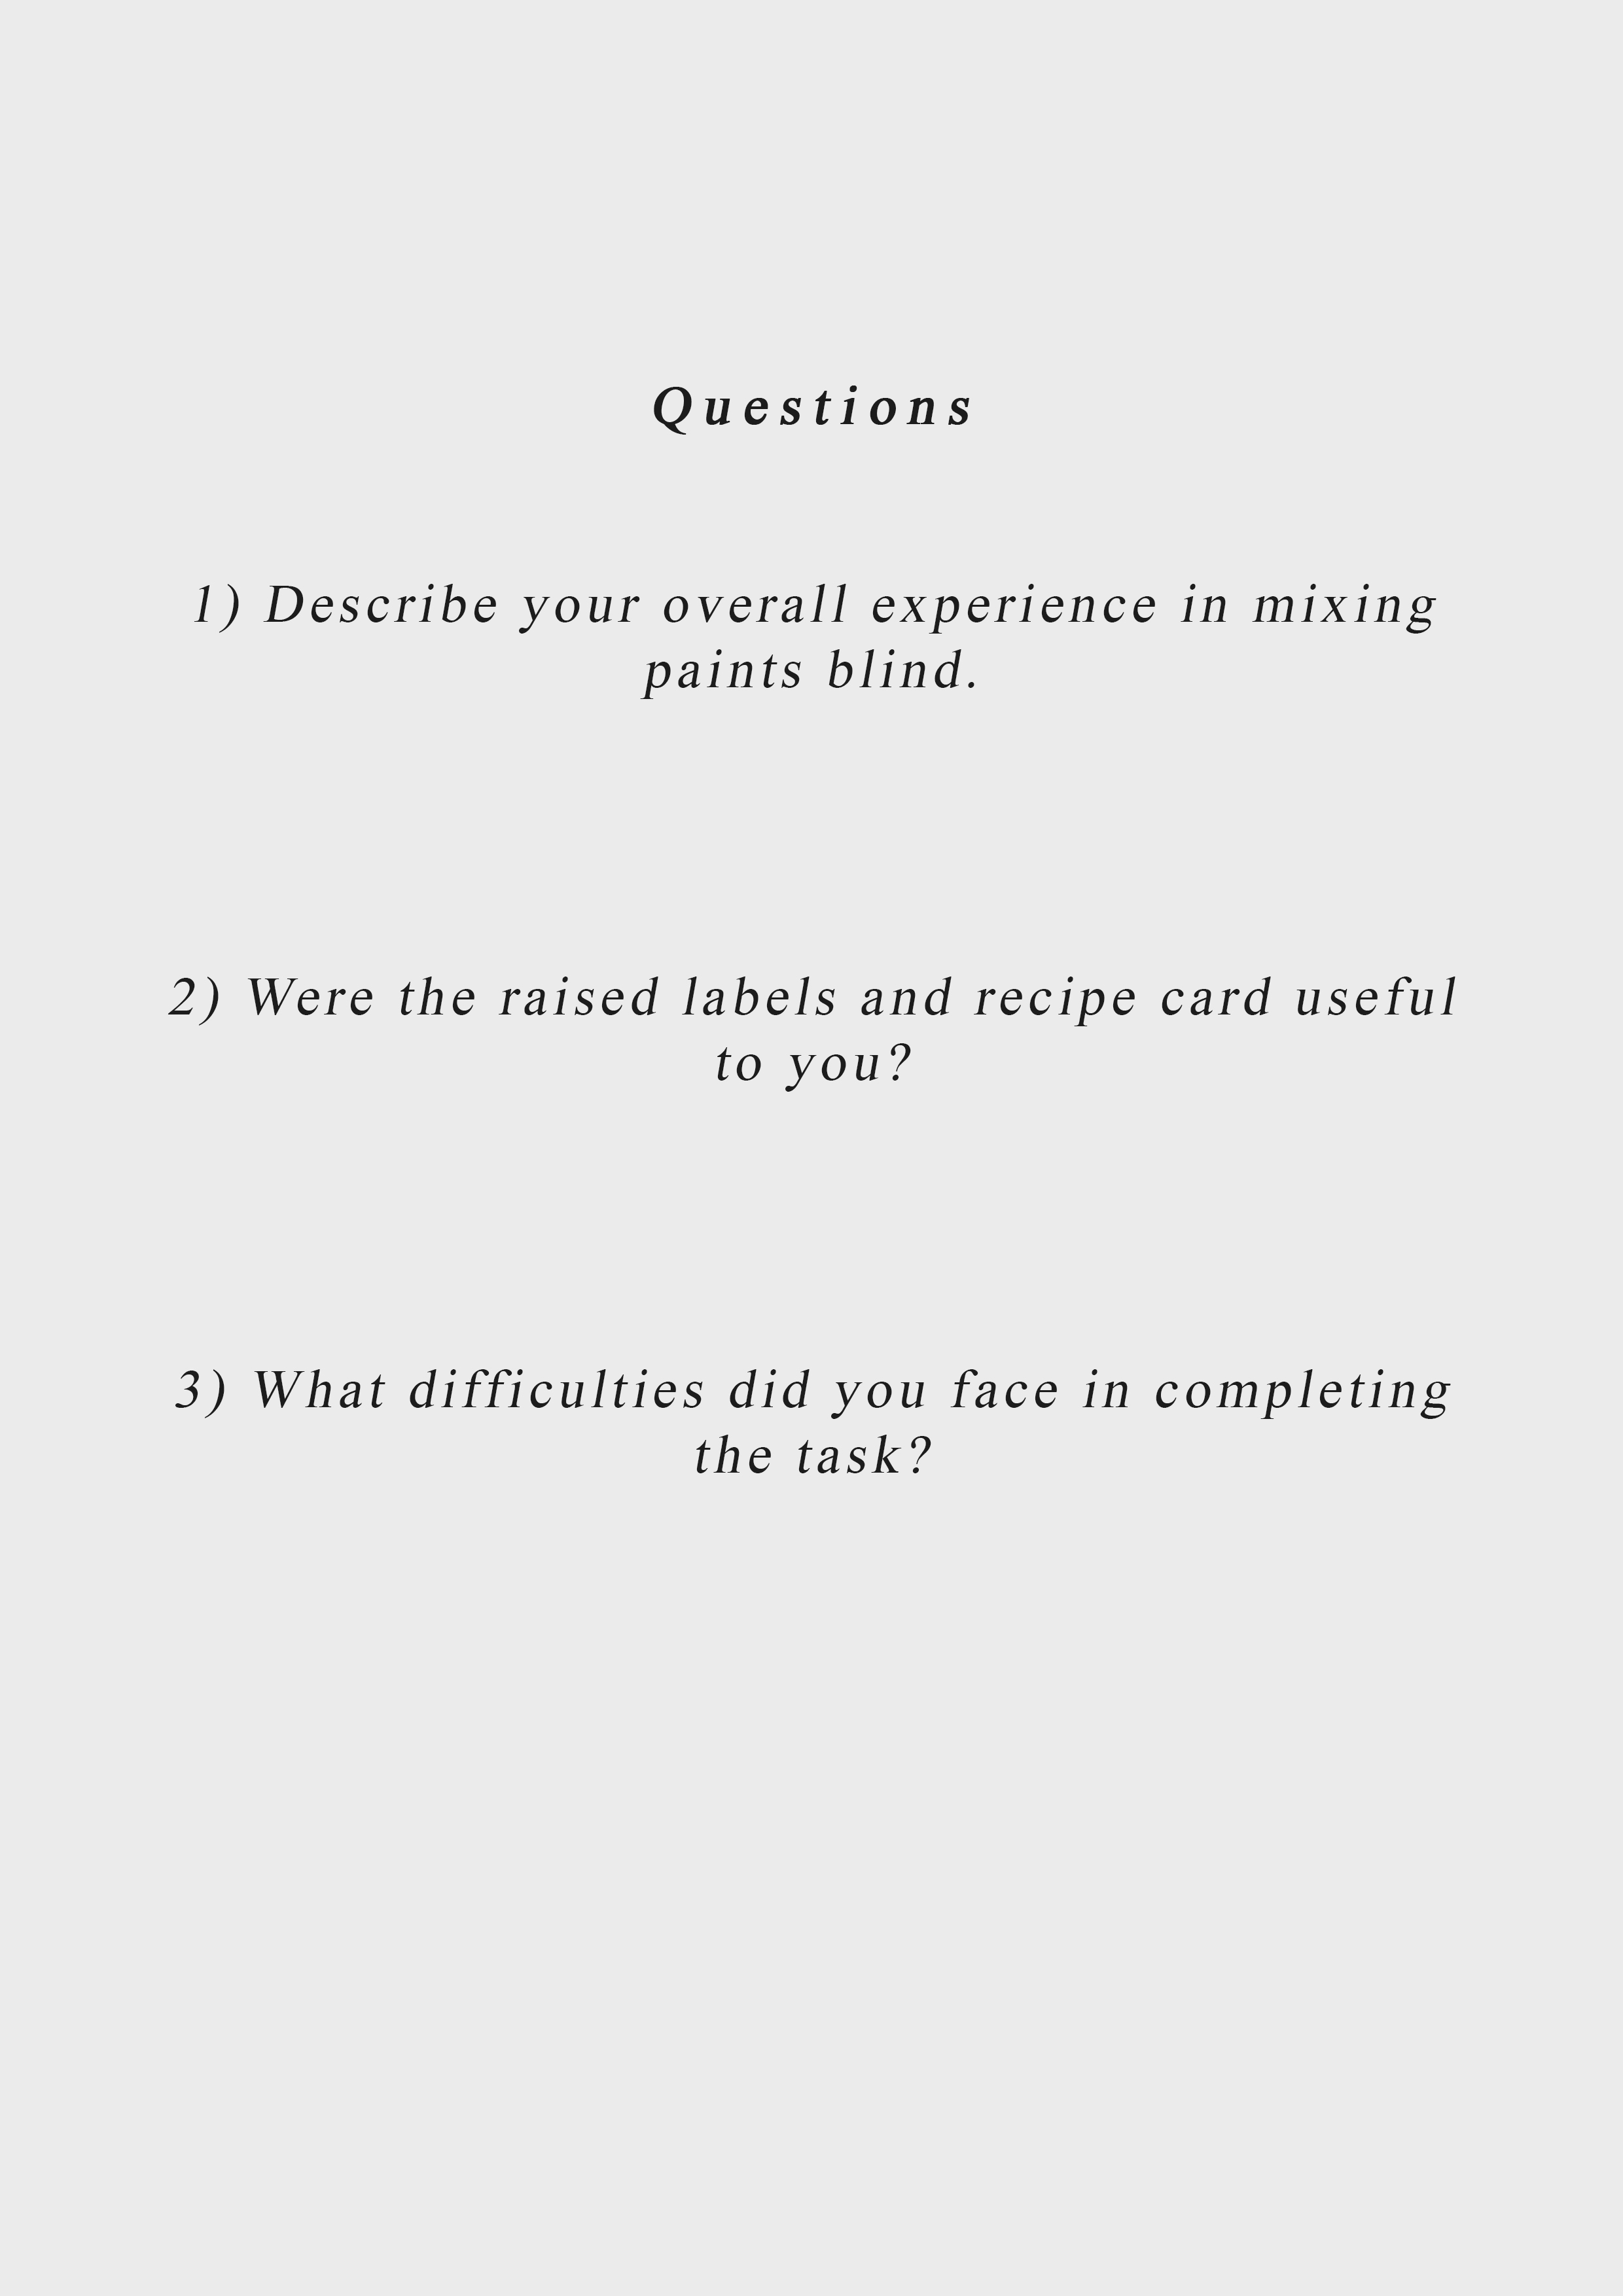
1) Describe your overall experience in mixing paints blind.
2) Were the raised labels and recipe card useful to you?
3) What difficulties did you face in completing the task?
Personal Thoughts
Creating this kit was incredibly fun, and it was exciting to see the different responses from the people who used my kit! I think it’s difficult to try and control subjective factors such as how much ‘one part’ or ‘two part’ of paints means to each person – as it differs from person to person. Perhaps this is something that can be looked into, or left to the individual’s intuition. I was also thinking of a similar recipe card to aid those with color blindness. Granted, the card would not need to be textured as color blind people can still see. However, it could showcase different colors, along with verbal descriptions, so that color blind artists can learn to recognize the subtleties in the different hues and shades of color. And if they don’t know what color something is, they would be able to match it to the color recipe card to figure it out. Different types of color blindness would also warrant different types of color recipe cards, but perhaps it could reduce the amount of second-guessing color blind artists have to do.
I got the chance to see the process of a fish dissection. This is a common practice for marine biologists who study fish in order to find out more about the anatomy and life cycle of aquatic creatures for conservation purposes.
Tools
Worksite
The experiments are usually done in a research lab, with access to appropriate equipment, chemicals, etc. There are usual procedures to be followed to ensure that the experiments are done in a systematic and proper manner.
Process
The fish dissected was called a common carp. First, the width and the length of the fish was measured using the tape and the vernier calliper. Different parts were measured such as the mouth size, which says a lot about its diet and initial environment.
Then, the needles were placed around to position the fish when cutting it up. The scalpel was used to cut the fish from tail to the fin. Afterwards, the organs were taken out slowly and carefully using the tweezers.
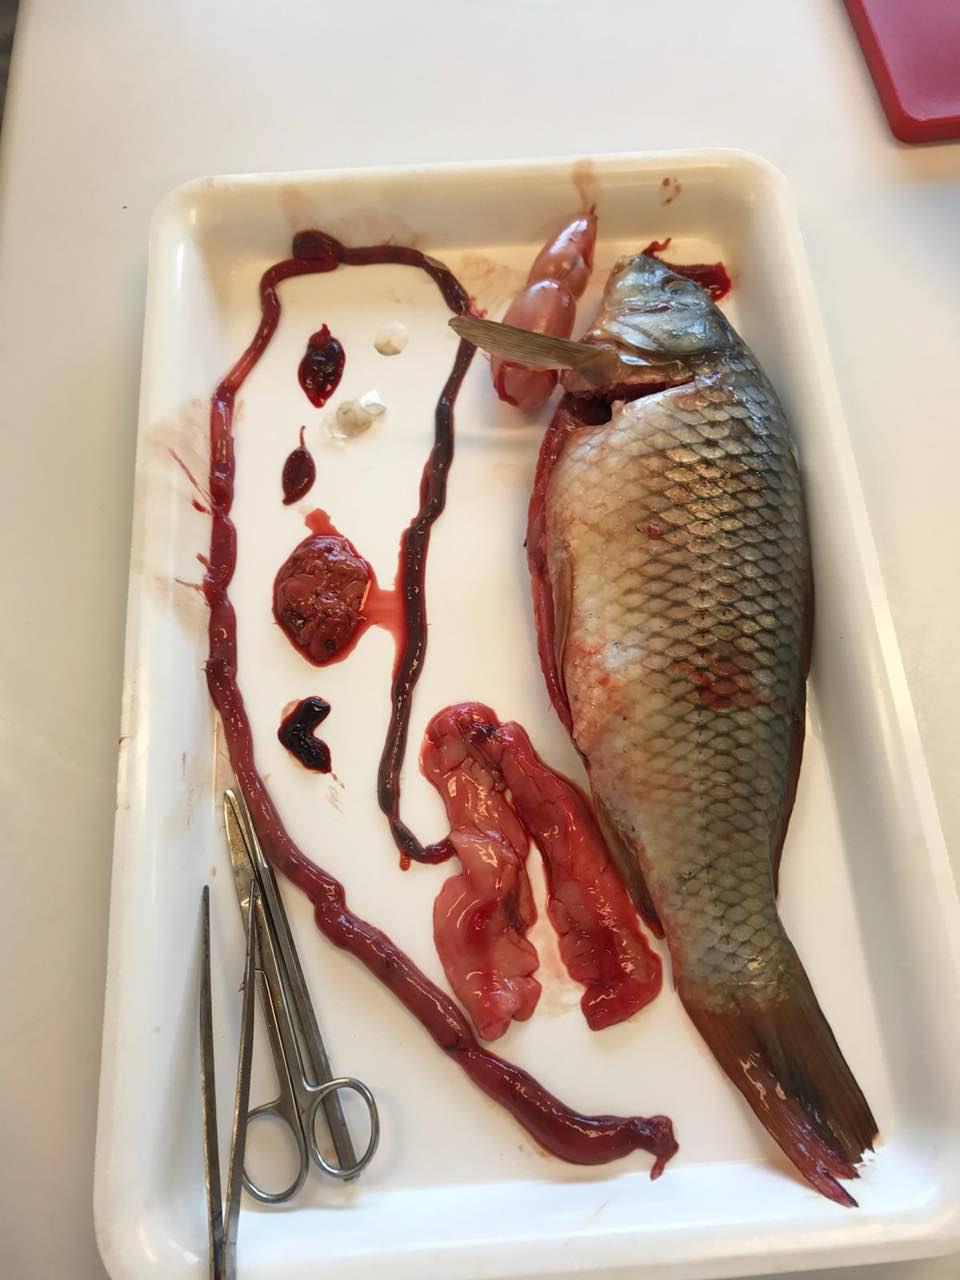
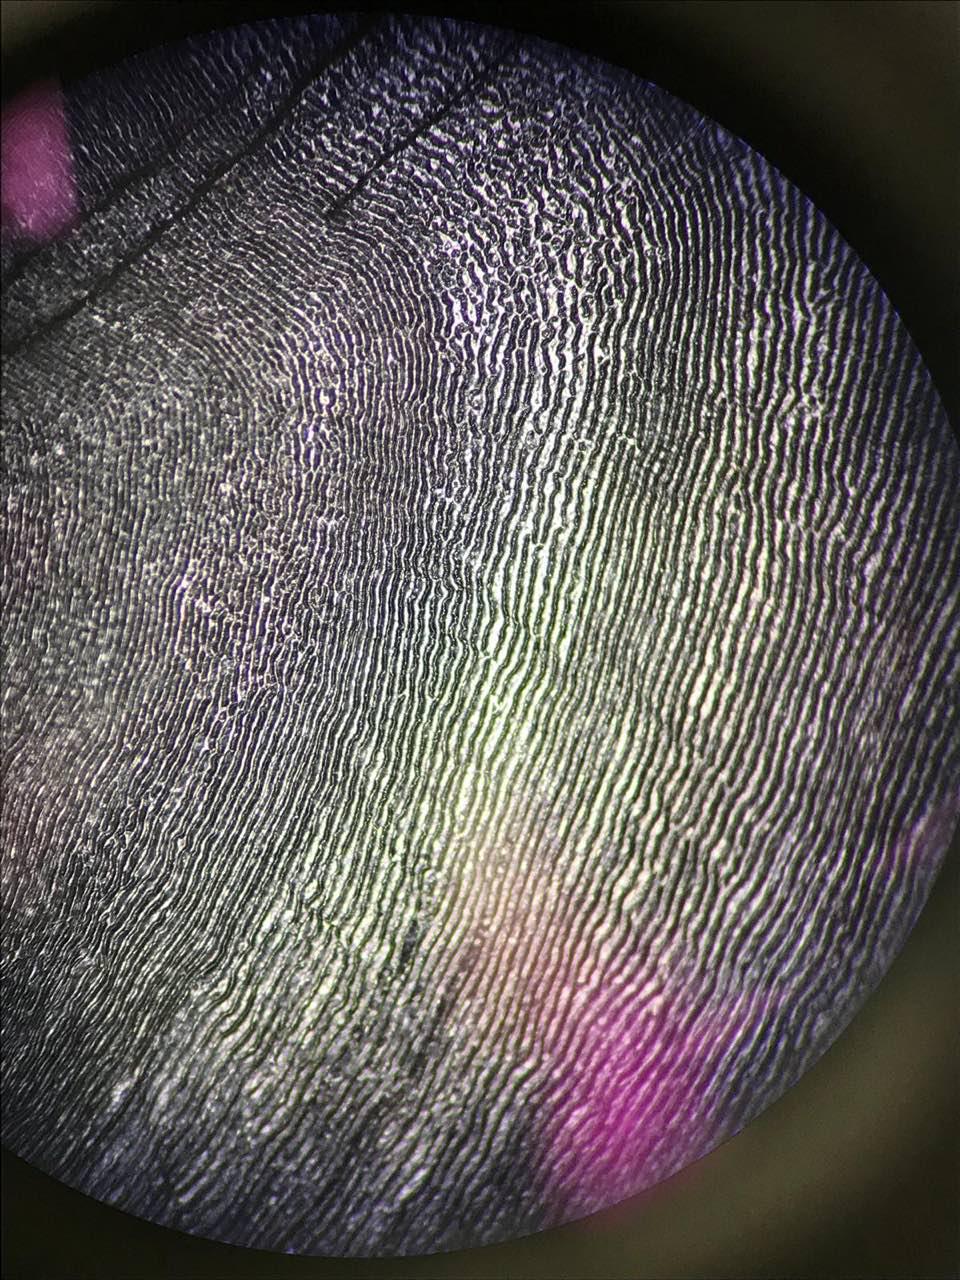
After gathering all the individual organs, each were measured and weighed. The microscope was also used to look at the scales of the fish which shows how old the fish is.
Thoughts
It can get quite messy with all the blood but it’s still an interesting process. One of the challenges would be trying to take out the organs because one has to do it slowly, without affecting the other parts. At one point, the fat can be all lumped up together making it difficult to separate each organ. The scalpel is also really sharp so putting too much pressure might accidentally cut an organ and resulting in more blood and inaccurate measurements after the experiment. Overall, each tool has an important function and ensures that the dissection is done as carefully and properly as possible.
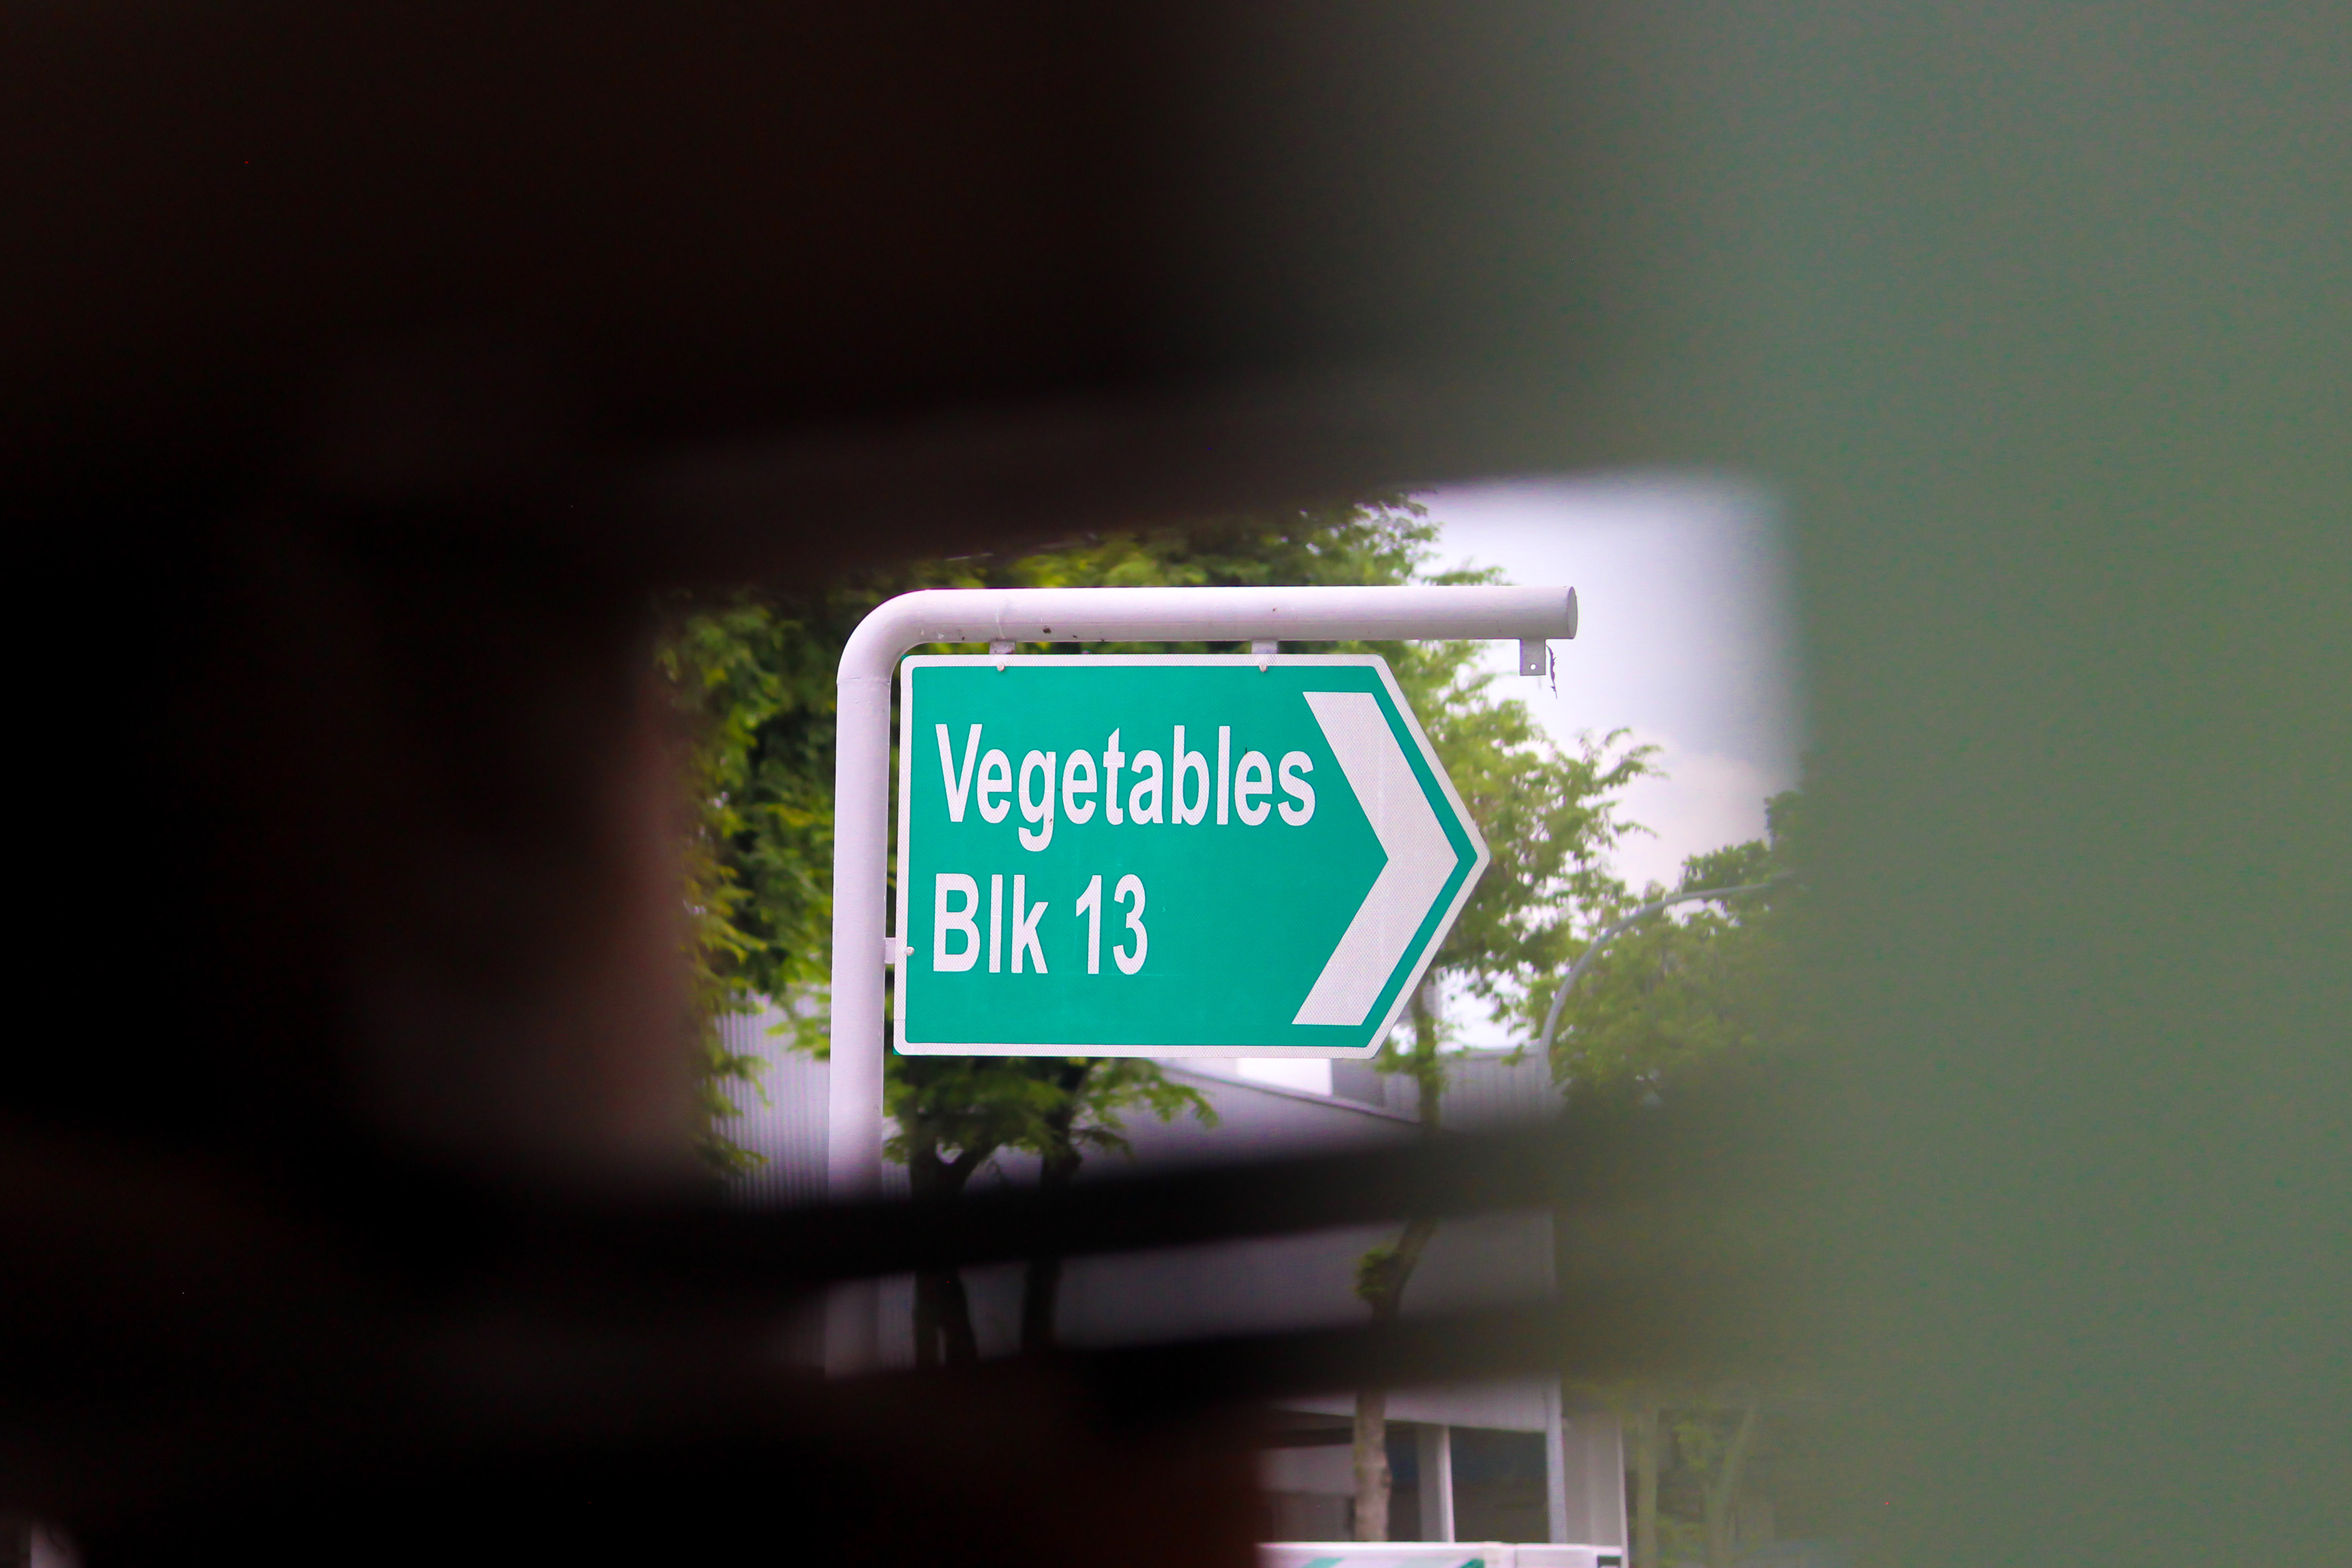
Practitioner #1: Veggie Rescue at Potong Pasir Wholesale Centre (PPWC)
I participated in the SG Veggie Rescue conducted at Pasir Panjang Wholesale Centre. Each Thursday (occasionally Saturday), the entire team of SG Food Rescue volunteers meet at PPWC.
Worksite Documentation
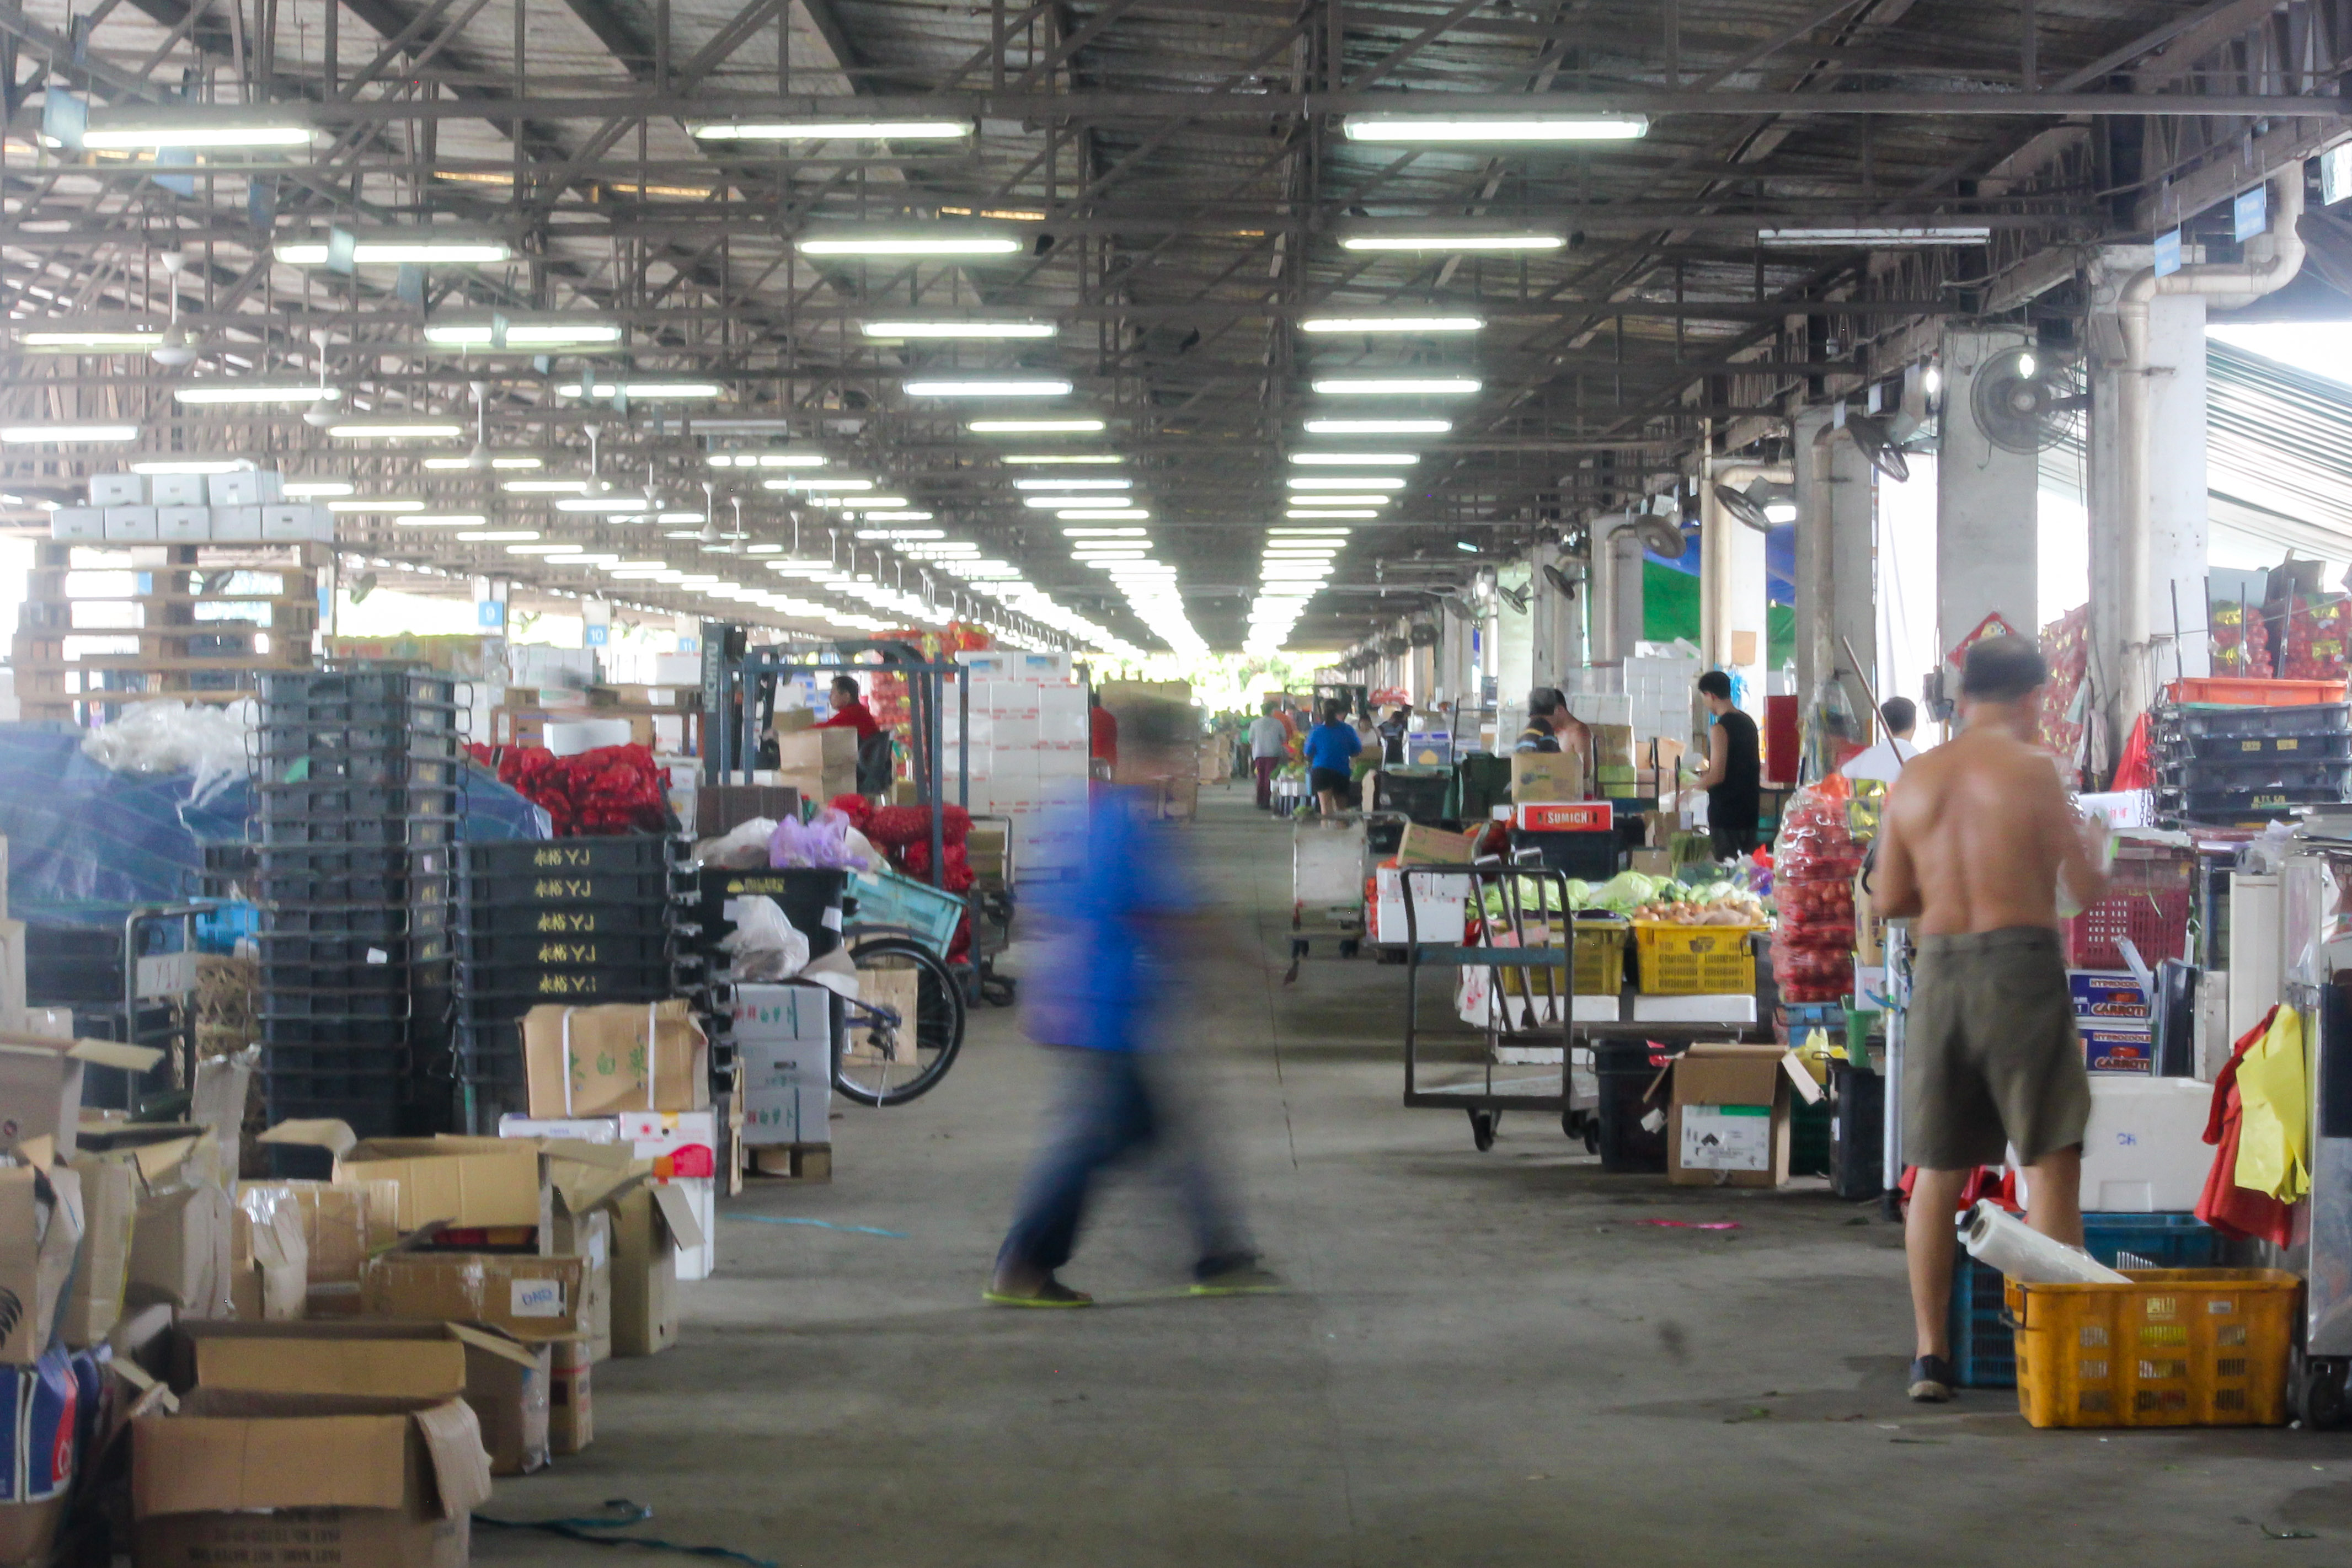
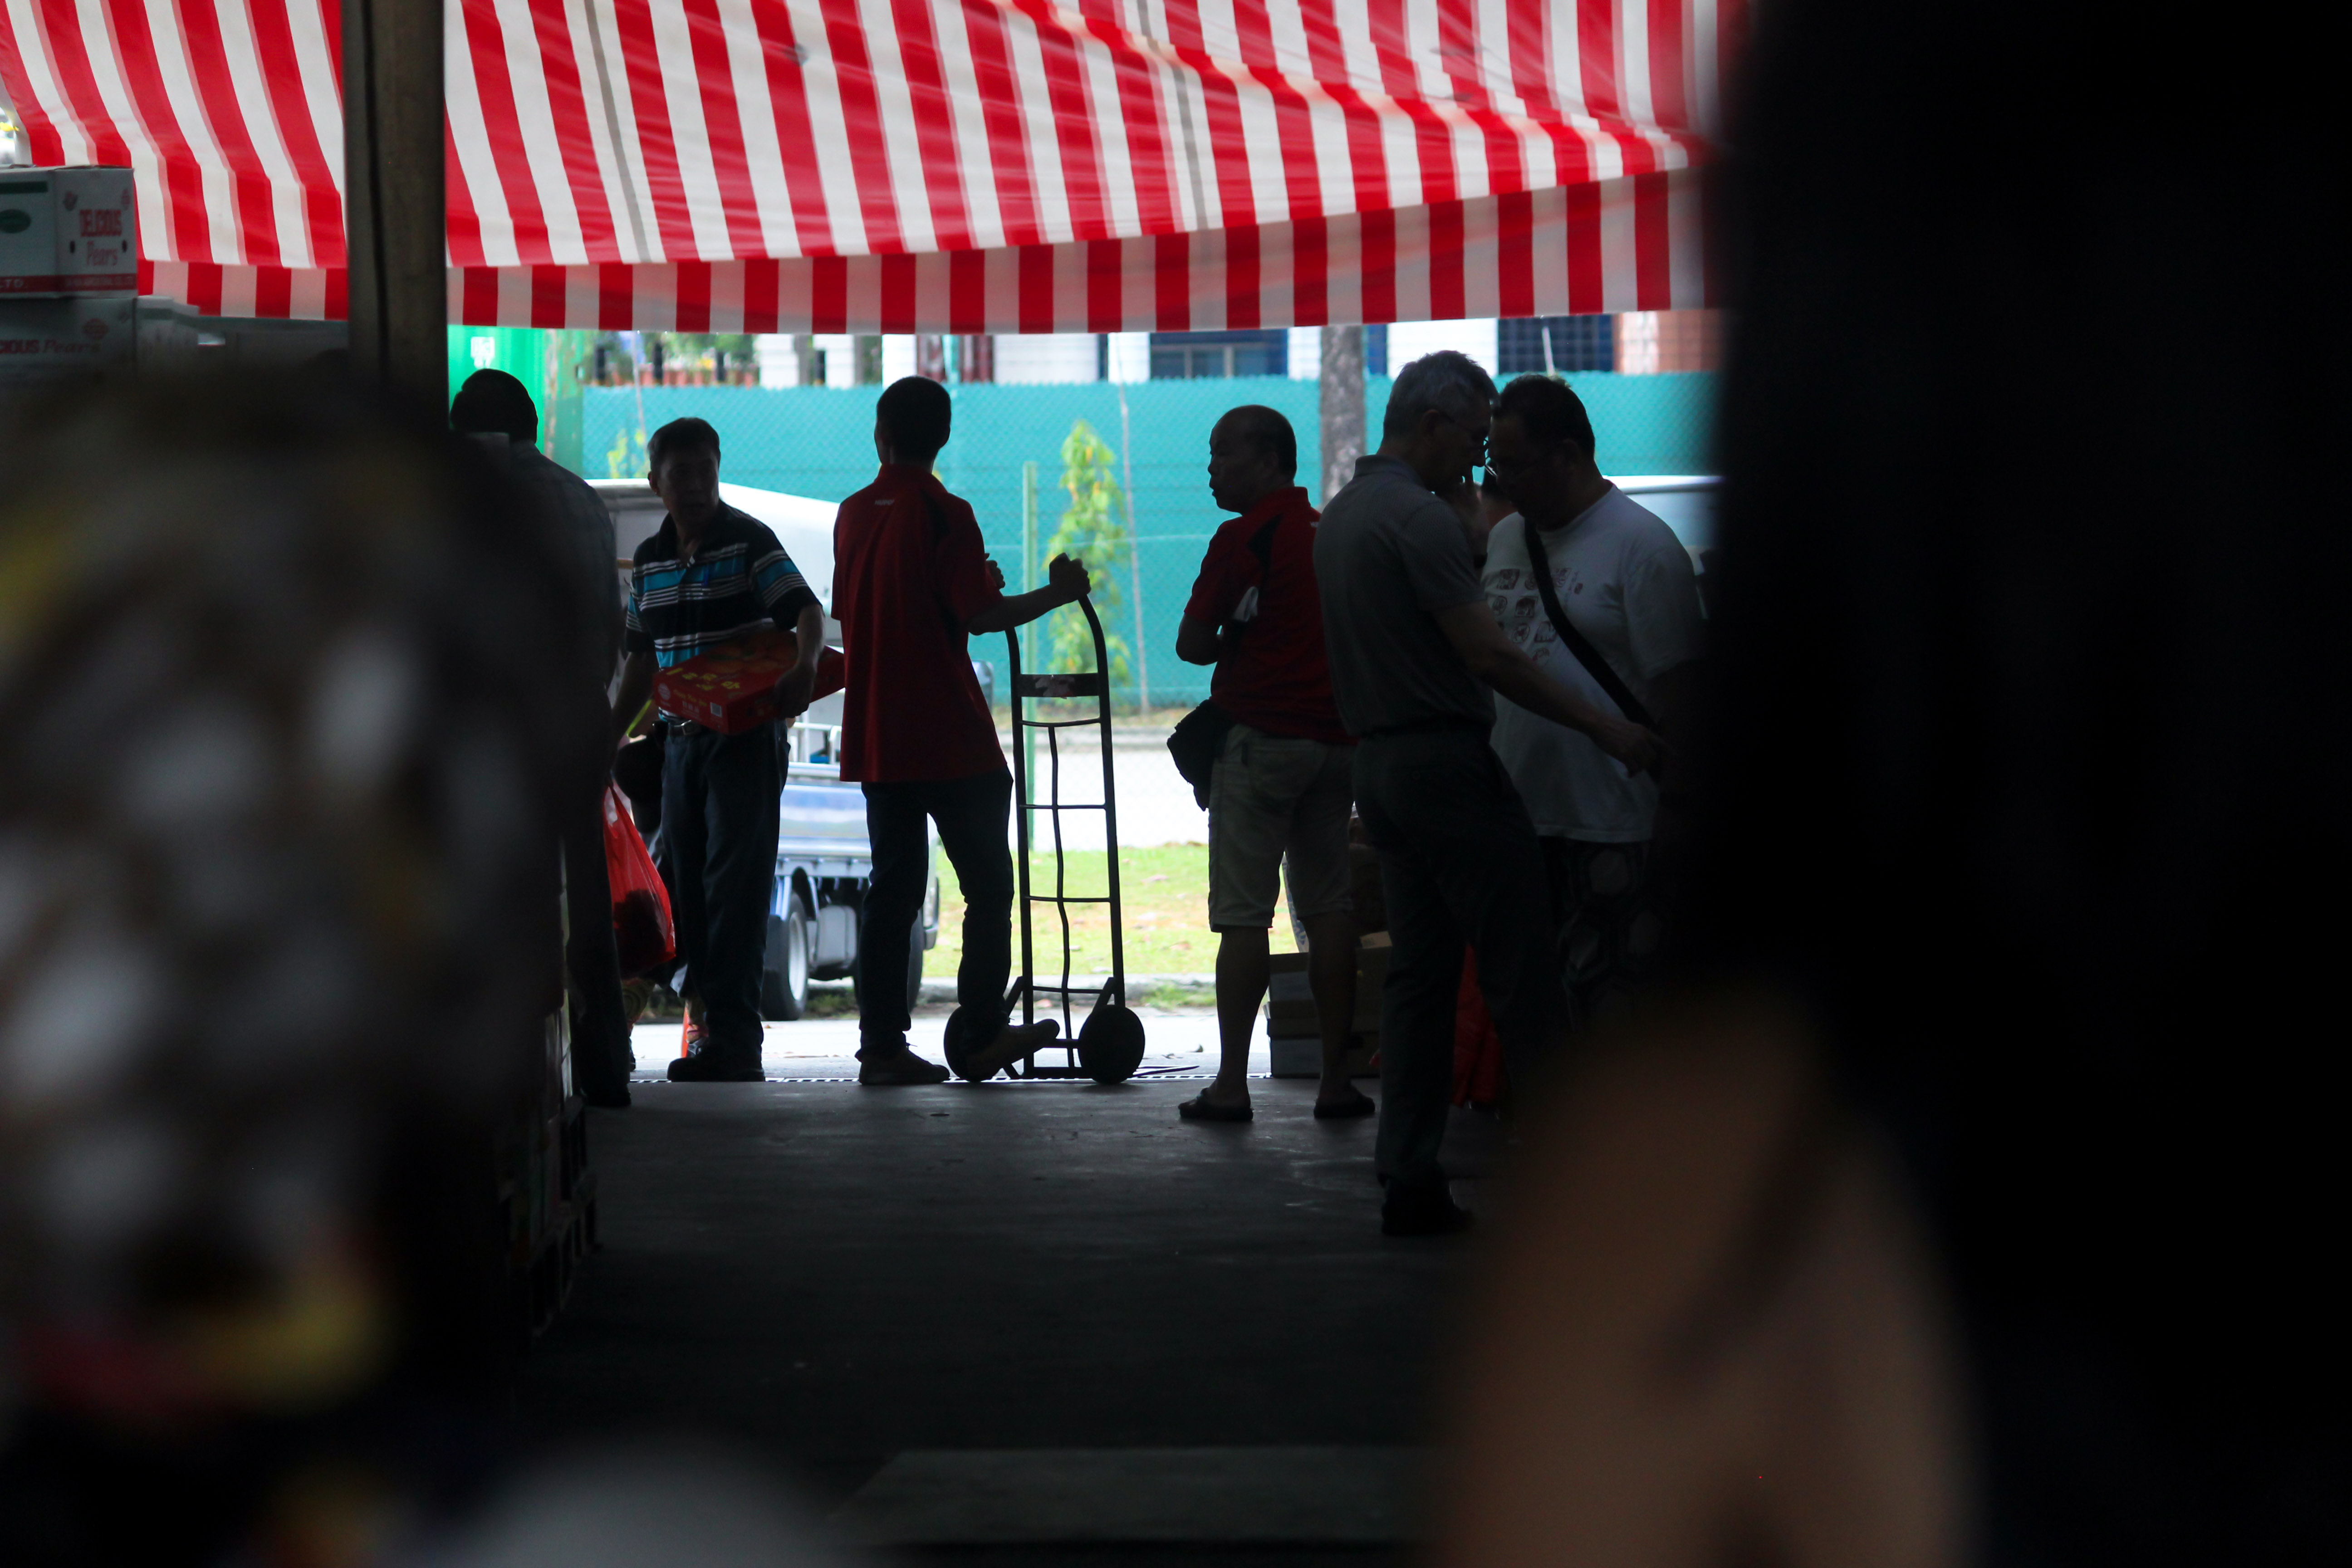
PPWC is a large wholesale centre that is split up into different blocks that focus on specific produce. There are blocks focusing on vegetables, fruits, dried foods and so on. It was an eye-opening sight, bustling with activity in the early morning as vendors sorted and sold their goods. Especially in the large auction hall, forklifts were constantly moving heavy boxes and people were shouting left and right. There were many container trucks, transporting and delivering goods. Within their own stores, each vendor had a team of staff that was working relentlessly to sort and pack produce.
Tools Used
Process Documentation

The food rescue commences with a briefing to all volunteers, conducted by the team leader. The briefing informs volunteers about SGFR, what to do, how to approach vendors, how to persuade them and most importantly, the dos and don’ts. For instance, don’t take photographs of the vendors themselves without their permission. Always ask for permission before taking, even if you’re certain it looks like trash. The ground rules were established before we split up into our separate groups: fruit and vegetable. Each group would focus on rescuing produce from the respective blocks. A few people were also stationed at Block 17 (the gathering point) to be ready to receive, sort and look after the goods collected throughout the food rescue. Team leaders and volunteers would keep in contact via mobile phones and WhatsApp chat groups set up ahead of time.
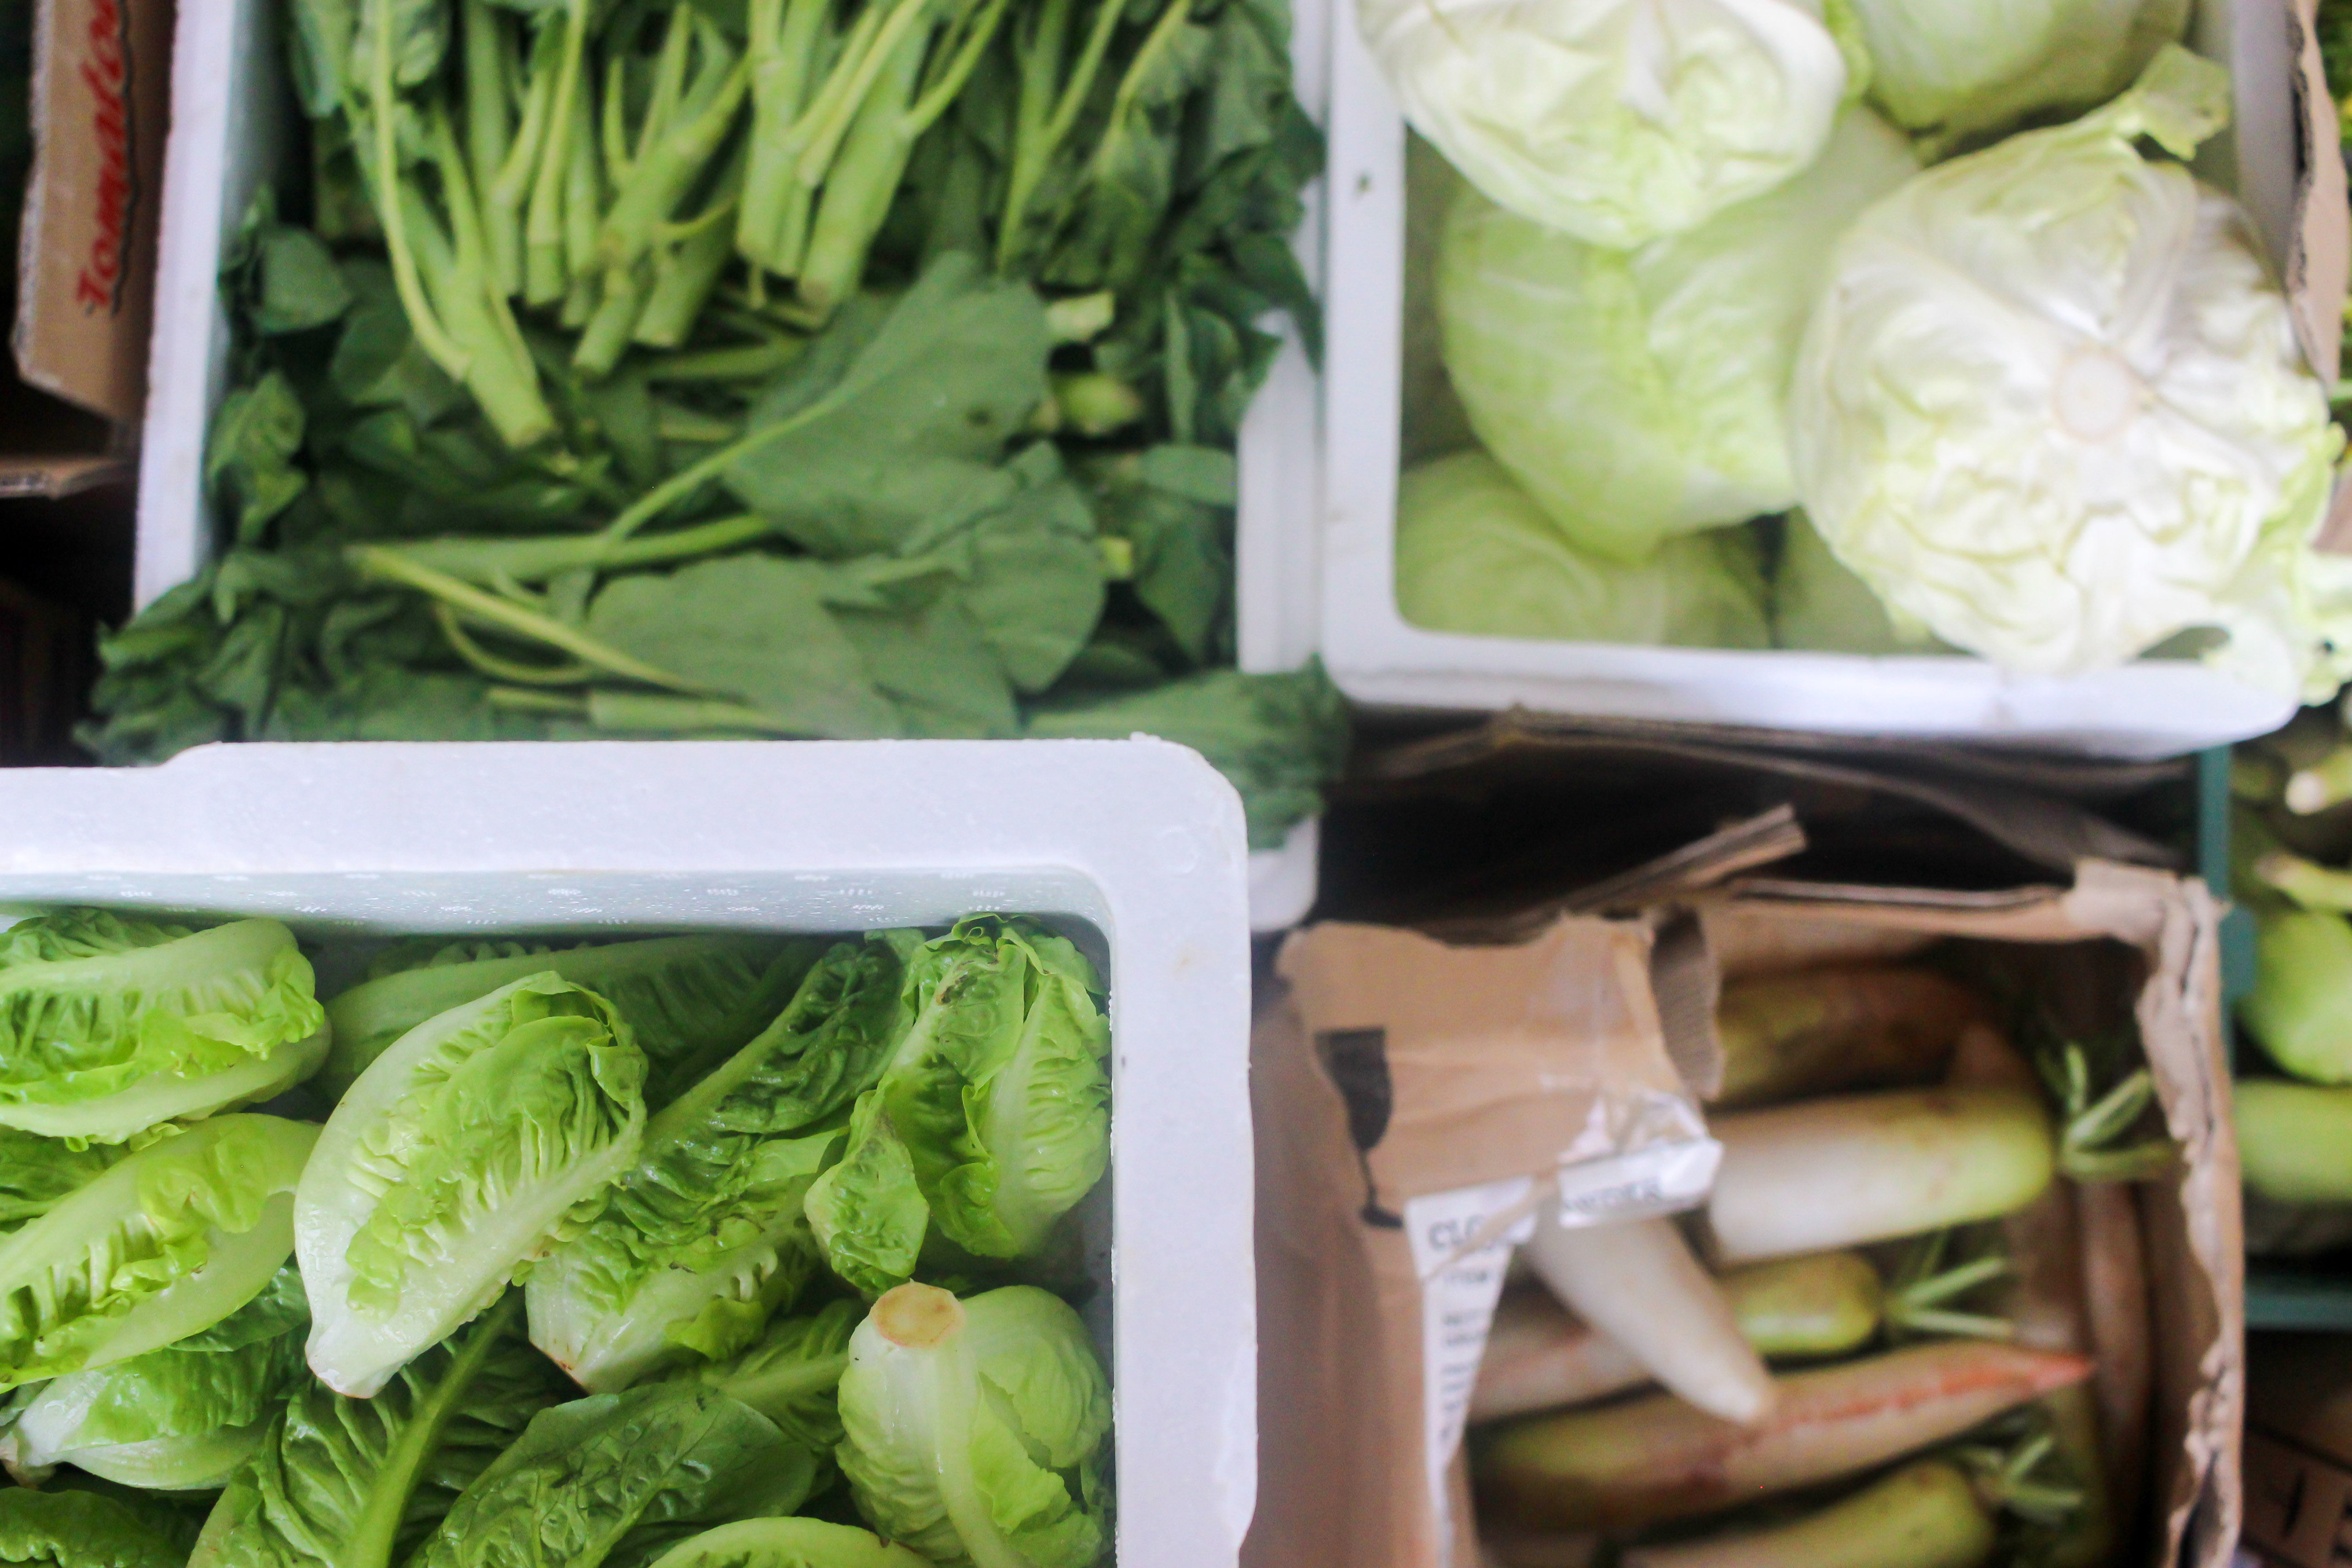
After splitting up to our respective blocks (I was in vegetables!), team leaders (and experienced volunteers) would approach vendors and ask for produce that could not be sold for whatever reason. Some cited the produce as ugly, or not up to standard, even if they were perfectly edible. The rest of the volunteers would then load up the trolley with boxes of whatever the vendors gave, and then push it back to the gathering point. Some vendors recognized the SGFR lanyards and had already set aside items to give, and most of them were super friendly! There was also a time limit to the collection process, and after an hour and a half, we made our way back to Block 17.
We were then debriefed and were allowed to bring home as much produce as we could carry. During the debrief, the SGFR team gathered feedback from participants to find out why vendors threw away the produce. Some volunteers also gave vendor details to SGFR, so the team could contact them to participate in the future PPWC Veggie Rescues. Subsequently, volunteers packed their bags with the rescued food and helped to load up the delivery truck, which would transport the food to communities in need.
Pain Points + Thoughts
Every time the trolley was full, volunteers would have to make the trip back to deposit the collected goods. This often resulted in many trips (and PPWC is quite big!) back and forth vendors and the gathering point. In my opinion, it wasted energy and time – as compared to being able to collect all the goods before making one trip back. Additionally, some times people are slow to check/pick up their phones, so there may be a lapse in communication.
Overall, I thought the veggie rescue was a great initiative started by Daniel (the freegan dude!) and some volunteers. Not only does it teach volunteers how to help with rescuing produce, but also opens their eyes to the food waste prevalent around us. Plus, you get rewarded by helping out with free food! What’s not to like?
Practitioner #2: Film making
I participated in filming a fictional short film with some experienced film makers.
Worksite Documentation

The worksite changes often, depending on the day of the shoot and what scenes we’re shooting. For instance, we can shoot scenes in a flat, at a wet market, and at a car park all in one day.Due to this, there was a lot of shifting about and the team had to pack up all the equipment quickly and move to the next filming location. On top of that, since the ‘worksite’ changes, this means that we either plan things out before hand (location scouting/recee) or be able to adapt on the spot.
Tools Used
Process Documentation
We arrived a few hours before the cast to begin setting things up. We had scouted the place before, so we knew what to do upon arriving (e.g. where to place the tripods for which scenes, what areas to block out for certain shots, where to put props). The tripods were set up, then put into position (one main camera, one secondary camera) and other team mates would prep the set. This involved putting props into specific positions (following a photograph snapped on a phone) to ensure there was continuity in the film.
When the cast arrived, the director would talk to them to settle them down, before briefing them on what was to be shot for the day. After which, the cast would run through their lines and the director would advise them on what to change, or what emotions to convey.
After a few practice runs and blocking out shots (to help check the framing on the camera), we began filming. Most scenes took one to three takes to complete, and we had to work fast in order to ensure that the light did not change much from shot to shot. It was a constant race against time. Additionally, every time we were filming a scene with dialogue or specific sounds, we had to ensure there was silence on set. This proved to be difficult especially when in public areas that had influencing factors we couldn’t control (e.g. the flat was located near the MRT tracks, the microphone kept picking up the rumbling of the train).
Throughout the entire filming, team mates had to work together to back up the files on the laptop, change and charge batteries for the camera and microphones, change and empty out SD cards, shift lights, tripods and carry sound equipment. After finishing the scenes at one location, every one had to rush to pack up and shift items back to their original positions, before moving on to the next location and redoing the whole process.
Pain Points + Thoughts
The SD cards fill up fast, especially when filming for the whole day. Since we had limited SD cards, every time a card was full – the camera man had to pause filming, remove the card, pass it to a team mate and replace it with another SD card. Meanwhile, the team mate would insert the SD card into a laptop, back up the files, clear the card and then return it to the camera man. This was a cyclical process. A lot of time was spent waiting to back up the files and pausing to switch SD cards.
Another pain point is the sound equipment. The lapel and boom microphones had to have wires connected to the main zoom microphone. As we had two lapel mics and one boom, this resulted in a mess of long wires that often got tangled up. It was difficult to manage them, however, if they were color-coded, it would make things a lot easier. Additionally, similar to the SD cards, the batteries in the mics and cameras ran out quickly and had to constantly be swapped out to charge.
All in all, it was a fun and hectic experience that taught me a lot about film making. Especially with regard to the logistical process behind it (setting up, putting props in specific spots, resetting scenes, manipulating light to make it look like certain times of the day, etc).
Practitioner #3: Watercolor painting
I went to observe a friend who does commissioned watercolor paintings at her home.
Worksite Documentation
She works from the desk in her room. For privacy reasons, I didn’t take any photos. But her desk is just a plain IKEA study table, white in color (she says it’s good for taking photos of her pieces against a white background). When she wants to do her watercolor painting, she makes space on the table and leaves her laptop there, and brings out her watercolor tool box.
Tools Used
Process Documentation
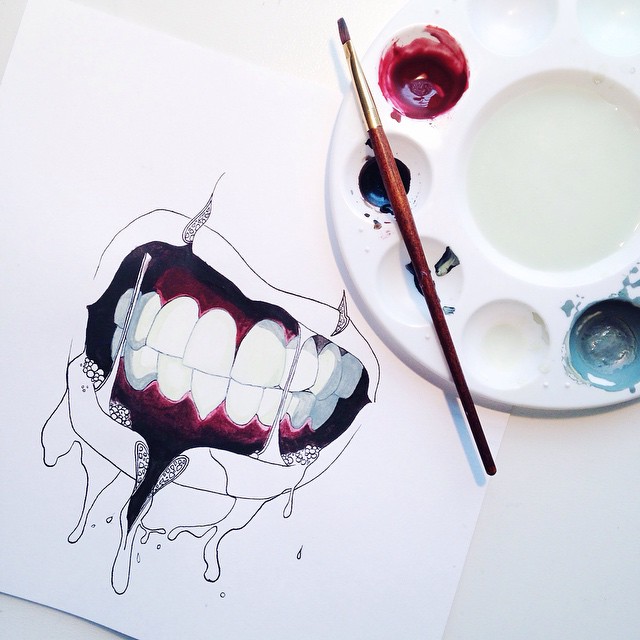

Before she starts, she lays out her paints and fills her jar with water. Everything is set up so she doesn’t have to get up from her seat during the painting process. After that, she begins by drawing the image onto a piece of watercolor paper. When she’s done, she uses india ink and goes over it to bring out the details. It’s not conventional to do so, as most people will go over the entire drawing with india ink after painting – but she does two coats of india ink in order to be precise and make the details pop. India ink is used as it doesn’t get diluted by the watercolor that goes over.
Once the line art is done, she begins mixing all her colors out. She measures and squeezes out the pain onto her palette, then mixes the paint and tests it out on a piece of scrap paper to see if it’s to her liking. Only after she’s mixed all the paint, does she finally start painting. She says she prefers to mix all her paints at the start so that there’s consistency in the color and the hues and shades don’t differ – as compared to if she had mixed several different batches throughout the entire process.
She works from the ‘inner’ most layer, as she described. I likened the process to photoshop, where you have different layers. She starts with the base, which in this case is inside the mouth. Then she works upwards, to paint the gums, the teeth, the plague on the teeth, then the lips. It was very therapeutic watching her work and blend the colors! My favourite part was when she added details to really make the painting pop off the paper.
After all that, she used india ink and went over all the lines once more to finish off the piece.
Pain Points + Thoughts
Throughout the process, she had to get up to make a few trips to refresh and refill her water jar. As she was using dark paints, the water got dirty quickly – and didn’t clean her brushes as effectively.
Additionally, when she going over the lines for a final time during india ink with a calligraphy pen, there was zero room for error. If the nib got caught and extra ink flowed onto the paper, especially on the lighter parts (e.g. teeth, lips), there was almost no way to salvage the piece.
The watercolor paint also took time to dry, and she had to be careful not to smudge some parts while detailing others. However, it was difficult to tell which parts were dry and which were not. It would be pretty cool if there was a sensor that could tell you so.
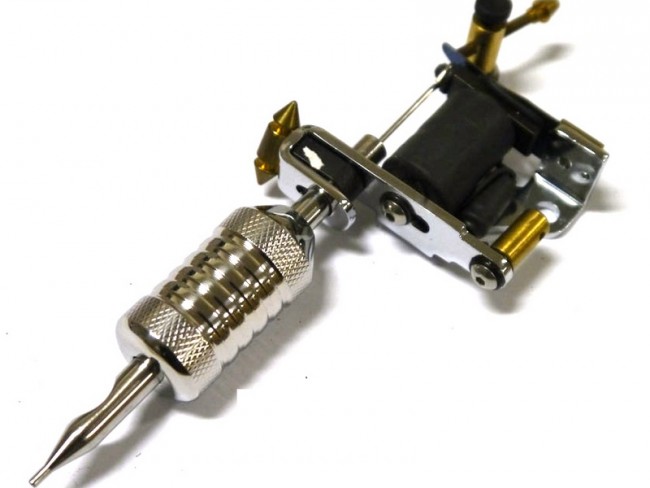
My friend is a tattoo artist and I went over to his studio to find out more about the process. For obvious reasons, I was not able to try out the practice but could just observe.
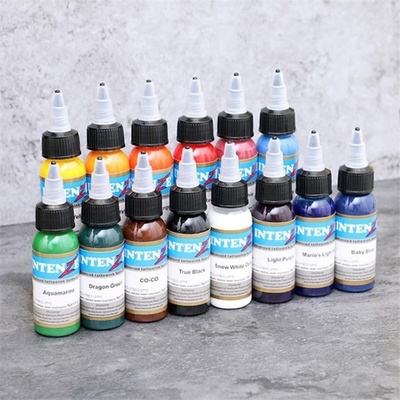
Tools
• Illustration methods
• Special stencil paper
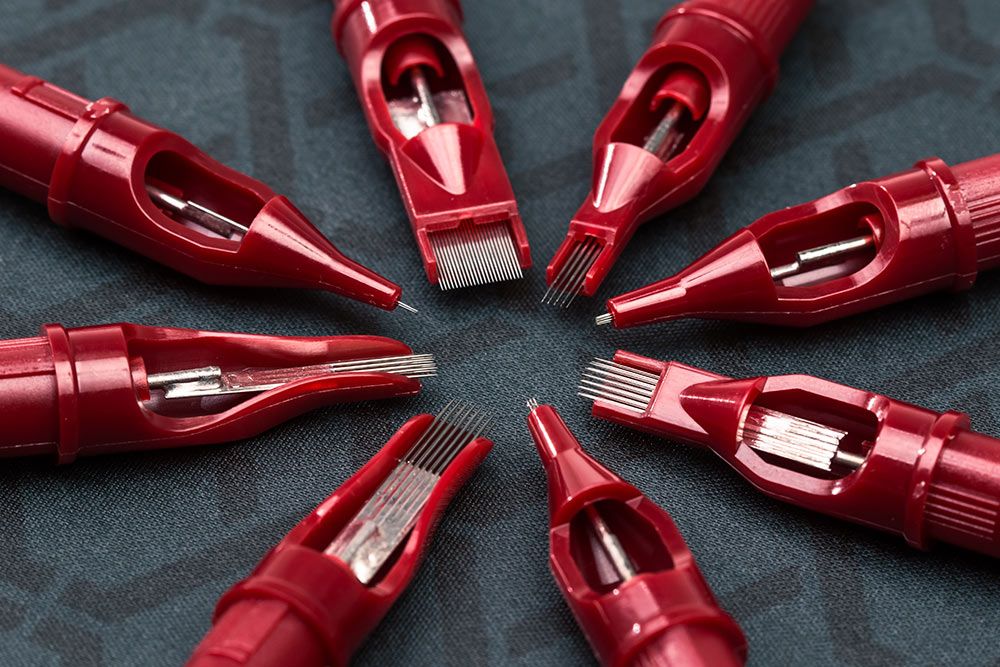
• Tattoo machines
• Needles
• Ink
• Gloves
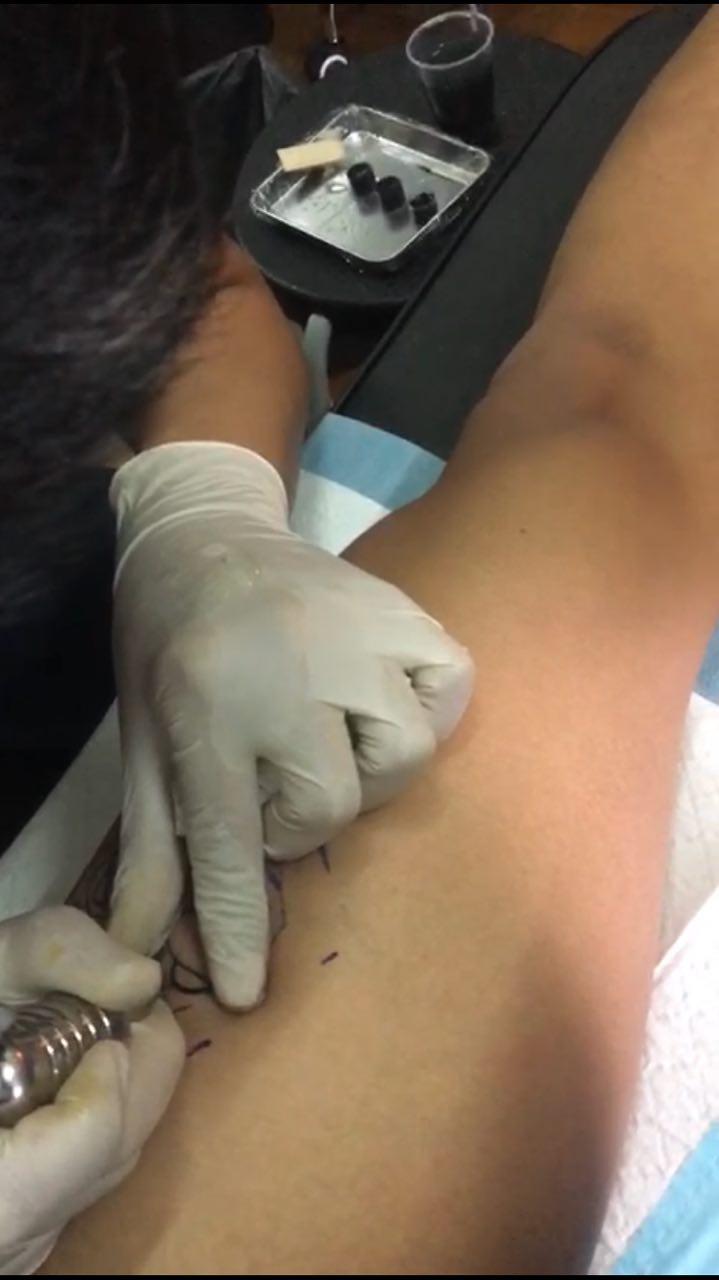
Worksite
The usual worksite for tattoo artists is at a tattoo studio. The studio that I went to had an artistic vibe, with lots of paintings and designs everywhere. Although the space did feel a bit stuffy and can get a bit intimidating with the loud buzzing sounds. When it came to tattooing, I found out that one of the critical factors is actually hygiene. It is important for both the environment and equipment used to be sterile.
Process
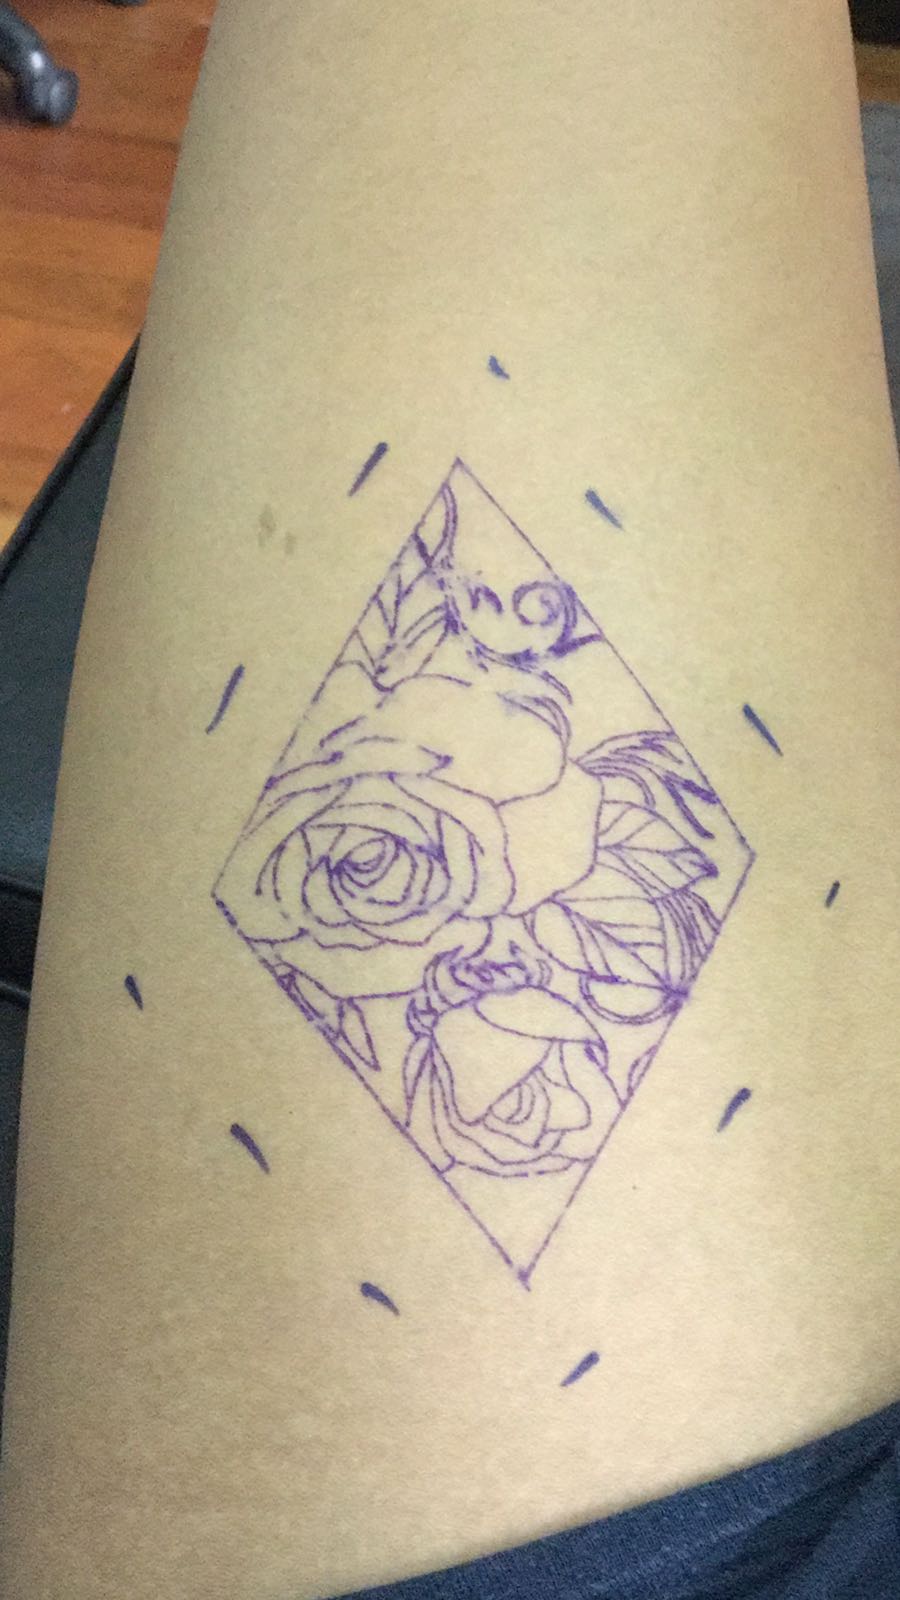
The process is quite straightforward. Once the customer has selected their tattoo design, the stencil will be printed on a special paper. This stencil will be transferred onto the skin, coming off as a blue-purple temporary ink.
Before the actual inking, the artist has to wear gloves and single-use needles are used as well. There are different types of needles which will be attached to the tattoo machine. Each needle has different functions ranging from lining, shading and colour packing. The ink is placed in little ink caps and there’s also vaseline to help moisture and allow the needle to slide along the skin much more easily.
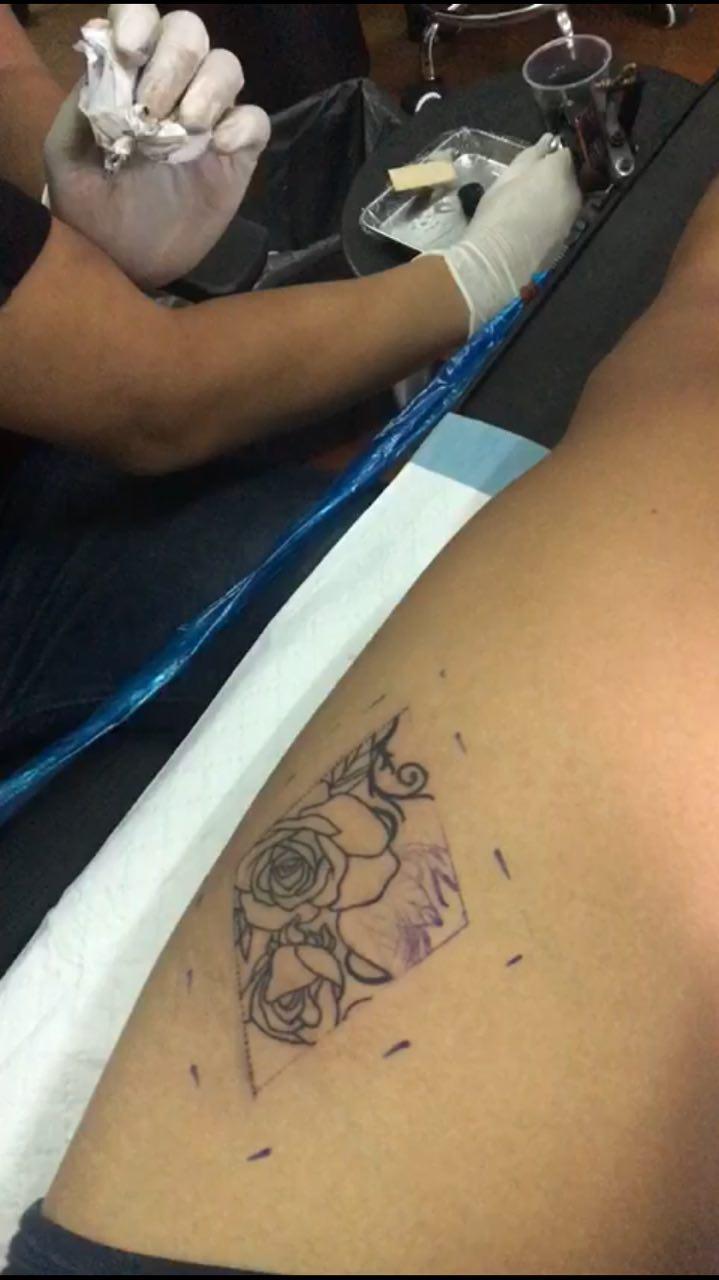
Once the inking is done for several hours, the body part will be wrapped with some form of wrap/bandage to avoid any infection.
Thoughts
From an observer’s point of view, it might have looked simple for something so permanent on your skin. However, it required focus and consistency especially when you’re inking for hours. As for the tools, there are a wide variety but they are portable and may be used in different environments. However, hygiene might be an issue as behind the scenes, a lot of importance is placed in ensuring that the equipment used is clean and sterile.