Field Trips – Chia Li Hui

The following are the field trips that I attended:

  1. A Craftsman Journey – From Dream to Reality
  2. 1+1 DM Staff Show 2018
  3. In-Process A collection of the making-of.

This field trip is the one that I enjoyed the most as I got the chance to create my own moisturiser and insect repellent. It was a very interesting experience as I never knew how challenging it is to come out with a pleasant scent.

For the second field trip, I came across this artist that published two different children book. One book that contains positive thoughts about life and the other contains the artist’s childhood memories. I find it really nostalgic as it makes me reflect back on my childhood. 

The last field trip I attended is the in-process exhibitions and it contains the art pieces of the NAFA students. Not only they showcase their final product, they also showed their documentation which documents their entire process in coming up with the final design. This was beneficial to me as it helped me when I was documenting for my group project. 

Small Design Decision – Chia Li Hui

Show Watched: Black Mirror Season 2 Episode 1 – Be Right Back

One small design decision I noticed in the show was the pregnancy kit that Martha took. It was very interesting as unlike the usual pregnancy kit that shows only lines, it also shows a digital animation of a baby. Also, there were congratulatory sounds coming out of the pregnancy kit when the digital animation appeared.

Practice Storyworld – Chia Li Hui

1. Story

On a random day, Kate received a video message on her device. The device started to play the message and to Kate’s surprise, she saw herself on it. The message warned her that she should not invite one of her classmates, Joe, to hang out after school. Kate thinks that the message was a prank therefore, chose to ignore it.

When she reached school, she realised that there was a class gathering that day and Joe marked that he was unable to make it. Kate found the accuracy of the message weird but brushed it off and eventually, continues to persuade Joe to attend it. He finally gave in and went ahead with the class but the next day, Joe did not turn up in school.

Subsequently, every morning before school, Kate will receive one video message warning her on the things she should not say or do to Joe. However, Kate continues to ignore those video messages.

One day when Joe suddenly did not turn up for school, Kate found it weird. Kate approached her two other friends and there was a sudden revelation that all of them are receiving weird messages in the morning. At that point, they realized that those messages were serving as a warning of Joe’s suicide.

As days passed, the three of them will come together and discuss their video messages. From there, they found out that Joe was suffering from depression. When Kate finally gathered courage to talk to Joe about it, she found out that he lost his parents on the day they hung out. This caused Joe to resent himself and has always been thinking of committing suicide since that day. However, things did not become better.

One fateful night, Kate received another message, asking them to go to Joe’s house. She rushed to Joe’s house to find Joe trying to commit suicide. Joe was perplexed about the situation as he did not mention his suicide plans to anyone. It was then that Kate told him about what was going on. Joe eventually broke down in front of Kate. 

After that night, things got better, and Joe started to cherish his life together with his friends.

In the second dimension:

The three friends started to reminisce on their days together in front of Joe’s tombstone. They thought about the day they received the news that Joe had committed suicide and passed away. On that day, they recorded a video of themselves. The video consists of the things they wish they could tell their 18-year-old selves, to save their friend. At the end of the day, they left the graveyard together, thinking about Joe.

2. Method

The story will first show the video message that Kate received and how she ignores the video messages. Joe will start showing weird behavior that lead the group to confess everything that they have been receiving. It will slowly progress into how they work together and eventually, managed to save Joe.

The story will then move on to the second dimension where she did not manage to save Joe and the changes in their life without Joe. It will also show the origin on the videos.

3. Technology

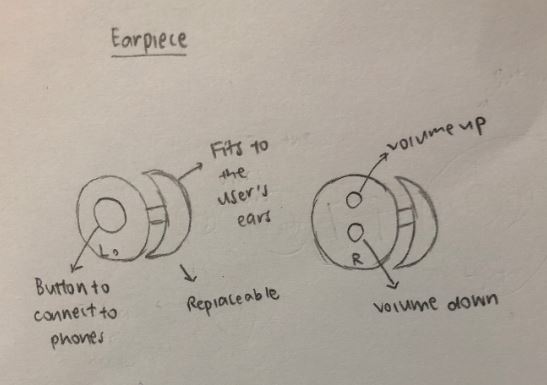
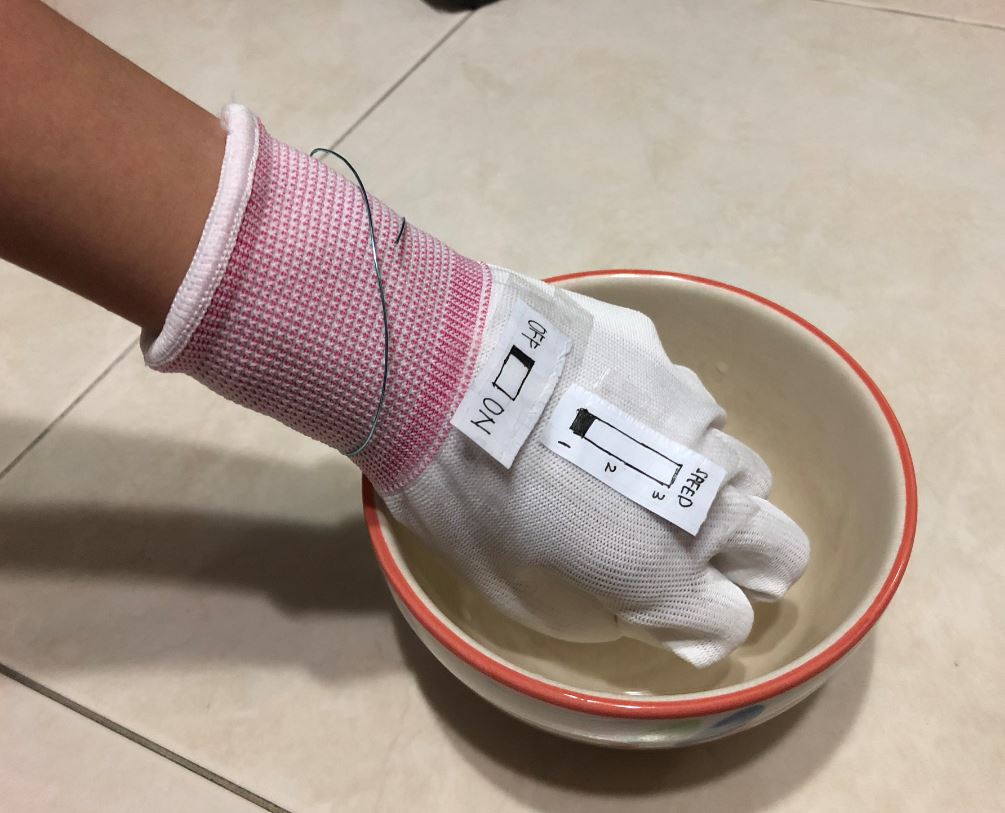
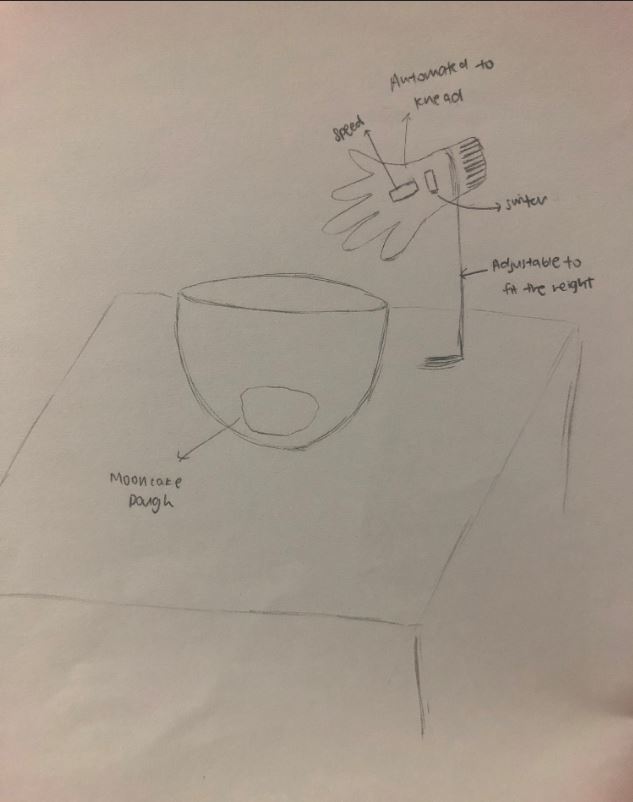
The role of the device is to portray how the messages were sent from one dimension to another. It will also show how technology had advanced. The 3-dimensional video messages and the exclusion of phones in the world. The wristband will have to also show how people now video calls each other instead of texting and just normal phone calls.

I think that there is a need to create other materials to prove that the parallel dimensions do exist, and things can be transported from one dimension to another.

Share Your World – Clare Chang, Brenda Tan, Chia Li Hui

Finalised Microfiction

In the year 2500, global warming is now almost fully eradicated. In order to stop the accumulation of heat, governments worked together to eliminate not just carbon dioxide emissions, but all greenhouse gases. Deforestation and other harmful land uses have been successfully reversed. As a result, the Earth is experiencing drastic climate change and now has an average temperature of -18°C. The Earth’s daylight savings time is out of whack and sunlight is sporadic. In attempt to revamp a cleaner way to generate energy, other energy generating ways have failed and things now run on only music-powered energy. In this world, music has become a drug of choice and people are becoming more anti-social. They have high reliance on their earpieces and are not able to leave their house without them. Train stations provide free earpieces as all public transports announcements are made through them.

Ceramic art is now at risk of banality. The chemical reactions between the mineral contents in the clay bodies during the throwing process is not controllable by the human hand. As the climate on Earth started experiencing drastic changes, clay can no longer withstand the low temperatures and started to harden very quickly during the throwing process.

Our protagonist, Emma, is a passionate street ceramic artist whose biggest dream is to bring ceramic art back to life and she is unwilling to send it down the lane of banality. Emma carries a one-of-a-kind ceramic art music backpack around with her to conduct her ceramic art on the streets.

Current Technology

  • Electric Pottery wheel
  • Music sensors

New Technology

The backpack contains a portable pottery wheel, a portable stool, a speaker and two slots to insert earpieces. There will be two layers in the backpack as follows:

For the first layer, the top compartment will hold the portable stool which she can unfold easily. Under the first layer lies a compartment that has optimal moisture and an atmosphere that keeps the clay at optimal room temperature to prevent it from drying up.

For the second layer, it will be a pottery wheel board that functions using music powered energy. There will be a sound sensor at the bottom of the board that detects music and the pottery wheel will turn based on the tempo of the music. In a scenario where there is no music playing in the background, it also allows Emma to insert her earpieces and play her choice of music through the speakers embedded at the bottom of the board. There will be lights that line the circumference of the pottery wheel to assist the user when there is no sunlight.

Cover Art

Set in the future, our cover art aims to evoke a futuristic feeling. The focal point of the poster would be the pink wheel that embodies both the mutated form that Earth has become and also what the world means to our protagonist, Emma, who is a passionate ceramic artist who now has to execute this practice in a totally unsupportive environment.

Share your world – Chia Li Hui

In this world, everyone wears a wireless earpiece and listens to the same music. Music becomes a drug of choice and no one will be walking anywhere without the earpiece. The music depends on what is played in the location, e.g. in coffee shops or in the library (silent disco concept). As long as there is music playing in the location, the earpiece will be connected automatically and will play them.

It functions similarly to a solar panel (but instead of sun, it will work when there is the presence of music). People can choose to disconnect from the location’s music and engage in a conversation with another party by connecting to a virtual chat room. Parties can hear one another through the earpiece. When TVs or radios are detected, users can also choose to connect to them. It can also store music in this earpiece.

Whenever someone loses or damages their earpiece, he or she can easily collect another one in any nearby train stations for free.

  •    Addresses accessibility and the reliance on this earpiece in this world.
  •    Addresses social class issues → Something that everyone has, regardless of social class

Summary of the functions:

  •       Plays any music that is playing at the location
  •       Will function whenever any music is detected
  •       Disconnect to background music
  •       Connect to a virtual chat room to engage in a conversation (face to face)
  •       If it detects any TVs or radios, users can choose to connect to them
  •       Store music
  •       Sets music of the location
  •       Do not need to charge (like solar panel)

The story will focus on a male who is passionate about pottery and would like to perform street pottery to promote this underrated art. He uses a pottery wheel that works functions based on the music playing at the location. Whenever he reaches a location where there is no background music played, he will plug in his earpiece to the pottery wheel and sets the music of the location. This way, people who walk pass will be able to hear the tune he is creating his pottery to. As music consist of different tempos, there will be a stand to help control the stability of his hands which will help him to draw and carve the pottery in straight lines.

Sketch:

Cultural Probe: Design and Findings – Chia Li Hui

Design probe (concept):

In the first documentation, I approached a practitioner that was making homemade snow skin mooncakes. To facilitate the kneading process, I came out with the design below. It is actually an automated heat-resistant machine hand that is used to mix the food colouring with the dough. This will avoid the dough to become sticky due to the heat transfer from your bare hands. Also, there is a switch that allows you to set the machine hand into automatic mode and the glove will knead the dough on its own. You can also control the speed of the kneading. Lastly, the height of the stand is adjustable. This will allow the glove to be set at a height that the practitioner is comfortable with. The whole purpose of this glove is to reduce the work of kneading and to refrain the dough from becoming too soft and sticky.

Instructions:

  1. Based on what you see, determine how it can help in your mooncake making process.

First person:

First thoughts:

  • Automated hand-shaped kneading tool
  • Adjustable height
  • Different levels of kneading speed
  • Heat resistant to prevent dough from becoming too sticky

Pros:

  • Reduce the amount of work needed to knead the dough
  • As many newbies face the problem of the dough becoming too sticky due to body heat, the heat resistant tool helps them a lot

Cons:

  • May not be able to get the preferred dough consistency as compared to kneading with real hands
  • Don’t think that it is possible to wash it since it is an electronic appliance -> Hygiene issues

Questions:

  • Will be battery operated or does it require the appliance to be plugged into a power socket? Personally, I think battery operated would be better as the cables that connect to the power socket may get tangled up with the tool.

Second Person:

First thoughts:

  • Is a glove that requires users to put their hands inside
  • The glove can help control the temperature when kneading

Pros:

  • It helps the user a lot as there is no need for him/her to use his/her muscles when kneading the dough

Cons:

  • Usually when you touch the dough, you should know when it is ready. However, this is automated, so you will not be able to feel the dough. Therefore, you do not know when will the dough be ready.

Suggestions:

  • The automated hand should be bigger so that it can knead even faster.

Third Person (Original Practitioner):

First thoughts:

  • At first glance, she does not know how to use it in her practice.
  • User fiddled with it for a while before asking what the purpose of it is.

Pros:

  • If it works well as what it assumes to be, it will save a lot of time and energy in the preparation process.

Cons:

  • Kneading is not just one fixed motion; The dough may not mix well if it is automated.
  • The machine can’t tell you whether it is sticky enough or not, it still requires manual work in testing it.

Questions:

  • Is there other way to set more motions? Kneading also includes squeezing and massaging the dough, is there a way to set the automated hand to do them as well?
  • Do you pre-set the time for the automated hand to work? Is there like a timer?

Explore Practitioners 3: Ceramics Clay (Firing) – Chia Li Hui

As I went to a pottery workshop for my second practitioners, I decided to look for ceramics clay workshop next. Although most people find that they are the same thing, there is actually a slight difference between them. Ceramics are not only made up of clay, it also includes other materials like glazes. On the other hand, pottery is solely made up of clay. For this documentation, I will focus on the firing process; The aim is to heat the ceramic clay to the optimal level of melting.

Process Documentation

Steps:

  1. Throwing the ceramic clay
  2. Trimming it into your desired shape
  3. Apply wax at foot ring of the clay.
  4. Bisque Firing – To convert the greenware into glasslike. As greenware is fragile, it is important to deal with it carefully when loading it into the pottery kiln. From there, increase the temperature slowly as if it is heated too quickly, it may cause the clay to burst.
  5. When the clay reaches approximately 499°C, the clay is completely dehydrated – the pot is now a ceramic material. However, continue firing until it reaches 944°C, the ceramic will become less fragile and will be prepared to accept the application of glazes.
  6. Turn off the pottery kiln and wait for the ceramic to cool before removing it.
  7. Apply a layer of glaze using the paint brushes to the cooled ceramics and leave it to dry.
  8. Load into the pottery kiln for the second round of heating: glaze firing.
  9. Slowly heat the pottery kiln to the proper temperature to bring the clay and glazes to maturity and then slowly cool it again. Same as step 5, wait till the ceramic is cooled before removing it.
  10. The ceramic should be rock-hard and water-resistant now.

Tools used

  1. Wooden Carving tool
  2. Pottery Kiln
  3. Glaze Buckets
  4. Paint Brushes
  5. Sponge
  6. Wax

Thoughts

I find the worksite really big and spacious which is easy for us to move around. After attending this workshop, I realised ceramics clay art is something that needs lots of practice and consist of many different skills. I really respect ceramics clay artist as it takes a lot of patience to even get a hang of the different skills. I was really glad to be able to attend this workshop as I find that this workshop is an eye-opener for me and at the same time, participate slightly in the process.

Explore Practitioners 2: Pottery (Cups) – Chia Li Hui

Pottery is one of my many interests that I have always wanted to learn but have no time to do it. As I wish to create my own plates and cups in the future, I decided to choose my second creative practice to be pottery. As my cousin opens pottery workshop for children, I decided to approach him to learn the basic skills of pottery.

Process Documentation

Steps:

  1. Take a fair amount of clay and put some water on it.
  2. Make sure that the clay is not too watery. If it is, leave it to dry on Plaster of Paris. The clay should be partially sticky and not too hard.
  3. Put it on the middle of the pottery wheel and set the pottery wheel to be turning at a pace you are comfortable with.
  4. Shape the clay into a cone-shape and use your thumb to push the middle of the cone down to create the opening for the cup.
  5. Move on to shape the body of the cup.
  6. Use the wooden carving tool to shape the bottom of the cup.
  7. Use the sponge to remove air bubbles in the clay and the tip of the cup so that there will be consistency.
  8. Use hairdryer to dry the clay.
  9. Use the wire clay cutting tool to remove the cup from the pottery wheel.

Tools used

  1. Plaster of Paris (Calcium Sulphate Monohydrate)
  2. Pottery wheel
  3. Wooden Carving tool
  4. Sponge
  5. Hairdryer
  6. Wire Clay Cutting Tool

Worksite Documentation

My cousin conducts the workshops in his house. Although I find that the worksite is a little cramped, there was still enough space to learn. As his stuffs were surrounding the pottery wheel, I had to be extremely careful so that I would not dirty his stuffs while learning.

Pain points

As it was my first time trying out, I find it hard to gauge how much clay to use and how to determine whether the clay was ready to put on the pottery wheel. It is also important to have firm hands so that the sides of the cup were even. In addition, the cleaning up was quite tedious as for an amateur, the clay will splatter outside of the pottery wheel. However, despite all these difficulties, I still enjoy the process of learning pottery!

Explore Practitioners 1: Mooncake Making – Chia Li Hui

As mid-autumn festival is around the corner, I have decided to learn how to make handmade snow skin mooncakes to give out to my family and friends. Therefore, I chose to approach my friend who sells snow skin mooncakes.

Process Documentation

Making handmade snow skin mooncakes may seem easy but it is a very tedious process. It takes up one whole day to create just a few pieces!

Steps:

  1. Mix the flour with water and butter. Knead until the dough is form.
  2. Add food flavouring and colouring to the dough. Knead the dough until the colour is evenly spread out.
  3. Scoop about 20g of dough and roll it into a ball.
  4. Leave the dough one side and scoop about 40g of paste. Roll the paste into a ball.
  5. Flatten the dough balls using a wooden rolling pin.
  6. Wrap each flatten dough around each paste ball.
  7. Dust some premix flour around the wrapped ball to prevent it from sticking to the mooncake mould.
  8. Put the wrapped ball into the mooncake mould to create your final mooncake!
  9. Refrigerate the mooncake.

Tools used

  1. Bowls
  2. Wooden rolling pin
  3. Mooncake mould
  4. Electronic weighing scale
  5. Spoon

Worksite Documentation

As I made the snow skin mooncakes at my friend’s house, it is very convenient to get extra bowls. Additionally, it was easy to clean up and we prepared a plastic cover on the table so even with all the flour, we did not make a big mess. As there were several types of paste and dough, we are also required to wash our hands every single time we change a paste or dough. Hence, it was very convenient for us to wash our hands as the workspace was just beside the kitchen. Therefore, I find that I was at a very comfortable state to learn this new skill.

Pain points

Kneading of the dough takes the most effort. It takes skill to knead it properly and we are not supposed to knead the dough for too long as it would become too soft. When it becomes too soft, it would be hard to flatten it and wrap it around the paste balls. At the same time, the colours may not be spread evenly if the dough was not kneaded properly as well. From this, I learnt that making handmade snow skin mooncakes are not as easy as I thought it will be. It is a very tiring process and it takes up a lot of time to produce a small amount.